1. Introduction
The Schellenberg RolloDrive 45 is an electric belt winder designed for convenient and automated operation of roller shutters. This device allows you to control your roller shutters with a simple button press or through a programmable automatic timer function. It is suitable for plastic roller shutters with a surface area of up to 4 m² and is compatible with the Maxi roller shutter system, which uses a 23 mm wide strap. The RolloDrive 45 is engineered to directly replace existing mechanical belt winders, simplifying the upgrade process. Its design facilitates installation in standard wall boxes, making it an ideal solution for various residential settings, including rental properties, as it avoids the need to access the roller shutter box for installation.
2. Safety Instructions
- Read all instructions carefully before installation and use.
- Ensure the power supply is disconnected before performing any installation or maintenance work.
- This device is intended for indoor use only. Protect it from moisture and extreme temperatures.
- Do not attempt to repair or modify the device yourself. Contact qualified personnel for service.
- Keep children and pets away from moving roller shutters.
- Ensure the roller shutter path is clear of obstructions before operation.
- Use only original accessories and spare parts.
3. Package Contents
Verify that all components are present in the package:
- 1x Schellenberg RolloDrive 45 Electric Belt Winder
- 1x Power Adapter
- Mounting Screws and Wall Plugs
- Instruction Manual
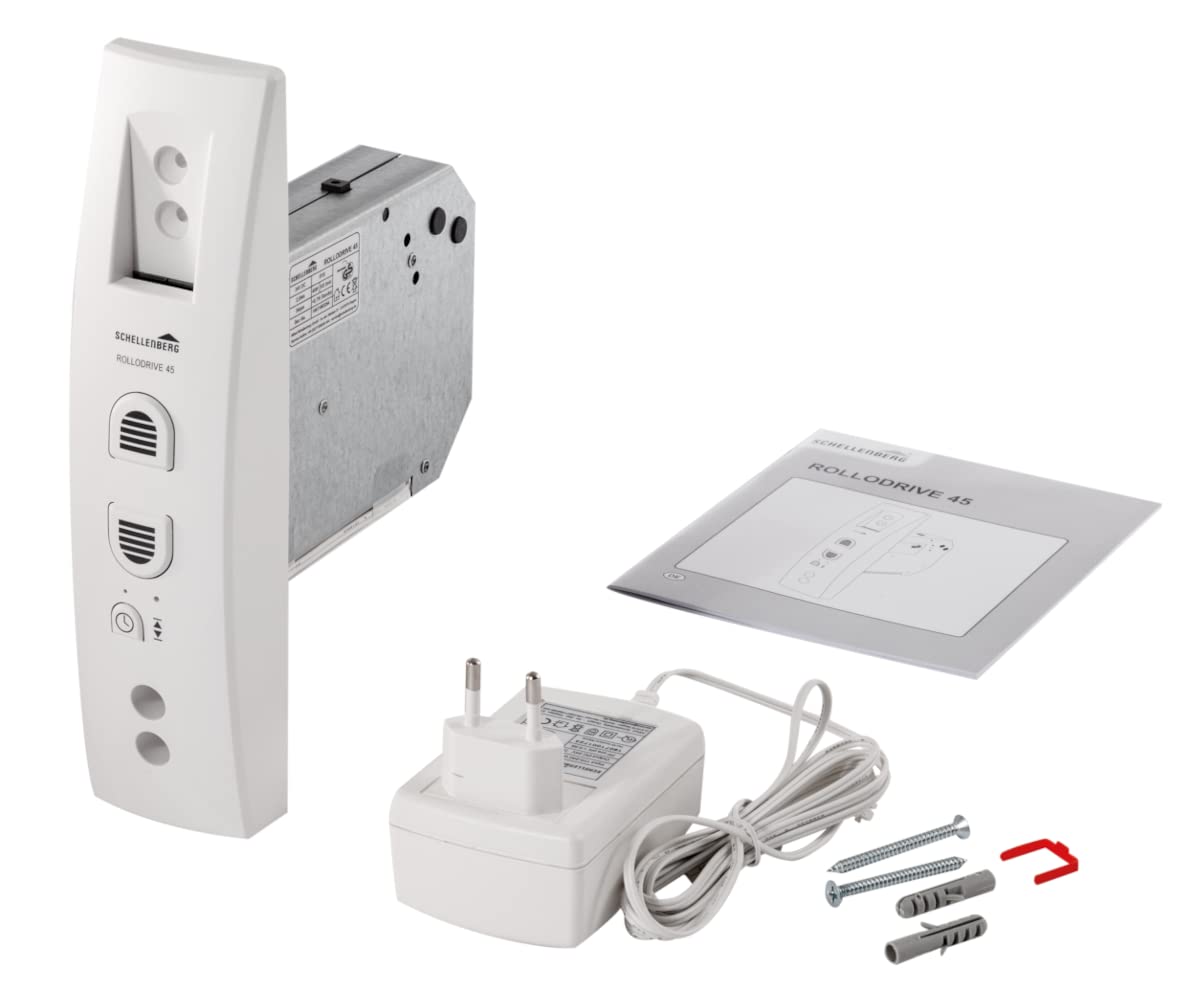
Image: Contents of the RolloDrive 45 package, showing the device, power supply, mounting hardware, and user manual.
4. Product Overview
The Schellenberg RolloDrive 45 is an electric belt winder designed for easy control of your roller shutters. It features intuitive buttons for manual operation and an integrated timer for automated control. The device is housed in a white plastic casing, designed for wall-mounted installation.

Image: Front view of the RolloDrive 45, highlighting its control panel and belt opening.
5. Installation (Setup)
The RolloDrive 45 is designed for straightforward installation, replacing an existing mechanical belt winder. It fits into standard wall boxes with an opening width of at least 35 mm and a height of at least 103 mm. The device supports two screw hole spacings: 135 mm or 165 mm.
5.1. Preparation
- Disconnect Power: Ensure the main power supply to the area is switched off before beginning installation.
- Remove Old Winder: Carefully remove your existing mechanical belt winder from the wall box.
- Check Dimensions: Verify that your wall box meets the minimum dimensions for the RolloDrive 45 (35 mm width, 103 mm height).
5.2. Mounting the Device
- Insert Belt: Feed the roller shutter strap through the slot in the RolloDrive 45.
- Secure Device: Position the RolloDrive 45 into the wall box. Align the screw holes with either the 135 mm or 165 mm spacing.
- Fasten: Use the provided screws and wall plugs to securely fasten the device to the wall.
- Connect Power: Plug the power adapter into the device and then into a suitable power outlet.

Image: Installation step, showing the RolloDrive 45 being inserted into a wall box.

Image: Dimensional drawing of the RolloDrive 45, indicating measurements for installation.
6. Operating the RolloDrive 45
The RolloDrive 45 offers both manual and automatic operation modes.
6.1. Manual Operation
To manually control your roller shutter:
- Press the Up button (usually indicated by an upward arrow or a raised shutter icon) to raise the roller shutter.
- Press the Down button (usually indicated by a downward arrow or a lowered shutter icon) to lower the roller shutter.
- Release the button to stop the roller shutter at any desired position.

Image: A user demonstrating manual operation of the RolloDrive 45.
6.2. Automatic Timer Function
The RolloDrive 45 includes an automatic timer function, allowing you to program specific times for your roller shutters to open and close. Refer to the detailed programming section in the included manual for step-by-step instructions on setting up the timer and end positions.
7. Programming
The RolloDrive 45 features an automatic timer and safety stop functions that require initial programming. This typically involves setting the upper and lower end positions of your roller shutter and configuring the desired times for automatic movement.
7.1. Setting End Positions
The device needs to learn the maximum up and down positions of your roller shutter. This process usually involves:
- Entering a programming mode (often by pressing and holding a specific button).
- Manually moving the roller shutter to its fully open position and confirming.
- Manually moving the roller shutter to its fully closed position and confirming.
Consult the specific instructions in your product manual for the exact button sequences and indicators for setting these limits.
7.2. Setting the Automatic Timer
To utilize the automatic timer, you will typically:
- Access the timer programming mode.
- Set the current time.
- Program desired opening times for the roller shutter.
- Program desired closing times for the roller shutter.
The device may also feature a safety stop mechanism that activates in case of power failure, ensuring the roller shutter remains in its last position or moves to a safe state. Detailed instructions for timer setup and safety features are provided in the comprehensive manual included with your product.
8. Maintenance
The Schellenberg RolloDrive 45 requires minimal maintenance to ensure long-term performance.
- Cleaning: Wipe the device's surface with a soft, dry cloth. Do not use abrasive cleaners or solvents.
- Strap Inspection: Periodically check the roller shutter strap for any signs of wear or damage. Replace worn straps promptly to prevent operational issues.
- No Internal Servicing: The device contains no user-serviceable parts. Do not open the casing.
9. Troubleshooting
If you encounter issues with your RolloDrive 45, try the following solutions:
| Problem | Possible Cause | Solution |
|---|---|---|
| Device does not respond | No power supply | Check if the power adapter is correctly plugged in and the outlet is functional. |
| Roller shutter stops unexpectedly | Obstruction in roller shutter path; End positions not set correctly | Remove any obstructions. Re-program the upper and lower end positions. |
| Automatic timer not working | Timer not programmed or incorrect settings | Refer to the programming section to set the timer correctly. Ensure current time is accurate. |
| Unusual noises during operation | Worn strap or internal mechanism issue | Inspect the strap for wear. If noises persist, contact customer support. |
If these steps do not resolve the issue, please contact Schellenberg customer support.
10. Technical Specifications
| Feature | Specification |
|---|---|
| Model Number | 22638 |
| Product Dimensions (L x W x H) | 50 x 50 x 28 cm |
| Weight | 1.16 kg |
| Color | White |
| Style | STANDARD |
| Material | Plastic |
| Voltage | 230 Volts |
| Power | 29 Watts |
| Max. Roller Shutter Surface Area | Up to 4 m² (for plastic roller shutters) |
| Strap Width Compatibility | 23 mm (Maxi system) |
| Mounting Type | Wall-mounted |
| Screw Hole Spacing | 135 mm or 165 mm |
| Operating Mode | Automatic / Manual |
| Certifications | CE |
11. Warranty and Support
11.1. Warranty Information
This product is typically covered by a standard manufacturer's warranty. For specific details regarding warranty duration and terms, please refer to the documentation provided with your purchase or contact Schellenberg customer service. In case of a return, a 30-day refund/replacement policy may apply if purchased from Amazon.
11.2. Customer Support
For technical assistance, troubleshooting, or any questions regarding your Schellenberg RolloDrive 45, please contact Schellenberg customer support. You can usually find contact information on the manufacturer's website or in the product packaging.


