1. Introduction
This user manual provides comprehensive instructions for the safe and efficient operation of your Naweisz 30V 5A DC Bench Power Supply, Model NP3005. This regulated adjustable power supply is designed for a wide range of applications in laboratories, educational institutions, and repair workshops, offering stable and precise voltage and current outputs.
Please read this manual thoroughly before using the device to ensure proper functionality and to prevent damage or injury.
2. Safety Information
Always observe the following safety precautions to prevent electric shock, fire, or damage to the device:
- Ensure the power supply is connected to a grounded outlet. The device features a grounding port for enhanced safety.
- Do not operate the device in wet or damp conditions. Keep it away from liquids.
- Do not open the casing of the power supply. There are no user-serviceable parts inside. Refer all servicing to qualified personnel.
- Verify the input voltage matches the power supply's requirements (110-115 Volts AC for US models).
- Before connecting or disconnecting loads, ensure the power supply is turned off or the output is set to zero.
- Avoid short-circuiting the output terminals for extended periods, although the device has short-circuit protection.
- Ensure proper ventilation. Do not block the cooling fan or vents.
- In case of smoke, unusual odors, or abnormal operation, immediately disconnect the power supply from the mains and contact support.
3. Product Overview
The Naweisz NP3005 is a compact and reliable DC bench power supply featuring a 3-digit LED display for precise voltage and current readings. It incorporates multiple protection mechanisms for safe operation.
3.1 Front Panel Controls and Indicators
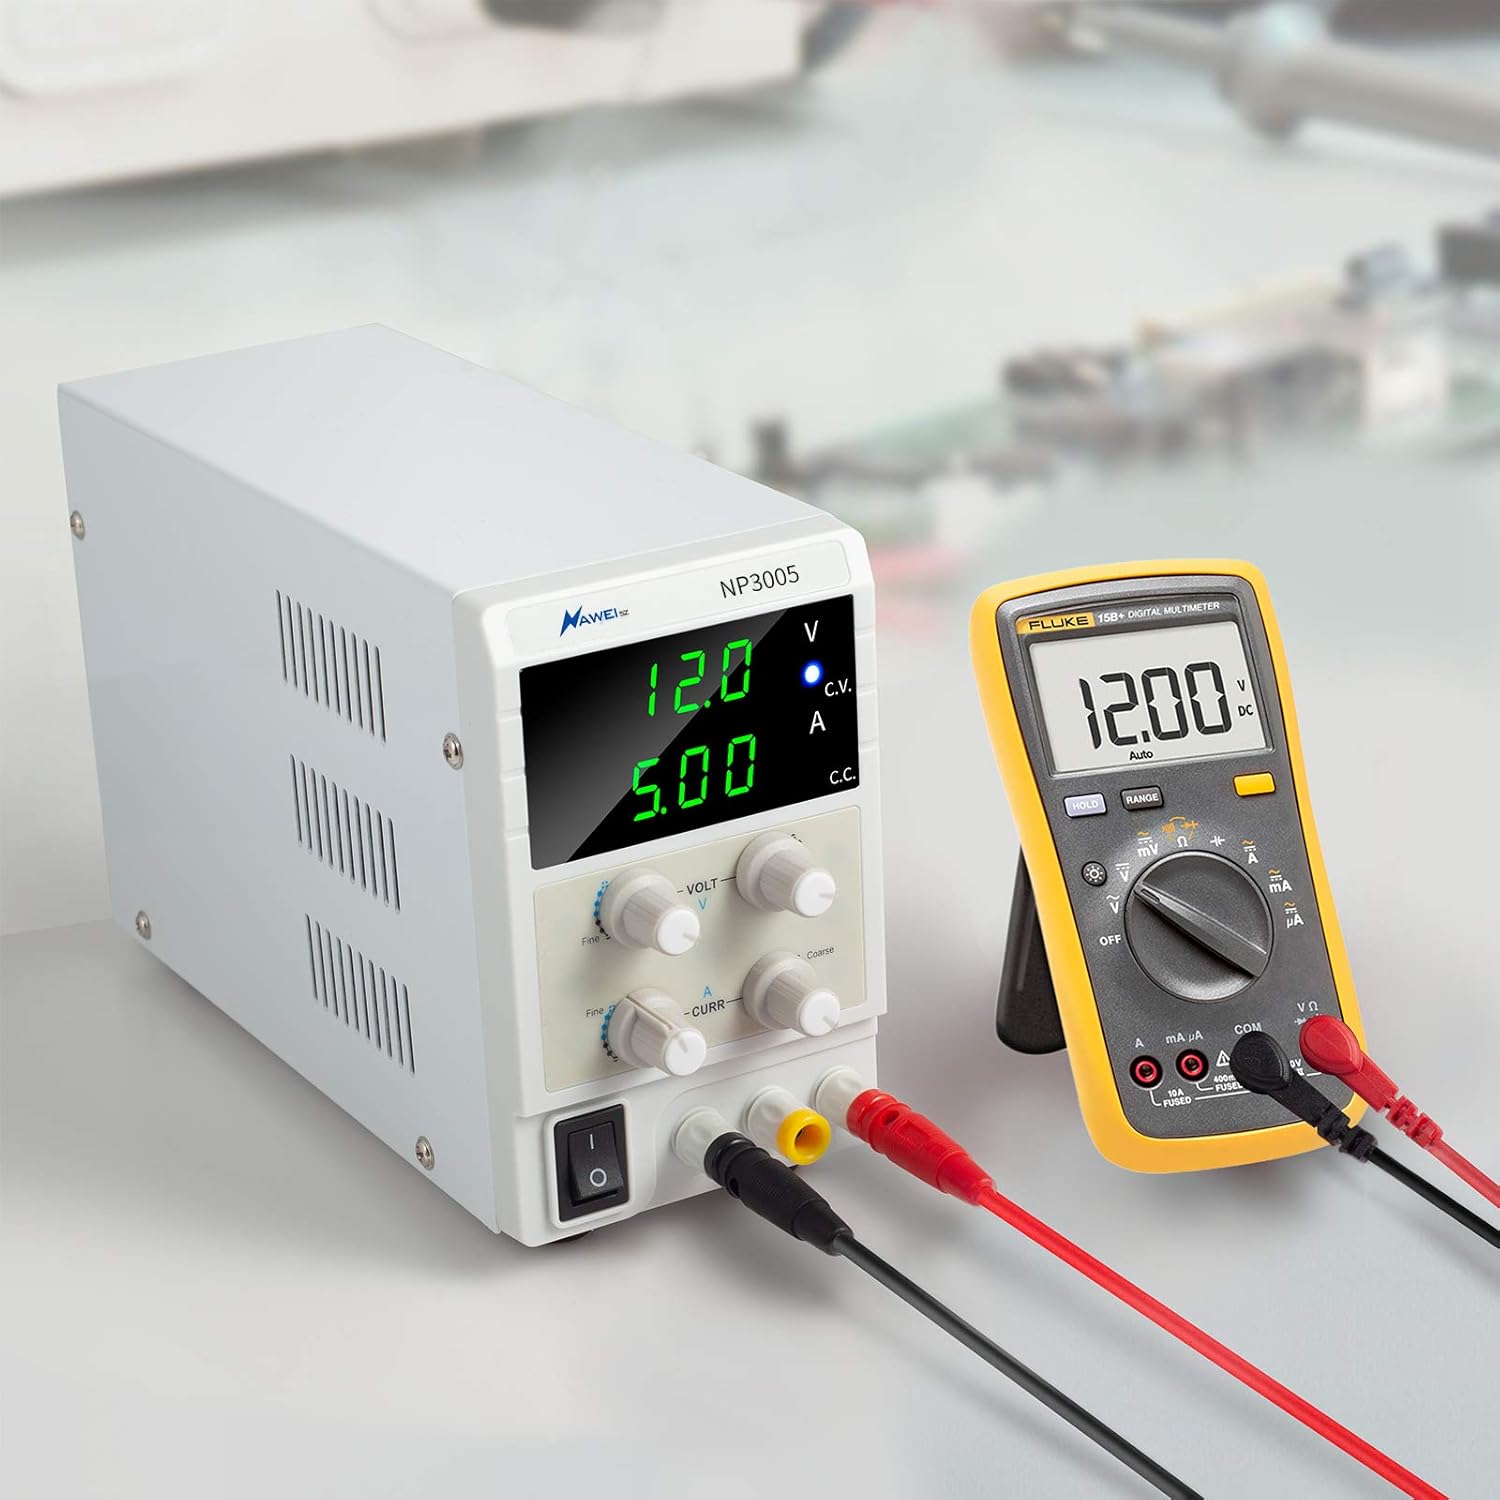
- Voltage Output Display: Shows the current output voltage in Volts (V).
- Current Output Display: Shows the current output current in Amperes (A).
- C.V. Constant Indicator Light: Illuminates when the power supply is operating in Constant Voltage (CV) mode.
- C.C. Constant Indicator Light: Illuminates when the power supply is operating in Constant Current (CC) mode.
- Output Voltage Fine Knob: Provides fine adjustment for the output voltage.
- Output Voltage Coarse Knob: Provides coarse adjustment for the output voltage.
- Output Current Fine Knob: Provides fine adjustment for the output current.
- Output Current Coarse Knob: Provides coarse adjustment for the output current.
- Power Switch: Turns the power supply ON or OFF.
- Output Positive Pole (+): Red terminal for positive output connection.
- Output Negative Pole (-): Black terminal for negative output connection.
- Grounding Terminal (GND): Yellow terminal for grounding connection.
3.2 Rear Panel Features

- Cooling Fan: Built-in fan with thermo-sensor for intelligent temperature control, reducing noise and prolonging device life.
- AC Power Input: Standard AC power socket for connecting the input power cord.
- Fuse Box: Contains the protective fuse for the power supply.
4. Setup
Follow these steps to set up your Naweisz DC Bench Power Supply:
- Unpacking: Carefully remove the power supply and all accessories from the packaging. Verify that all components are present: the power supply unit, 4mm Alligator Clip Leads with Banana Plugs, and the US Power Cord.
- Placement: Place the power supply on a stable, flat surface with adequate ventilation. Ensure that the cooling fan at the rear is not obstructed.
- Power Connection: Connect the provided US Power Cord to the AC Power Input on the rear panel of the power supply and then plug it into a grounded 110-115V AC wall outlet.
- Initial Check: Before connecting any load, ensure the power switch is in the OFF position. Turn the Voltage and Current coarse adjustment knobs fully counter-clockwise to their minimum settings.

4.1 Video Guide: How to Use the DC Power Supply
This video demonstrates the basic steps for setting up and using the Naweisz DC Bench Power Supply, including adjusting voltage and current.
5. Operating Instructions
The Naweisz NP3005 can operate in either Constant Voltage (CV) or Constant Current (CC) mode. The appropriate indicator light (C.V. or C.C.) will illuminate to show the active mode.
5.1 Setting Voltage and Current Limits (Pre-setting)
- Power On: Turn on the power supply using the power switch. The LED displays will light up.
- Set Voltage: Adjust the Output Voltage Coarse and Fine knobs to set the desired output voltage. Observe the Voltage Output Display. The C.V. indicator should be lit.
- Set Current Limit: To set the current limit, temporarily short the positive and negative output terminals using the provided alligator clip leads. The C.C. indicator will light up, and the voltage display will drop to near zero. Adjust the Output Current Coarse and Fine knobs to set the desired maximum current limit. Observe the Current Output Display.
- Remove Short: Once the current limit is set, remove the short circuit from the output terminals. The voltage display will return to the preset voltage, and the C.V. indicator will light up again.
5.2 Connecting a Load
After setting the desired voltage and current limits, turn off the power supply or ensure the output is at zero before connecting your device (load). Connect the positive (+) terminal of your load to the red output terminal of the power supply and the negative (-) terminal of your load to the black output terminal. For safety, connect the grounding terminal (GND) of the power supply to the ground of your setup if applicable.
Once the load is connected, turn on the power supply. The power supply will deliver the preset voltage and current, operating in either CV or CC mode depending on the load's requirements and the set limits.

5.3 Video Guide: Stable Output and Variable Voltage
This video highlights the stable output capabilities of the Naweisz Bench Power Supply, crucial for sensitive electronic work.
This video demonstrates the variable voltage adjustment of the 30V power supply, showcasing its flexibility for different applications.
6. Maintenance
Proper maintenance ensures the longevity and reliable performance of your power supply.
- Cleaning: Regularly clean the exterior of the power supply with a soft, dry cloth. Do not use abrasive cleaners or solvents. Ensure the device is powered off and unplugged before cleaning.
- Ventilation: Periodically check that the cooling fan and ventilation openings are free from dust and debris. Blocked vents can lead to overheating.
- Storage: When not in use for extended periods, store the power supply in a cool, dry place, away from direct sunlight and extreme temperatures.
- Fuse Replacement: If the power supply does not turn on, the fuse may need replacement. Disconnect the power cord, locate the fuse box on the rear panel, and replace the fuse with one of the same type and rating. (Refer to specifications for fuse type).

7. Troubleshooting
This section addresses common issues you might encounter with your power supply.
| Problem | Possible Cause | Solution |
|---|---|---|
| No power/Unit does not turn on | Power cord not connected; Power outlet faulty; Blown fuse. | Check power cord connection; Test outlet with another device; Replace fuse (refer to Maintenance section). |
| No output voltage/current | Output terminals not connected correctly; Voltage/current knobs set to zero; Overload/Short-circuit protection activated. | Verify connections; Adjust voltage/current knobs; Disconnect load, check for short, then reconnect. |
| C.C. indicator always on (even without short) | Load resistance is too low, causing the power supply to enter Constant Current mode. | This is normal operation. The power supply is limiting current to the set value. Increase the current limit or check your load's resistance. |
| Unit gets hot/Fan runs constantly | Heavy load; Insufficient ventilation; Dust buildup in fan/vents. | Reduce load if possible; Ensure adequate airflow around the unit; Clean fan and vents. |
| Inaccurate readings | External factors; Calibration needed (unlikely for user). | Ensure proper connections and stable environment. If persistent, contact customer support. |
8. Specifications
| Feature | Detail |
|---|---|
| Model Number | NP3005 |
| Output Voltage | 0-30 Volts DC (Adjustable) |
| Output Current | 0-5 Amperes (Adjustable) |
| Display Type | 3-Digital LED Display (Back-lit) |
| Display Accuracy | 0.1 V, 0.01 A |
| Input Voltage | 110-115 Volts AC |
| Output Wattage | 150 Watts |
| Protection Features | Limit current protection, Thermal protection, Voltage overload protection, Short-circuit protection |
| Cooling Method | Air (Intelligent Temperature Control Fan) |
| Dimensions (L x W x H) | 10.63 x 3.15 x 6.69 inches |
| Weight | 3.42 Pounds |
9. Warranty and Support
Naweisz provides a 30-day free return policy and a 36-month warranty for this product. For any technical support, warranty claims, or inquiries, please contact Naweisz customer service through the platform where you purchased the product or visit the official Naweisz store online.
Born from expertise, Naweisz delivers high-performance DC power supplies crafted by specialized engineers in our dedicated factory. We merge innovation with reliability, ensuring lab-grade accuracy, industrial durability, and unmatched safety. Every product reflects our commitment to quality control and cutting-edge technology, empowering professionals worldwide.

