1. Introduction
Thank you for choosing the HPC Fire Forno Dual Fuel Pizza Oven. This manual provides essential information for the safe and efficient operation, installation, and maintenance of your new pizza oven. Please read all instructions carefully before assembly or use to ensure proper function and to prevent injury or property damage. Keep this manual for future reference.
This oven is designed for outdoor use only and operates on either natural gas or wood fuel, offering versatile cooking options.
2. Safety Information
WARNING: Failure to follow these instructions could result in fire, explosion, or carbon monoxide poisoning, which could cause property damage, personal injury, or death.
- FOR OUTDOOR USE ONLY. Never operate this appliance indoors or in an enclosed area.
- GAS SAFETY: Ensure all gas connections are tight and leak-free. Perform a leak test with soapy water before initial use and after any gas component replacement. Do not use a flame to check for leaks.
- CLEARANCES: Maintain minimum clearances from combustible materials. Refer to local building codes and the installation section for specific distances.
- HOT SURFACES: The oven and its components become extremely hot during operation and remain hot for a period after use. Use heat-resistant gloves and exercise extreme caution. Keep children and pets away from the oven.
- FUEL: This oven is designed for Natural Gas and seasoned hardwoods only. Do not use charcoal, lighter fluid, or any other accelerants.
- VENTILATION: Ensure adequate ventilation around the oven. Do not block any vents.
- CARBON MONOXIDE HAZARD: Burning wood or gas produces carbon monoxide, which is odorless and can be deadly. Ensure proper ventilation.
- ELECTRICAL: If equipped with electronic ignition, ensure electrical connections are properly grounded and protected from water.
- PROFESSIONAL INSTALLATION: Gas connections should be performed by a qualified gas installer or service agency.
3. Product Overview
The HPC Fire Forno Dual Fuel Pizza Oven is a versatile outdoor cooking appliance designed to deliver exceptional pizza. It features a durable construction and a cart-mounted design for convenience.
- Dual Fuel Capability: Operates with either natural gas or wood, or a combination of both.
- Electronic Ignition: Provides quick and reliable gas ignition.
- Cart-Mounted Design: Stainless steel cart with wheels for mobility.
- Advanced Heating: Utilizes radiant, convection, and conduction heat for even cooking and crispy crusts.
- Durable Construction: Features a refractory oven with a stainless steel hearth and a glass tile exterior.

Image: The HPC Fire Forno Dual Fuel Pizza Oven mounted on its mobile cart, ready for outdoor use.
Heating Principles
The Forno oven employs three primary heat sources to achieve optimal cooking temperatures:
- Radiant Heat: Direct heat from the flame or hot dome walls cooks the top of the pizza.
- Convection Heat: Hot air circulates within the oven chamber, cooking the sides and ensuring even heat distribution.
- Conduction Heat: Direct heat transfer from the hot refractory hearth stone to the bottom of the pizza, creating a crispy crust.

Image: Diagram showing the three heat sources (radiant, convection, conduction) at work within the oven chamber.
4. Setup
4.1 Unpacking and Inspection
- Carefully remove all packaging materials.
- Inspect the oven and cart for any shipping damage. Report any damage to your retailer immediately.
- Ensure all components listed in the packing list are present.
4.2 Choosing a Location
- Place the oven on a level, stable, non-combustible surface.
- Ensure adequate clearance from combustible materials (e.g., walls, fences, trees). Consult local fire codes for specific requirements. A minimum of 3 feet (0.9 meters) from sides and back is generally recommended.
- Ensure the area is well-ventilated and not under any overhead combustible construction.
4.3 Cart Assembly (if required)
The oven typically comes pre-mounted on the cart. If assembly is required, follow the separate cart assembly instructions provided with the unit. Ensure all bolts are securely tightened.
4.4 Gas Connection (Natural Gas)
IMPORTANT: Gas connections must be performed by a qualified gas installer or service agency in accordance with all local codes and regulations.
- Ensure the main gas supply valve is OFF.
- Connect the oven's gas inlet to your natural gas supply line using appropriate fittings and a flexible gas hose (if applicable).
- Perform a leak test: Turn on the gas supply. Apply a soapy water solution to all connections. Bubbles indicate a leak. If a leak is detected, turn off the gas, tighten connections, and retest. Do not operate the oven if a leak persists.
4.5 Initial Burn-In (Curing)
Before cooking food, the oven's refractory materials must be cured. This process removes moisture and strengthens the oven. Perform a slow burn-in over several hours:
- Start with a small, low gas flame or a very small wood fire for 1-2 hours.
- Gradually increase the heat over the next 2-3 hours, allowing the oven to reach medium temperatures.
- Finally, bring the oven to full operating temperature for about an hour.
- Allow the oven to cool completely. This process should be done once.
During the curing process, some smoke or steam may be visible, which is normal. Ensure good ventilation.
5. Operating Instructions
5.1 Gas Operation
- Ensure the gas supply valve is open.
- Locate the electronic ignition switch and gas control knob.
- Push and turn the gas control knob to the 'PILOT' position. Press and hold the ignition button until the pilot flame ignites. Continue holding for 10-15 seconds to allow the thermocouple to heat up.
- Once the pilot is stable, turn the control knob to the desired temperature setting. The main burner should ignite.
- Allow the oven to preheat for 30-60 minutes, or until the hearth reaches the desired cooking temperature (typically 700-900°F / 370-480°C for pizza).
- To shut down, turn the gas control knob to the 'OFF' position and close the main gas supply valve.
5.2 Wood Operation
For wood-fired cooking, the gas burner can be off or used to assist in initial heating.
- Wood Selection: Use only seasoned hardwoods such as oak, maple, or fruitwoods. Avoid softwoods, treated wood, or wood containing resins, as these can produce excessive smoke and creosote.
- Starting the Fire: Place a small amount of kindling and a fire starter (no lighter fluid) at the back or side of the oven chamber. Light the kindling.
- Building the Fire: Gradually add small pieces of wood as the fire grows. Aim for a consistent flame that rolls across the top of the oven dome.
- Preheating: Allow the oven to preheat for 60-90 minutes, or until the dome and hearth are glowing white and the temperature reaches 700-900°F (370-480°C).
- Maintaining Heat: Push the burning embers to the side or back of the oven. Add small pieces of wood as needed to maintain temperature.

Image: Wood burning inside the oven, illustrating the wood-fired operation.
5.3 Dual Fuel Operation
You can use both gas and wood simultaneously. The gas burner can provide a consistent base heat, while wood adds flavor and higher temperatures. Ignite the gas burner first, then introduce wood as described above.
5.4 Cooking
- Once the oven is preheated to the desired temperature, use a pizza peel to place your pizza directly onto the hot hearth stone.
- Monitor the pizza closely. Pizza cooks very quickly in a high-temperature oven (often 60-120 seconds).
- Rotate the pizza periodically with the peel to ensure even cooking and browning.
- Remove the pizza when the crust is golden brown and the cheese is melted and bubbly.

Image: A pizza cooking on the hot hearth inside the oven, demonstrating the cooking process.
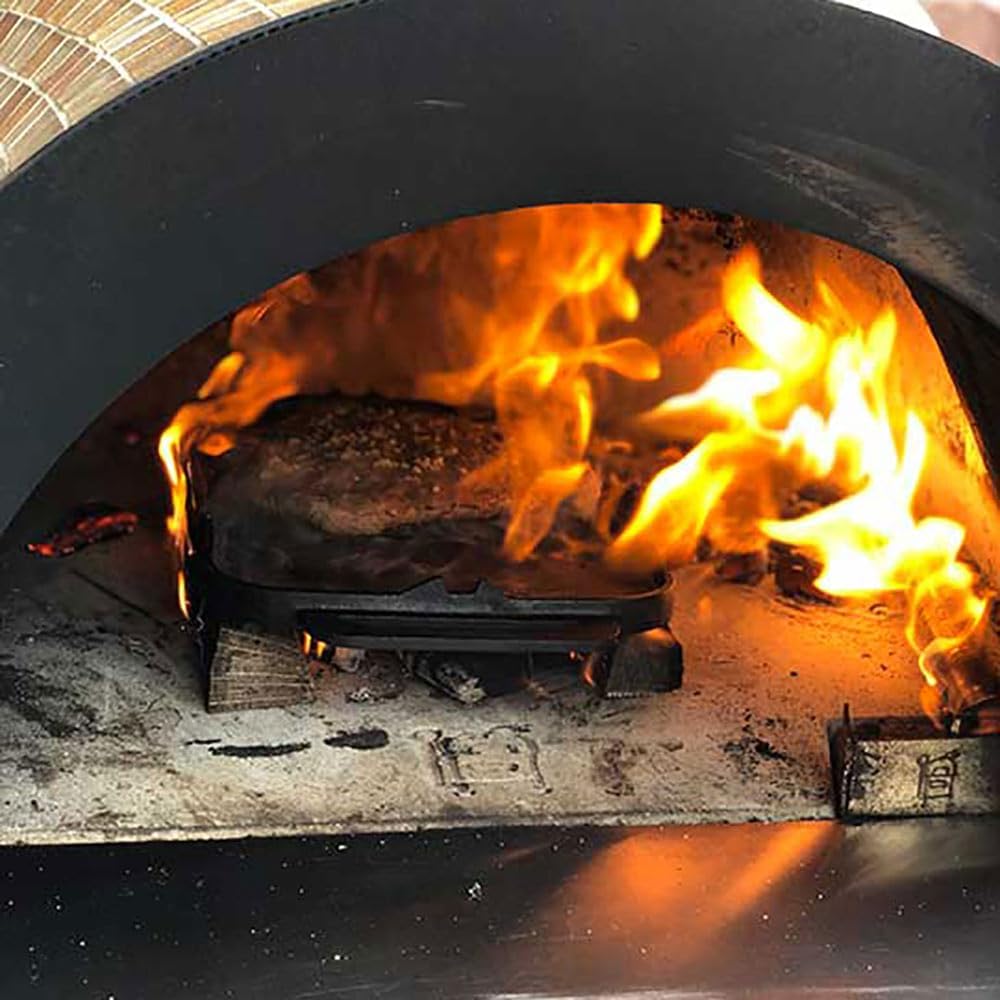
Image: A dish cooking inside the oven, surrounded by flames, showcasing the intense heat.
6. Maintenance
6.1 Cleaning the Hearth and Interior
- After the oven has cooled completely, use a brass-bristle brush to scrape any food residue from the hearth stone.
- Use a small shovel or ash scoop to remove ash and debris from the oven chamber.
- Do not use water or chemical cleaners on the refractory surfaces, as they can damage the material. The high heat of the oven naturally sanitizes the cooking surface.
6.2 Ash Removal (Wood Fired)
Regularly remove ash from the oven. Ensure ashes are completely cold before disposal. Place them in a metal container with a tight-fitting lid, away from combustible materials.
6.3 Exterior Cleaning
Clean the stainless steel and glass tile exterior with a mild soap and water solution and a soft cloth. Avoid abrasive cleaners that could scratch the surfaces.
6.4 Gas System Inspection
Periodically inspect the gas hose, regulator (if applicable), and connections for signs of wear, damage, or leaks. Replace any damaged components immediately. Have the gas burner and lines inspected annually by a qualified technician.
6.5 Winterization
In colder climates, it is recommended to cover the oven with a weather-resistant cover when not in use, especially during winter months, to protect it from moisture and freezing temperatures.
7. Troubleshooting
| Problem | Possible Cause | Solution |
|---|---|---|
| Gas burner does not ignite. |
|
|
| Uneven cooking. |
|
|
| Excessive smoke (wood fired). |
|
|
| Gas smell. |
|
|
8. Specifications
- Brand: HPC
- Model Number: FDP-FORNO/BLX-EI-NG
- Item Weight: 450 pounds
- Product Dimensions: 44 x 33.25 x 60 inches (Length x Width x Height)
- Installation Type: Countertop (on Cart)
- Oven Cooking Mode: Conduction, Convection, Radiant
- Color: Black Onyx Glass Tiled Oven and Black Powder Coated Steel Cart
- Fuel Type: Dual Fuel (Natural Gas, Wood)
- Ignition: Electronic Ignition System
9. Warranty and Support
9.1 Warranty Information
HPC products are manufactured to high-quality standards. For specific warranty details regarding your HPC Fire Forno Dual Fuel Pizza Oven, please refer to the warranty card included with your purchase or visit the official HPC website. Keep your proof of purchase for warranty claims.
9.2 Customer Support
If you have any questions, require technical assistance, or need to order replacement parts, please contact HPC customer support. Contact information can typically be found on the manufacturer's website or in the documentation provided with your oven.
Website: www.hpcfire.com (Example, please verify actual website)
Phone: Refer to manufacturer's website for current contact numbers.


