1. Important Safety Information
Please read these instructions carefully before installation and retain them for future reference. All electrical connections must be in accordance with local codes and ordinances, the National Electric Code (NEC), and ANSI/NFPA 70-1999. If you are unfamiliar with electrical wiring, consult a qualified electrician.
- WARNING: To avoid electric shock, disconnect power at the circuit breaker or fuse box before installation or servicing.
- CAUTION: Risk of electric shock. Do not install this fixture in wet or damp locations.
- Ensure the fixture is properly grounded.
- Do not exceed the maximum wattage specified for each bulb socket (60 watts).
- Handle glass components with care to prevent breakage.
2. Package Contents
Verify that all components are present before beginning installation:
- Lighting Fixture Body (with integrated backplate)
- Glass Shades (5 pieces)
- Mounting Hardware (screws, wire nuts, mounting bracket)
- Instruction Manual
- Cotton Gloves (for handling glass shades)

Image: All components of the SOLFART 5-Light Vintage Vanity Lighting Fixture, including the main body, glass shades, and mounting hardware.
3. Specifications
| Feature | Specification |
|---|---|
| Brand | SOLFART |
| Model Number | S8580-5T |
| Color | Bronze Black-Long Base |
| Material | Glass with Power Coated Matt Black Metal |
| Product Dimensions | 40.6"L x 7.7"W x 7.1"H (1030mm L x 195mm W x 180mm H) |
| Power Source | Corded Electric |
| Voltage | 110 Volts (AC) |
| Wattage | Max 300 watts (60 watts per bulb) |
| Bulb Base | E26 |
| Light Source Type | Compatible with Incandescent, LED, CFL, Halogen |
| Special Feature | Dimmable (with compatible bulbs and dimmer switch) |
| Installation Type | Wall Mount |
| Indoor/Outdoor Usage | Indoor use only |
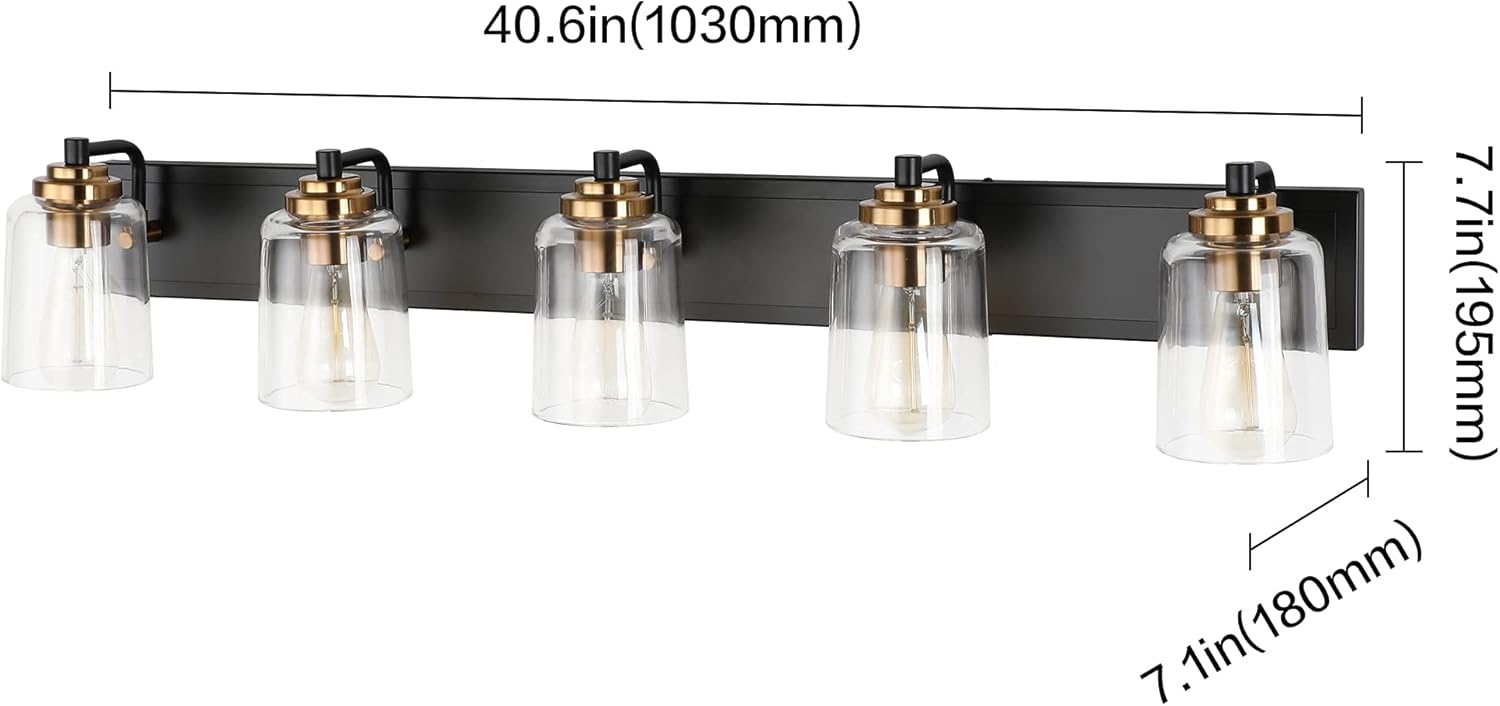
Image: Detailed dimensions of the SOLFART 5-Light Vanity Lighting Fixture, showing length, width, and height.
4. Installation Instructions
Installation typically takes approximately 15 minutes. Ensure power is disconnected before proceeding.
4.1. Preparation
- Turn off power at the circuit breaker or fuse box.
- Carefully unpack the fixture and all components. Place them on a clean, soft surface to prevent scratches.
- Identify the mounting bracket, fixture body, glass shades, and hardware.
4.2. Mounting the Fixture
- Attach the mounting bracket to the junction box using the provided screws. Ensure it is securely fastened.
- The fixture can be installed with the lights facing upwards or downwards. Decide on the desired orientation before proceeding.

Image: The fixture shown installed in both an upward-facing and downward-facing orientation, demonstrating versatility.
4.3. Connecting Wiring
- Connect the fixture's wires to the corresponding wires from the junction box using the provided wire nuts:
- Connect the black wire (Live/Hot) from the fixture to the black wire from the junction box.
- Connect the white wire (Neutral) from the fixture to the white wire from the junction box.
- Connect the ground wire (bare copper or green) from the fixture to the ground wire from the junction box.
- Carefully tuck all wires into the junction box.
- Align the fixture body with the mounting bracket and secure it with the decorative nuts or screws.
4.4. Attaching Glass Shades and Bulbs
- Wearing the provided cotton gloves to prevent fingerprints, carefully attach each glass shade to its respective socket. The shades are secured by a robust aluminum securing ring.
- Insert E26 base bulbs (not included) into each socket. Ensure bulbs do not exceed 60 watts.

Image: A close-up view highlighting the thick, solid glass shade and the durable metal securing ring.

Image: A visual comparison demonstrating the thickness and solidity of the fixture's glass shades compared to thinner alternatives.
5. Operating Instructions
Once installed, restore power at the circuit breaker. The fixture is now ready for use.
- Power On/Off: Use your wall switch to turn the light fixture on or off.
- Dimmable Functionality: This fixture is dimmable when used with compatible dimmable E26 bulbs and a suitable dimmer switch (bulbs and dimmer switch are not included).

Image: The SOLFART 5-Light Vanity Fixture shown in both the 'off' state (left) and the 'on' state (right), illustrating its illumination.

Image: An illustration showing various compatible E26 bulb types (Incandescent, LED, Edison, CFL) and a dimmer switch, indicating the fixture's dimmable capability.
6. Care and Maintenance
To maintain the appearance and functionality of your lighting fixture:
- Always disconnect power before cleaning.
- Wipe the fixture with a soft, dry cloth.
- Do not use abrasive cleaners, solvents, or polishes as they may damage the finish.
- Clean glass shades with a mild glass cleaner and a soft cloth. Ensure they are completely dry before reattaching.
7. Troubleshooting
If you encounter issues with your lighting fixture, refer to the following common problems and solutions:
- Light does not turn on:
- Check if the power is on at the circuit breaker.
- Ensure bulbs are correctly installed and not burnt out.
- Verify all wire connections are secure.
- Flickering lights:
- Ensure bulbs are fully screwed into the sockets.
- If using dimmable bulbs, confirm they are compatible with your dimmer switch.
- Check for loose wire connections.
- Glass shade appears scratched or damaged:
- Inspect packaging upon arrival for damage.
- Contact customer support if components are damaged upon receipt.
8. Warranty and Support
This SOLFART lighting fixture comes with a 2-year warranty from the date of purchase.
For warranty claims, technical assistance, or any questions regarding your product, please contact SOLFART customer service. You can typically find contact information on the seller's platform or by searching for 'SOLFART customer support'.
When contacting support, please provide your order ID and the product model number (S8580-5T) for efficient service.


