1. Introduction
Thank you for purchasing the Explore Scientific RDP1001CM3000 Radio Controlled Projection Clock. This device combines a digital clock with a radio-controlled time signal receiver, an alarm function, and a unique projection feature to display the time on your wall or ceiling. This manual provides detailed instructions for setup, operation, and maintenance to ensure optimal performance and longevity of your clock.
2. Safety Information
- Read all instructions carefully before using the device.
- Keep this manual for future reference.
- Do not expose the device to extreme temperatures, direct sunlight, or high humidity.
- Avoid dropping or subjecting the device to strong impacts.
- Do not attempt to disassemble or repair the unit yourself. Refer all servicing to qualified personnel.
- Dispose of used batteries responsibly according to local regulations.
3. Package Contents
Please check the package contents to ensure all items are present:
- Explore Scientific RDP1001CM3000 Projection Clock
- Batteries (pre-installed or included separately)
- User Manual (this document)
- Optional: AC Power Adapter (may be sold separately)
4. Product Overview
The RDP1001CM3000 features a clear digital display and a rotatable projection head. It shows the time, day of the week, date, and indoor temperature. The blue backlight ensures readability in low light conditions.
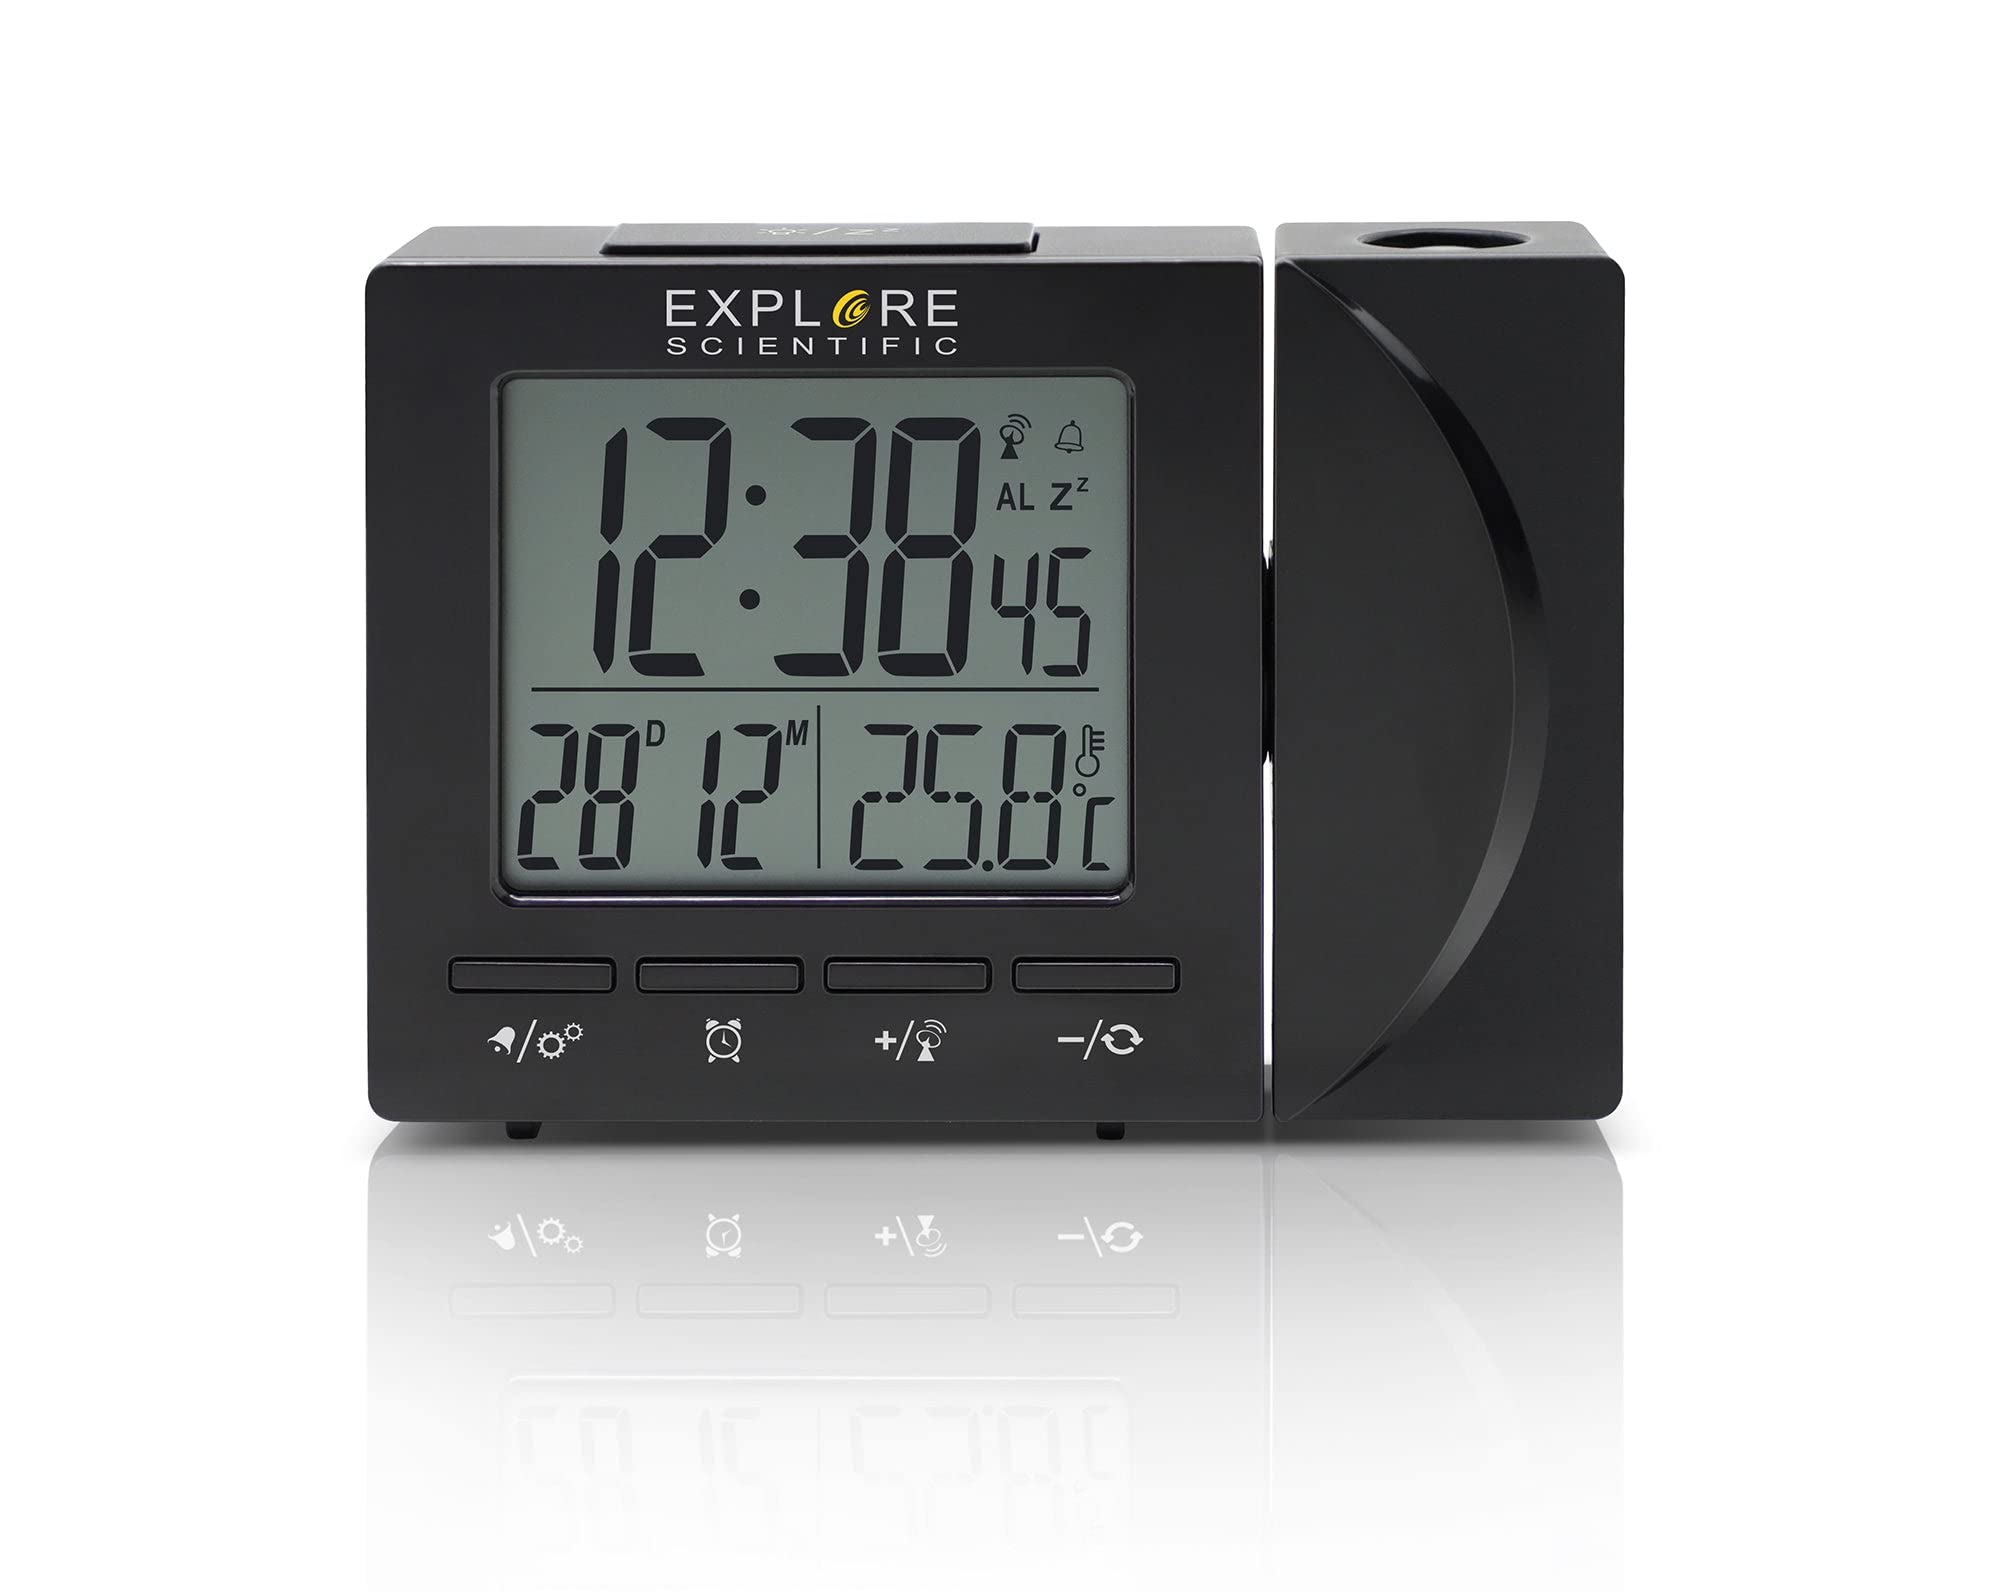
Figure 4.1: Front view of the Explore Scientific RDP1001CM3000 Projection Clock, displaying digital time, day, and date.
4.1 Key Features
- Radio Controlled Time: Automatically synchronizes with the NIST WWVB signal for accurate timekeeping.
- Time Projection: Projects the time onto a wall or ceiling with a 180-degree rotatable head and flip function.
- Digital Display: Shows time (12/24 hour selectable), weekday (five languages: GE, EN, FR, IT, DU), date, and indoor temperature (°F/°C selectable).
- Alarm with Snooze: Features a daily alarm with a convenient snooze function.
- Blue Backlight: Provides illumination for easy viewing in the dark.

Figure 4.2: The projection feature of the clock, displaying the time on an adjacent surface.
5. Setup
5.1 Battery Installation
- Locate the battery compartment cover on the back or bottom of the clock.
- Remove the cover.
- Insert the required batteries (typically AAA, refer to the compartment for polarity) ensuring correct polarity (+ and -).
- Replace the battery compartment cover.
5.2 Power Connection (Optional)
For continuous projection and backlight, an optional AC power adapter can be used. If using the adapter:
- Connect the AC adapter to the DC input jack on the clock.
- Plug the adapter into a standard wall outlet.
5.3 Initial Setup and Radio Control Synchronization
Upon initial power-up (after battery installation or connecting the AC adapter), the clock will automatically attempt to synchronize with the NIST WWVB radio signal. This process may take several minutes to several hours depending on your location and signal strength. During synchronization, a signal icon may flash on the display.
- Place the clock near a window for better signal reception.
- Avoid placing it near electronic devices that may cause interference.
- Once synchronized, the time and date will be set automatically.
6. Operating Instructions
6.1 Setting Time and Date Manually
If the radio-controlled signal is unavailable or you prefer to set the time manually:
- Press and hold the SET button (or similar, refer to device buttons) to enter time setting mode.
- Use the UP or DOWN buttons to adjust the flashing value (e.g., hour, minute, year, month, day).
- Press SET again to confirm and move to the next setting.
- Repeat until all settings are complete, then press SET to exit.
6.2 Setting the Alarm and Snooze Function
- Press the ALARM button once to display the alarm time.
- Press and hold the ALARM button to enter alarm setting mode.
- Use the UP or DOWN buttons to adjust the alarm hour and minute.
- Press ALARM to confirm each setting.
- To activate/deactivate the alarm, press the ALARM button briefly when the alarm time is displayed. An alarm icon will appear/disappear.
- When the alarm sounds, press the SNOOZE button to temporarily silence it. The alarm will sound again after a few minutes.
- To stop the alarm completely, press any other button (e.g., ALARM or SET).
6.3 Adjusting Projection
- The projection head can be rotated 180 degrees to direct the time display onto your desired surface.
- Look for a FLIP or ROTATE button/switch near the projection lens to invert the projected image if it appears upside down.
- Adjust the focus wheel (if present) on the projection lens for a clearer image.
6.4 Temperature Unit Selection
Press the °C/°F button (or similar) to switch between Celsius and Fahrenheit temperature display.
6.5 Time Format (12/24 Hour)
Press the 12/24H button (or similar) to toggle between 12-hour and 24-hour time formats.
6.6 Weekday Language Display
The weekday display can be set to one of five languages: German (GE), English (EN), French (FR), Italian (IT), or Dutch (DU). Refer to your device's specific buttons (e.g., a dedicated LANGUAGE button or a setting within the manual time setup) to cycle through these options.
7. Maintenance
- Clean the clock with a soft, dry cloth. Do not use abrasive cleaners or solvents.
- If the clock will not be used for an extended period, remove the batteries to prevent leakage.
8. Troubleshooting
| Problem | Possible Cause | Solution |
|---|---|---|
| No display or dim display | Low or dead batteries; AC adapter not connected (if used) | Replace batteries; ensure AC adapter is securely connected. |
| Incorrect time or date | Radio signal interference; manual setting error | Move clock to a location with better signal; perform manual time setting. |
| Projection is blurry | Out of focus | Adjust the focus wheel on the projection lens. |
| Projection is upside down | Projection flip function not activated | Press the FLIP or ROTATE button/switch. |
| Alarm does not sound | Alarm is not activated | Ensure the alarm icon is visible on the display. |
9. Specifications
- Model Number: RDP1001CM3000
- Display Type: Digital
- Power Source: Battery Powered, Corded Electric (optional AC adapter)
- Special Features: Alarm, Calendar Display, Temperature Display, Radio Controlled, Projection
- Temperature Units: °F / °C selectable
- Time Format: 12 / 24 Hour selectable
- Weekday Display Languages: GE, EN, FR, IT, DU
- Material: Acrylonitrile Butadiene Styrene
- Color: Black
- Item Weight: 8 ounces
- Mounting Type: Tabletop
10. Warranty and Support
Explore Scientific products are designed for quality and reliability. For warranty information, technical support, or service inquiries, please refer to the warranty card included with your purchase or visit the official Explore Scientific website. Please have your model number (RDP1001CM3000) and purchase date available when contacting support.


