
Introduction
Thank you for choosing the Mellerware Brizy Ceiling Fan. This manual provides essential information for the safe and efficient installation, operation, and maintenance of your new ceiling fan. Please read these instructions thoroughly before use and retain them for future reference.
The Mellerware Brizy ceiling fan features a silent 45W DC motor, 6 speeds, a summer/winter function, and a timer, all controllable via a modern remote. Its 132 cm (52 inch) diameter blades are designed for effective air circulation in rooms up to 20 m² (215 sq ft).

Figure 1: Powerful and Silent Operation. This image displays the Mellerware Brizy ceiling fan in a bedroom setting, emphasizing its key features: powerful and silent operation, 40W energy efficiency, 6 adjustable speeds, and a durable DC motor.
Important Safety Instructions
- Always disconnect power before installation or maintenance.
- Installation must be performed by a qualified electrician.
- Ensure the mounting structure can support the fan's weight (5.58 kg / 12.3 lbs).
- Maintain a minimum distance of 2.3 meters (7.5 feet) from the floor to the fan blades.
- Do not insert objects into the fan blades while operating.
- This appliance is for indoor use only.
- Use only the remote control provided with the fan.
Package Contents
Verify that all components are present before beginning installation:
- Ceiling Fan Motor Unit
- 3 Fan Blades (Paulownia Wood)
- Mounting Bracket
- Downrods (15 cm and 25 cm)
- Canopy
- Remote Control
- Hardware Pack (screws, washers, wire nuts)
- Instruction Manual
Setup and Installation
Note: Installation should be performed by a qualified electrician. Ensure power is disconnected at the circuit breaker before proceeding.
1. Mounting the Bracket
Secure the mounting bracket to a ceiling joist or a suitable electrical junction box capable of supporting the fan's weight. Use appropriate screws and washers.
2. Assembling the Downrod and Fan
Choose the appropriate downrod (15 cm for low/standard ceilings, 25 cm for high/sloped ceilings). Insert the downrod through the canopy and connect it to the fan motor unit. Ensure all screws are tightened securely.
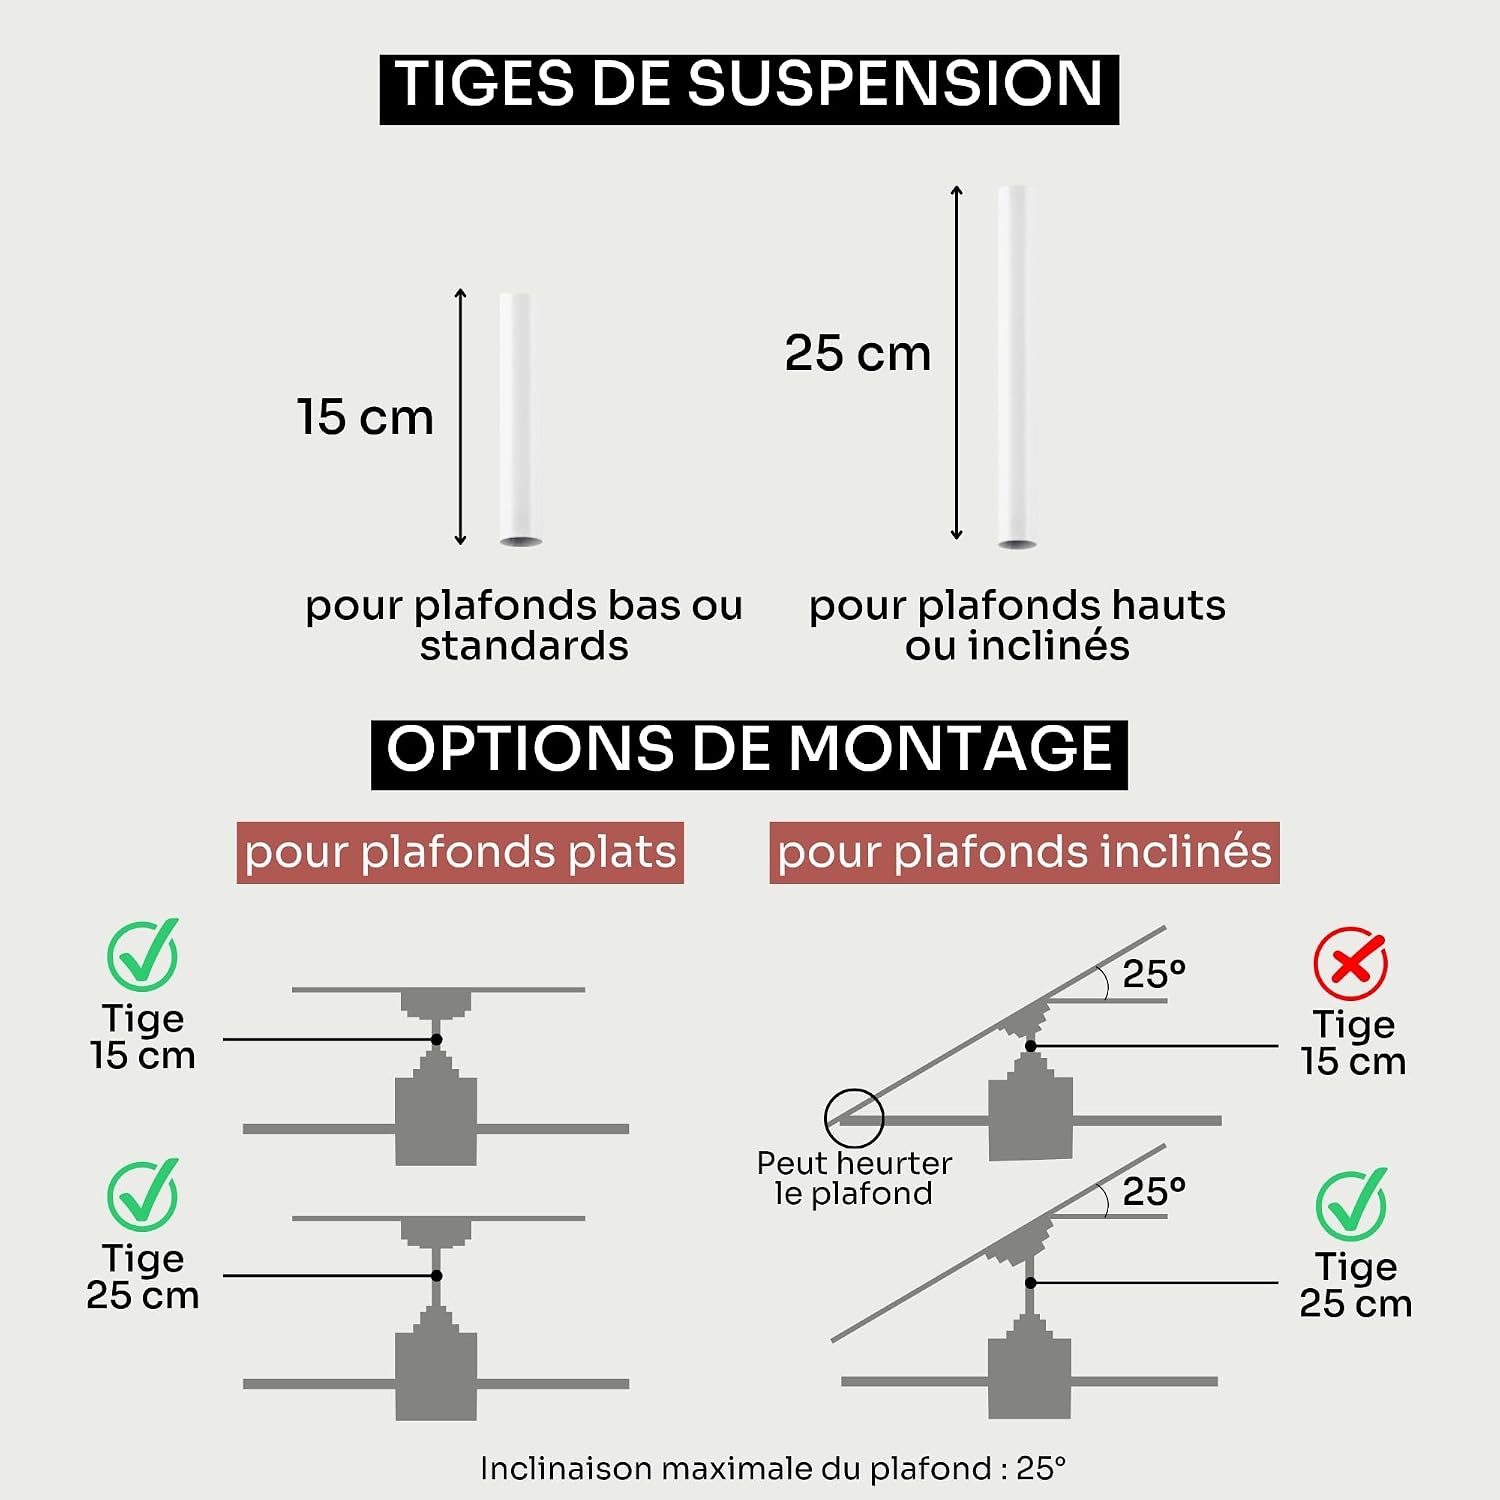
Figure 2: Suspension Rods and Mounting Options. The diagram illustrates two downrod lengths (15 cm and 25 cm) and how they are used for flat and inclined ceilings. For inclined ceilings, the 15 cm rod may hit the ceiling, while the 25 cm rod provides sufficient clearance for up to a 25-degree incline.
3. Wiring the Fan
Connect the fan's electrical wires to the household wiring according to local electrical codes. Typically, this involves connecting live, neutral, and ground wires. Use the provided wire nuts and ensure connections are secure.
4. Attaching the Blades
Attach the three Paulownia wood blades to the motor unit using the provided screws. Ensure they are firmly secured.

Figure 3: Paulownia Wood Blade Features. This image highlights the benefits of the Paulownia wood blades, including solid wood construction, high-end finish, extended lifespan, humidity resistance, and durability.
5. Securing the Canopy
Slide the canopy up to the ceiling and secure it with the provided screws, covering the wiring connections.
Operating Instructions
Your Mellerware Brizy ceiling fan is operated using the included remote control.
Remote Control Functions

Figure 4: Remote Control. The remote control features buttons for setting the timer (1h, 2h, 4h, 8h), adjusting fan speeds (6 levels from 100 to 198 rpm), and activating the breeze mode.
- Power Button: Turns the fan ON or OFF.
- Speed Control: Adjusts between 6 fan speeds.
- Timer Function: Set the fan to turn off automatically after 1, 2, 4, or 8 hours.
- Summer/Winter Mode:
- Summer Mode (Downward Airflow): Blades rotate counter-clockwise, creating a cooling breeze.
- Winter Mode (Upward Airflow): Blades rotate clockwise, circulating warm air from the ceiling downwards to balance room temperature.
- Breeze Mode: Simulates natural breeze by cycling through different fan speeds.
- Night Mode: Operates the fan at a very low, quiet speed for undisturbed sleep.

Figure 5: Summer/Winter Function. This diagram visually explains how the fan operates in summer mode (downward airflow for cooling) and winter mode (upward airflow to circulate warm air).

Figure 6: Quiet Operation. This image highlights the fan's ultra-quiet DC motor, showing it in a bedroom setting with a graphic indicating a minimum noise level of 23 dB, comparable to whispers.
Maintenance
Regular maintenance ensures optimal performance and extends the life of your fan.
- Cleaning: Periodically clean the fan blades and motor housing with a soft, damp cloth. Do not use abrasive cleaners or solvents. Ensure the fan is turned off and power is disconnected before cleaning.
- Tightening Screws: Check all screws and connections annually to ensure they are secure. Loose connections can cause noise or wobbling.
- Blade Balance: If the fan wobbles, check that the blades are securely attached and that no blades are bent or damaged. A balancing kit (not included) can be used if necessary.
Troubleshooting
| Problem | Possible Cause | Solution |
|---|---|---|
| Fan does not start | No power; Loose wiring; Remote control battery dead. | Check circuit breaker; Verify wiring connections; Replace remote control battery. |
| Fan wobbles | Loose blades; Uneven blade attachment; Mounting bracket not secure. | Tighten blade screws; Ensure blades are evenly attached; Secure mounting bracket. |
| Remote control not working | Battery dead; Remote not paired (if applicable); Obstruction. | Replace battery; Refer to remote pairing instructions (if any); Ensure clear line of sight to fan receiver. |
| Fan is noisy | Loose screws; Motor issue; Blades hitting an obstruction. | Check and tighten all screws; Contact customer support if motor noise persists; Ensure no obstructions are near blades. |
Specifications
| Feature | Detail |
|---|---|
| Brand | Mellerware |
| Model Number | ES9440120L |
| Color | Black |
| Electric Fan Design | Ceiling Fan |
| Power Source | Corded Electric |
| Style | No Light |
| Product Dimensions (D x W x H) | 32.5P x 71l x 23H cm (approx. 12.8 x 28 x 9 inches) |
| Room Type | Bedroom |
| Special Feature | Timer, Remote Control |
| Recommended Uses | Ventilation |
| Mounting Type | Ceiling Mount |
| Control Type | Remote Control |
| Number of Speeds | 6 |
| Noise Level | 45 Decibels (minimum 23 dB) |
| Wattage | 45 Watts |
| Number of Blades | 3 |
| Voltage | 24 Volts (DC) |
| Usage | Indoor |
| Efficiency | High |
| Motor Type | DC Motor |
| Smart Home Compatibility | Not Smart Home Compatible |
| Material | Aluminum, Wood |
| Blade Material | Wood |
| Finish Type | Black |
| Blade Length | 132 Centimeters (52 inches) |
| Item Weight | 5.58 Kilograms (12.3 lbs) |
| Included Components | Remote Control |
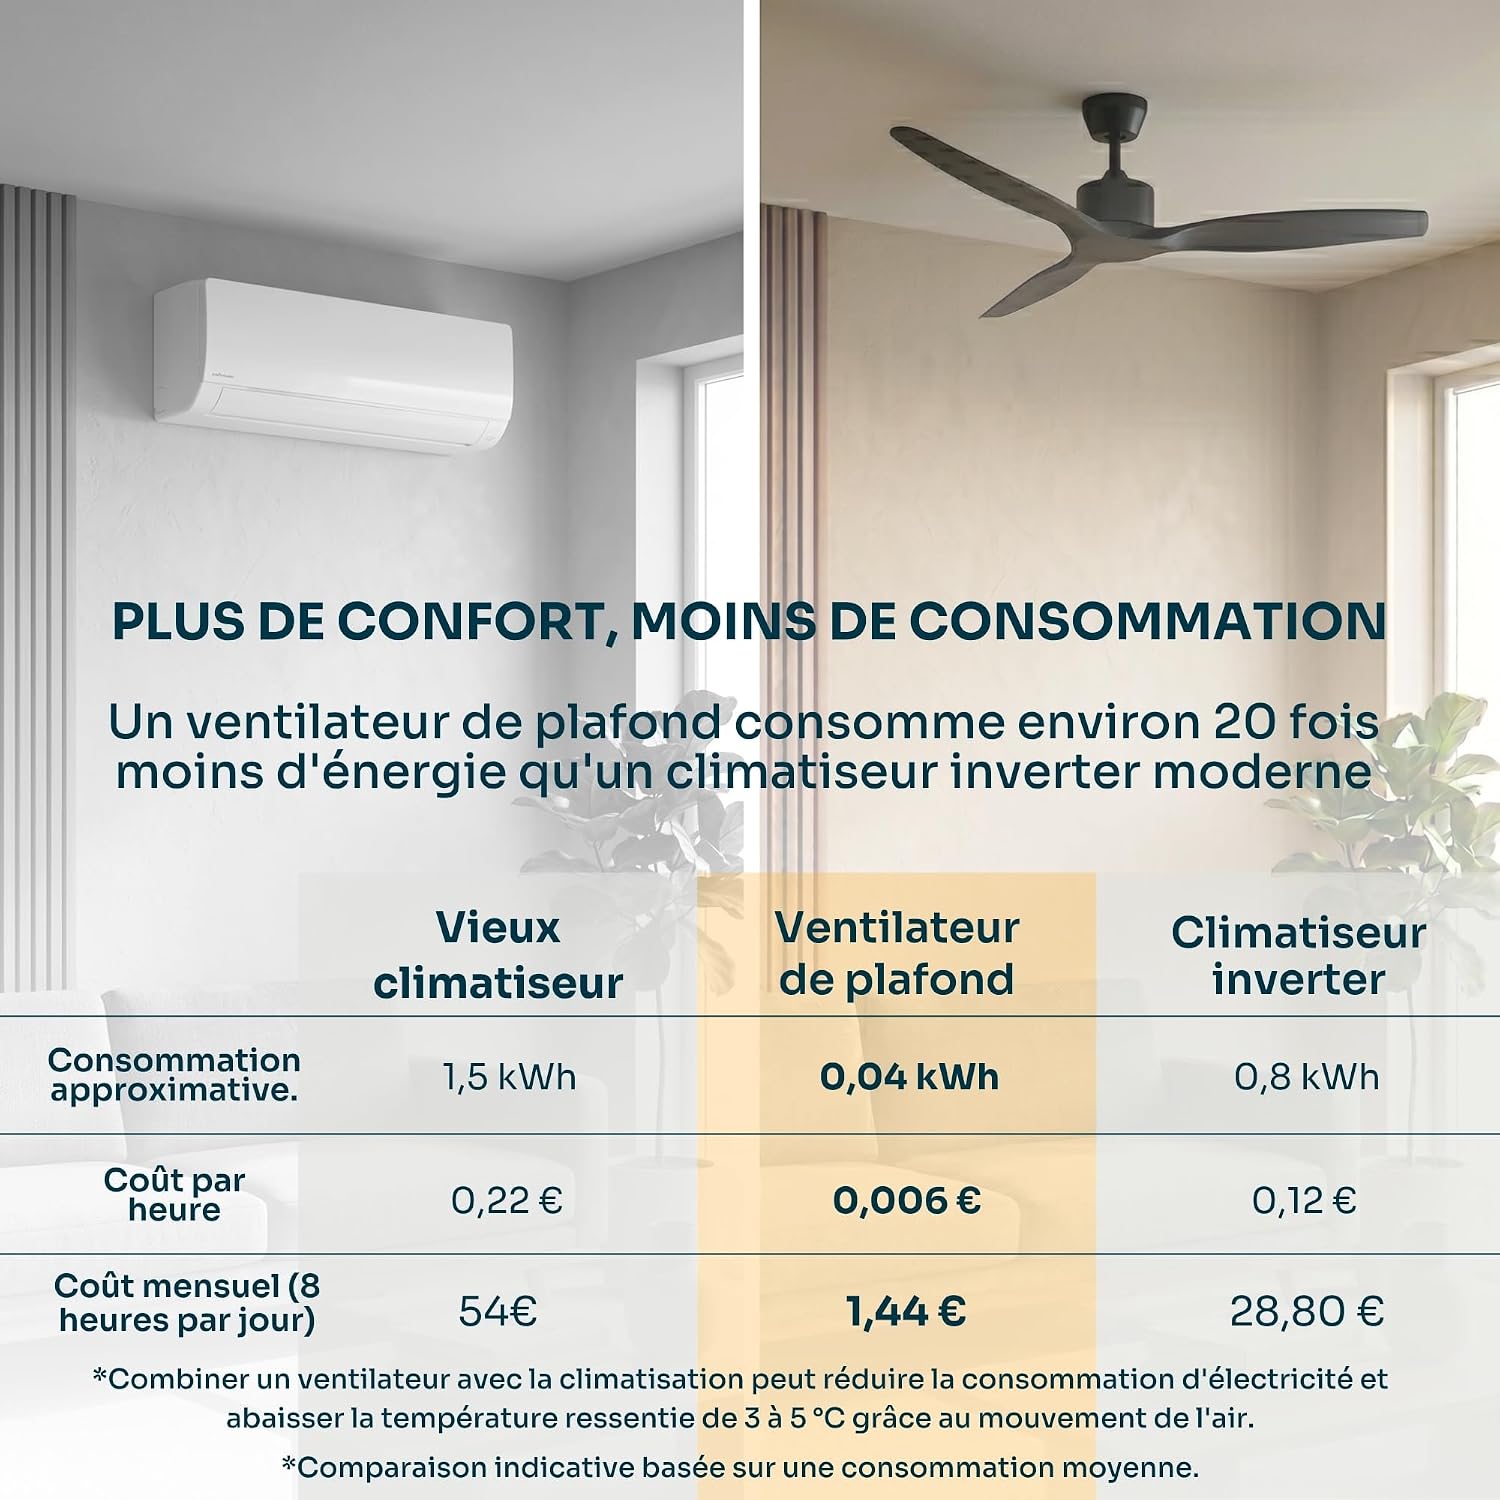
Figure 7: Energy Consumption Comparison. This table illustrates that a ceiling fan consumes significantly less energy than air conditioning units, offering a cost-effective cooling solution.
Warranty and Support
For warranty information and customer support, please refer to the official Mellerware website or contact your retailer. Keep your purchase receipt as proof of purchase.
Manufacturer: Mellerware
Contact: Please visit www.mellerware.com for support and contact details.


