1. Introduction
This manual provides comprehensive instructions for the proper use and maintenance of your Bestol R05/BGE A/C Controller. This remote control is designed as a replacement for various Midea and Fantasia air conditioning units, including specific models such as R05/BGE, RM05/BG(T)E-A, and R05/BGCE. Please read this manual thoroughly before operating the device to ensure optimal performance and longevity.
2. Product Overview
The Bestol R05/BGE A/C Controller is an ergonomic infrared remote designed for intuitive control of your air conditioning unit. It features a clear LCD display and clearly labeled buttons for various functions.

Image: Front view of the Bestol R05/BGE A/C remote control, showing the display and main control buttons.
Button Functions:
- Power Button (Red): Turns the air conditioner On or Off.
- Mode Button (M): Cycles through operating modes (Auto, Cool, Dry, Heat, Fan).
- Temperature Adjustment Buttons (Up/Down Arrows): Increases or decreases the set temperature.
- Fan Speed Button: Adjusts the fan speed (Auto, Low, Medium, High).
- Swing Button: Controls the air conditioner's louver swing function.
- Timer On/Off Buttons: Sets the timer for automatic power on or off.
- Clock Button: Sets the current time on the remote's display.
- ECO Button: Activates energy-saving mode (if supported by your A/C unit).
- Reset/Lock/CH Button: Multi-function button for resetting settings, locking controls, or changing channels (refer to your A/C unit's manual for specific compatibility).
3. Setup
Battery Installation:
The Bestol R05/BGE A/C Controller requires two AAA batteries (not included). Ensure correct polarity when inserting the batteries.
- Locate the battery compartment on the back of the remote control.
- Slide the battery compartment cover downwards to open it.
- Insert two AAA batteries, matching the (+) and (-) terminals as indicated inside the compartment.
- Slide the battery compartment cover back into place until it clicks securely.
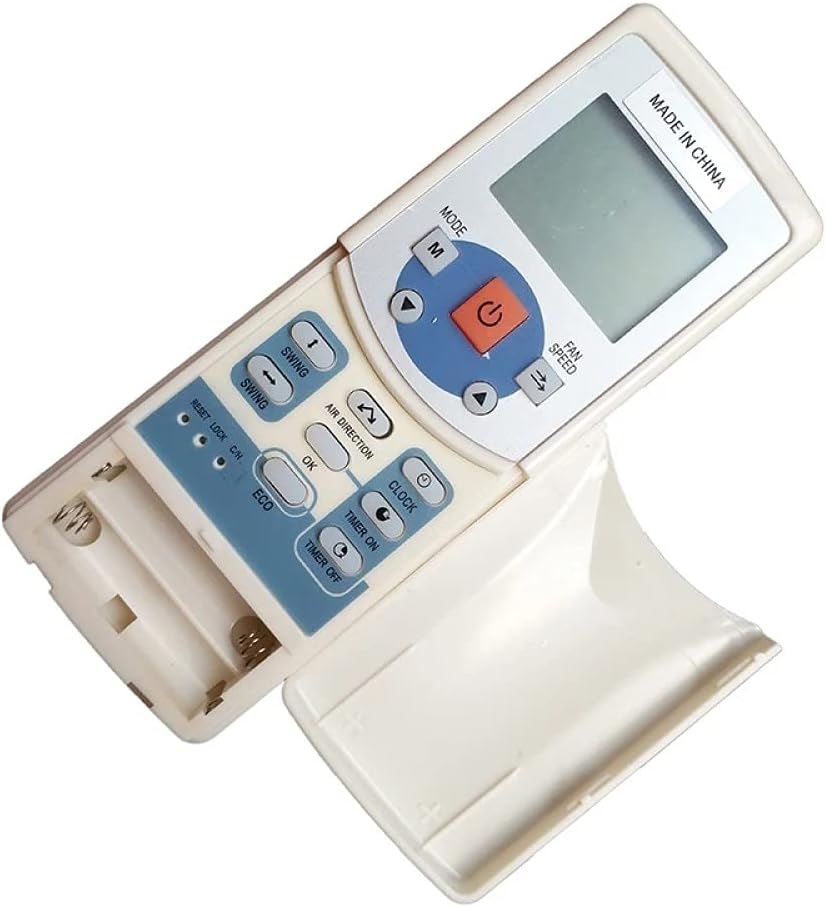
Image: Back view of the remote control with the battery compartment open, showing where to insert AAA batteries.
Note: If the remote control will not be used for an extended period, remove the batteries to prevent leakage and damage.
4. Operating Instructions
Point the remote control directly at the air conditioner's receiver when operating. Ensure there are no obstructions between the remote and the unit.
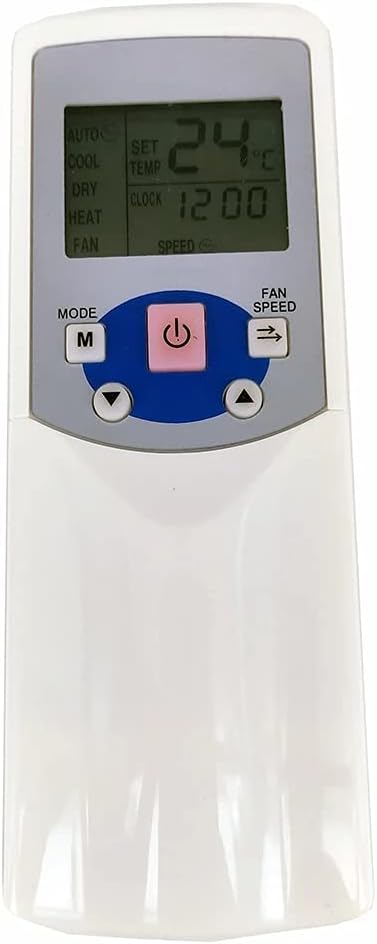
Image: Close-up of the remote control's display, showing typical temperature and clock settings, along with the main control buttons.
Basic Operation:
- Power On/Off: Press the Power button once to turn the unit on, and again to turn it off.
- Selecting Mode: Press the MODE (M) button repeatedly to cycle through the available operating modes: AUTO → COOL → DRY → HEAT → FAN.
- Adjusting Temperature: Use the Up/Down Arrow buttons to set your desired temperature. The temperature range is typically between 16°C and 30°C (60°F and 86°F).
- Adjusting Fan Speed: Press the FAN SPEED button to select the desired fan speed: AUTO → LOW → MEDIUM → HIGH.
- Setting Swing: Press the SWING button to activate or deactivate the automatic louver swing function.
Advanced Functions:
- Timer On/Off: Press the TIMER ON or TIMER OFF button, then use the temperature adjustment arrows to set the desired time. Press the button again to confirm.
- Setting Clock: Press the CLOCK button, use the temperature adjustment arrows to set the current time, then press CLOCK again to confirm.
- ECO Mode: Press the ECO button to activate an energy-saving mode. This mode typically adjusts the temperature automatically to optimize energy consumption. Press again to deactivate.
5. Maintenance
To ensure the longevity and proper functioning of your remote control, follow these simple maintenance guidelines:
- Cleaning: Wipe the remote control with a soft, dry cloth. Do not use liquid cleaners, abrasive cleaners, or chemical solvents, as these can damage the surface or internal components.
- Battery Replacement: Replace batteries when the display becomes dim or the remote's range decreases. Always replace both batteries at the same time with new ones of the same type.
- Storage: If the remote will not be used for an extended period, remove the batteries to prevent corrosion from battery leakage. Store the remote in a cool, dry place away from direct sunlight.
- Avoid Drops: Protect the remote from physical impact, as drops can damage internal circuitry or the LCD screen.
6. Troubleshooting
If you experience issues with your Bestol R05/BGE A/C Controller, refer to the following common problems and solutions:
- Remote not responding:
- Check if the batteries are inserted correctly with the correct polarity.
- Replace old batteries with new ones.
- Ensure there are no obstructions between the remote and the air conditioner's receiver.
- Confirm you are within the effective operating range (typically up to 8 meters).
- Display is dim or blank:
- Batteries are low or depleted. Replace them.
- Air conditioner not responding to specific functions:
- Ensure your air conditioner model supports the specific function (e.g., ECO mode, advanced timer settings). Refer to your A/C unit's original manual.
- Some functions may require specific operating modes (e.g., heating functions only available in Heat mode).
If the problem persists after trying these solutions, please contact the seller for further assistance.
7. Specifications

Image: Back view of the remote control, highlighting the label with model type and rated voltage information.
| Feature | Detail |
|---|---|
| Model | R05/BGE (also compatible with RM05/BG(T)E-A, R05/BGCE) |
| Brand | Bestol |
| Compatible Devices | Midea Fantasia Air Conditioners |
| Connectivity Technology | Infrared |
| Power Supply | 2 x AAA Batteries (Not Included) |
| Rated Voltage | 3VDC |
| Item Weight | 2.78 ounces (approx. 79 grams) |
| Package Dimensions | 6.54 x 2.68 x 0.91 inches (approx. 16.6 x 6.8 x 2.3 cm) |
| Special Feature | Ergonomic Design |
8. Warranty and Support
As this product is a replacement part, specific warranty terms may vary. For any questions regarding product functionality, compatibility, or to report a defect, please contact the seller directly through your purchase platform. Retain your proof of purchase for any support inquiries.


