
1. Product Overview
The ACEIRMC ESP8266 NodeMcu V3 Lua WiFi Development Board is a versatile module designed for Internet of Things (IoT) applications. It integrates the powerful ESP8266 microcontroller (ESP-12E) with 802.11 b/g/n WLAN capabilities and an integrated 25dBm antenna. This board is compatible with various development environments, including Arduino IDE and MicroPython, and features an upgraded CH340 serial chip for reliable communication.
Key features include:
- Integrated ESP8266 (ESP-12E) microcontroller with Wi-Fi.
- Upgraded CH340 serial chip for stable USB-to-serial communication.
- 4MB (32Mbit) flash memory for program storage.
- Support for Lua-Script, Arduino code, and Node.js API for flexible programming.
- Breadboard-optimized construction with 23 mm pin spacing.
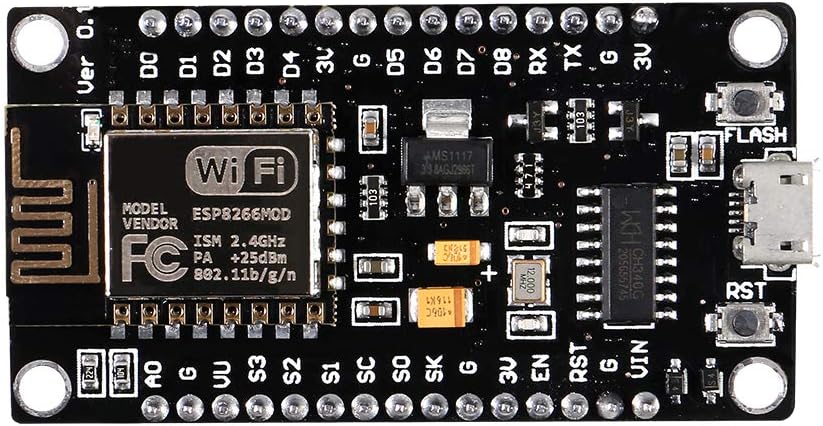
Figure 1: Top view of the ESP8266 NodeMcu V3 Development Board.
2. Setup Instructions
2.1 Driver Installation (CH340)
Before connecting the board, ensure the CH340 serial driver is installed on your computer. This driver facilitates communication between your computer and the ESP8266 board via the USB port.
- Download the CH340 Driver: Obtain the latest CH340 driver for your operating system (Windows, macOS, Linux) from a reliable source, such as the manufacturer's website or a reputable electronics hobby site (e.g., SparkFun's CH340 tutorial page).
- Install the Driver: Follow the installation instructions provided with the driver package. On Windows, this often involves running an executable file and clicking "Install." If you encounter issues, try uninstalling any previous CH340 drivers before reinstalling.
- Verify Installation: After installation, connect the ESP8266 board to your computer using a micro-USB cable. Open your computer's Device Manager (Windows) or check system information (macOS/Linux) to confirm that the CH340 (or USB-SERIAL CH340) device is recognized under "Ports (COM & LPT)" or similar.
2.2 Connecting the Board
Use a standard micro-USB cable to connect the ESP8266 NodeMcu V3 board to a USB port on your computer. The board will draw power from the USB connection.

Figure 2: ESP8266 NodeMcu V3 board connected via micro-USB.
2.3 Development Environment Setup
The ESP8266 NodeMcu V3 supports various development environments:
- Arduino IDE:
- Install the Arduino IDE.
- Add the ESP8266 board manager URL to Arduino IDE Preferences.
- Install the "ESP8266 by ESP8266 Community" board package from the Boards Manager.
- Select "NodeMCU 1.0 (ESP-12E Module)" from the Tools > Board menu.
- Choose the correct COM port for your board.
- NodeMCU Lua Firmware: The board comes pre-flashed with NodeMCU firmware, allowing programming using Lua scripts. Refer to the official NodeMCU documentation for details on using ESPlorer or other Lua development tools.
- MicroPython: The board can be flashed with MicroPython firmware. Instructions for flashing and using MicroPython can be found on the official MicroPython website.
3. Operating the Board
3.1 Pinout Diagram
Understanding the pinout is crucial for connecting sensors, actuators, and other components to your ESP8266 board.

Figure 3: ESP8266 NodeMcu V3 Pinout Diagram.
Refer to the diagram for specific pin functions, including General Purpose Input/Output (GPIO), power (3.3V, 5V, GND), and communication interfaces (UART, SPI, I2C).
3.2 Basic Programming and Uploading
Once your development environment is set up, you can write and upload code to the board.
- Writing Code: Develop your application using Lua, Arduino C++, or MicroPython.
- Compiling/Flashing: Use the respective IDE or toolchain to compile your code and flash it onto the ESP8266 board. Ensure the correct board and port are selected.
- Serial Monitor: Utilize the serial monitor in your IDE to view debug messages and interact with the board. Set the baud rate to 9600bps or as specified in your code.
3.3 Wi-Fi Connectivity
The ESP8266 is designed for Wi-Fi connectivity. Your code will typically include functions to connect to a Wi-Fi network (STA mode) or create its own access point (AP mode).
- Station Mode (STA): Connects the ESP8266 to an existing Wi-Fi network.
- Access Point Mode (AP): Allows other devices to connect directly to the ESP8266.
- Dual Mode (STA+AP): Operates as both a station and an access point simultaneously.
4. Maintenance
To ensure the longevity and reliable operation of your ESP8266 NodeMcu V3 board, follow these general maintenance guidelines:
- Handle with Care: Electronic components are sensitive. Avoid dropping the board or applying excessive force.
- Keep Dry: Protect the board from moisture and liquids, which can cause short circuits and damage.
- Cleanliness: Keep the board free from dust and debris. Use a soft, dry brush or compressed air for cleaning if necessary.
- Proper Storage: When not in use, store the board in an anti-static bag or a protective enclosure to prevent electrostatic discharge (ESD) damage.
- Power Supply: Always use a stable 5V power supply via the micro-USB port. Avoid using the VIN pin for power if possible, as some users have reported issues with it.
5. Troubleshooting
- Board Not Recognized / Upload Fails:
- CH340 Driver: Ensure the CH340 driver is correctly installed and updated. On Windows, try uninstalling and reinstalling the driver.
- USB Cable: Use a high-quality micro-USB data cable. Some cables are for charging only and do not support data transfer.
- COM Port: Verify that the correct COM port is selected in your IDE.
- Board Selection: Confirm that "NodeMCU 1.0 (ESP-12E Module)" is selected as the board type in Arduino IDE.
- Reset/Flash Buttons: For some uploads, you might need to press and hold the "FLASH" button, then press "RST" briefly, and release "FLASH" when the upload starts.
- Wi-Fi Connectivity Issues:
- Credentials: Double-check your Wi-Fi SSID and password in your code.
- Signal Strength: Ensure the board is within range of your Wi-Fi router.
- Power Supply: Insufficient power can lead to unstable Wi-Fi. Ensure a stable 5V supply.
- Reset: Sometimes a simple reset of the board can resolve temporary Wi-Fi issues.
- Board Malfunctions After Using 5V VIN Pin:
- It has been reported that some boards may experience issues when powered via the 5V VIN pin. It is recommended to power the board primarily through the micro-USB port.
6. Specifications
| Feature | Specification |
|---|---|
| Brand | ACEIRMC |
| Model Name | ESP8266 Serial Wireless Module ESP-12E |
| Microcontroller | ESP8266 (ESP-12E) |
| Flash Memory Capacity | 4 MB (32 Mbit) |
| Processor Speed | 80 MHz |
| Connectivity Technology | GPIO, Wi-Fi |
| Wireless Compatibility | 802.11b/g/n |
| USB-to-Serial Chip | CH340 |
| Total USB Ports | 1 (Micro-USB) |
| Compatible Devices | Arduino-compatible devices |
| Dimensions (Approx.) | 2.36 in (Length) x 1.25 in (Width) x 0.47 in (Height) |

Figure 4: ESP8266 NodeMcu V3 with approximate dimensions.
7. Warranty and Support
7.1 Warranty Information
This product is typically covered by a standard return policy. For specific warranty details, please refer to the purchase platform or contact the seller directly. Generally, products can be returned within 30 days for a refund or replacement if defective.
7.2 Technical Support
For technical assistance, programming guides, or further documentation, please refer to the following resources:
- Online Communities: Forums and communities dedicated to ESP8266, NodeMCU, Arduino, and MicroPython offer extensive support and project examples.
- Official Documentation: Consult the official documentation for ESP8266, NodeMCU firmware, Arduino IDE, and MicroPython for in-depth information.
- Seller Support: If you have specific issues related to the hardware or your purchase, contact ACEIRMC customer support through the platform where the product was purchased.