1. Introduction
Thank you for choosing the M LTMIRROR 24-Inch LED Round Bathroom Mirror. This mirror is designed to enhance your bathroom experience with its integrated LED lighting, anti-fog function, and smart touch controls. It features a fully enclosed structure for durability and safety, and offers three light color settings with dimmable brightness. This manual provides essential information for safe installation, operation, and maintenance of your new mirror.

M LTMIRROR 24-inch LED Round Bathroom Mirror installed above a vanity.
2. Safety Information
Please read all instructions carefully before installation and use. Keep this manual for future reference.
- Ensure the power supply is disconnected before installation or maintenance.
- Installation should be performed by a qualified electrician if hardwiring is chosen.
- Do not attempt to disassemble or modify the mirror.
- Keep the mirror away from excessive moisture or direct water spray.
- Handle the mirror with care to prevent damage to the glass or electrical components.
3. Setup and Installation
The M LTMIRROR LED Round Bathroom Mirror can be installed via plug-in or hardwired connection.
3.1 Mounting the Mirror
The mirror is designed for wall mounting. Ensure the wall can support the mirror's weight (approximately 10.8 pounds for the 24-inch model). Use appropriate wall anchors and screws for secure installation.
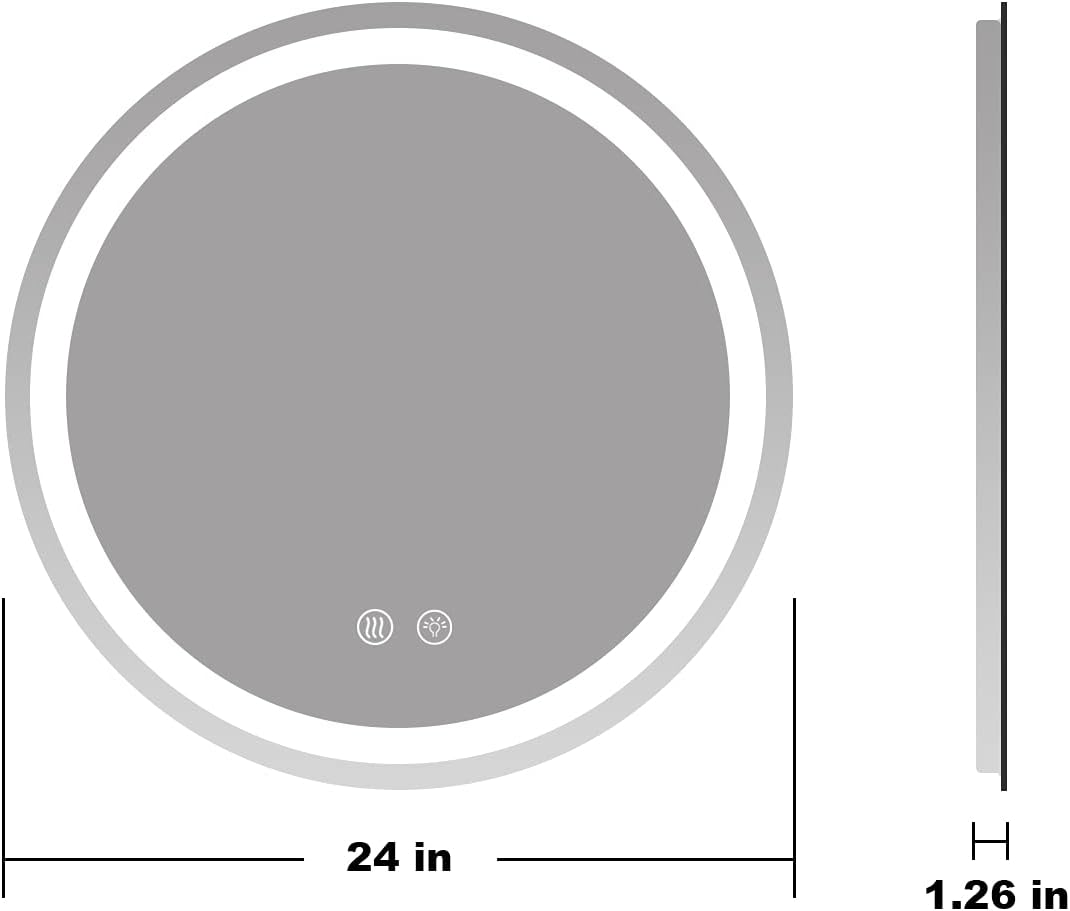
Technical drawing of the 24-inch round mirror, indicating its diameter and a thickness of 1.26 inches.
3.2 Electrical Connection
The mirror supports both plug-in and hardwire options. For hardwiring, consult a qualified electrician to ensure proper and safe connection to your home's electrical system.

Diagram showing two installation options: plug-in with a visible cord and hardwire installation where the cord is connected directly to electrical wiring.
3.3 Wall Switch Control
The mirror can be controlled directly by a wall switch. When connected to a wall switch, the mirror will remember its last state (light and defogger settings) when turned on/off via the wall switch.

Illustration showing the mirror's compatibility with a wall switch for power control, with a UL certification logo.
This video demonstrates turning the mirror's light on and off using a wall switch, and also shows the fully enclosed structure and uniform front illumination.
4. Operating Instructions
The mirror features intuitive touch buttons for controlling its functions.
4.1 Power On/Off and Color Temperature Adjustment
Locate the touch button on the mirror surface. A short press will cycle through the three available light color temperatures: Warm (3000K), Natural, and White (6000K). Pressing the button again after White will turn the light off.

Diagram illustrating the three color temperature settings (Warm, Natural, White) available on the mirror, ranging from 3000K to 6000K.
4.2 Brightness Dimming
To adjust the brightness, long press the touch button. The brightness will cycle between 10% and 100%. Release the button when the desired brightness level is reached.
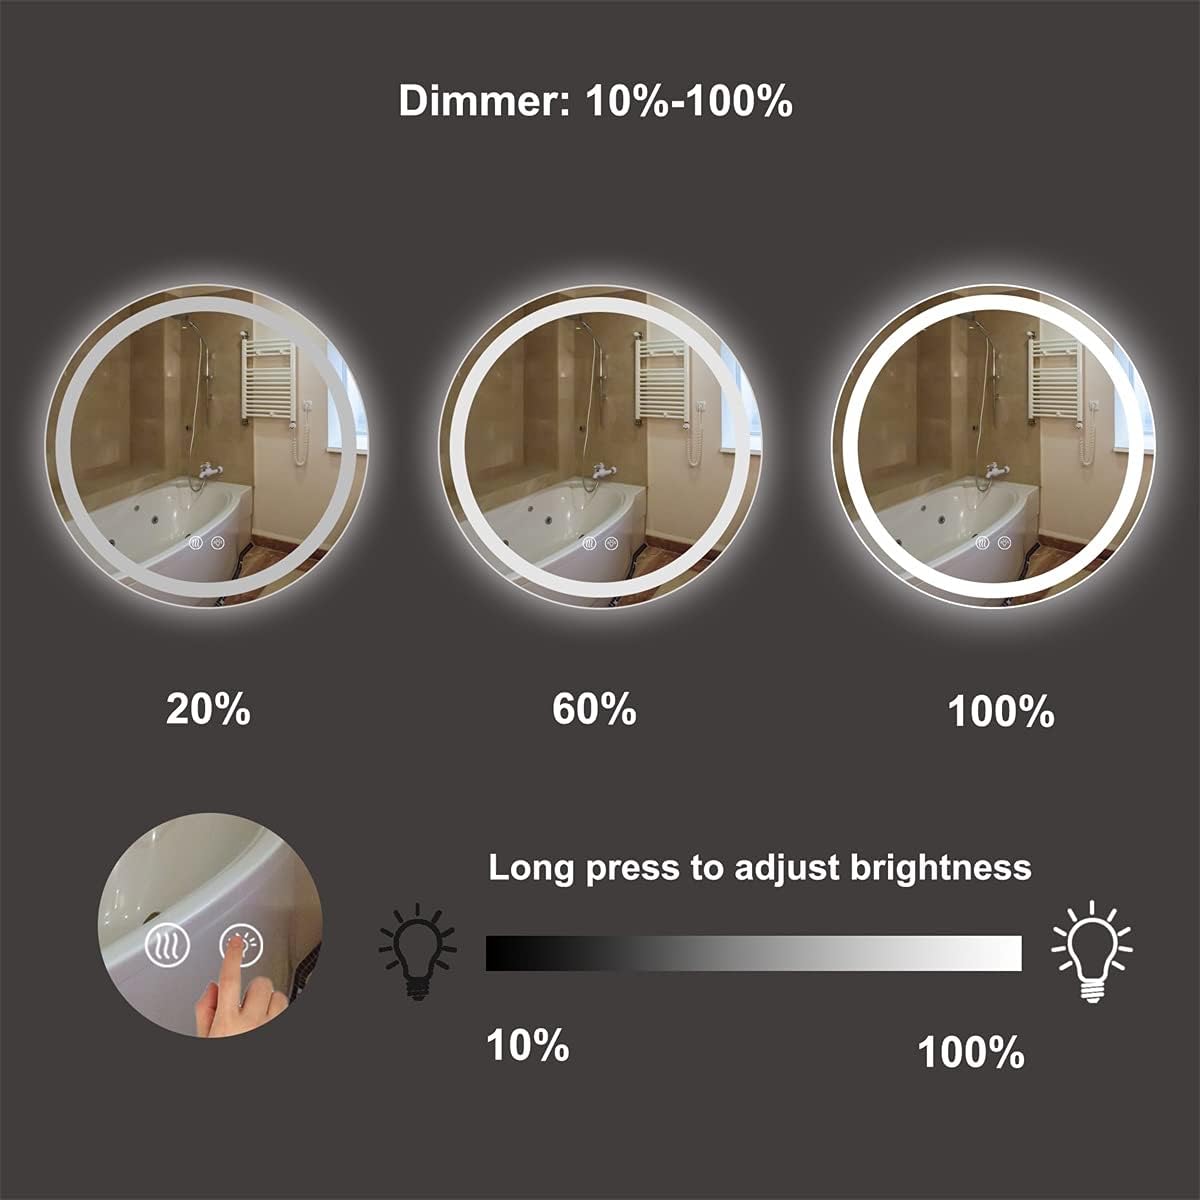
Diagram demonstrating the dimming functionality of the mirror, allowing brightness adjustment from 10% to 100% via a long press on the touch button.
4.3 Anti-Fog Function
Activate the anti-fog function by pressing the dedicated defogger touch button on the mirror surface. This feature prevents steam buildup, ensuring a clear reflection after hot showers. Press the button again to turn off the defogger.

Before and after comparison of the mirror surface, showing effective anti-fogging after a hot shower, activated by a touch button.
This video demonstrates the mirror's touch button controls for adjusting light color and brightness, and activating the anti-fog function.
5. Maintenance
To ensure the longevity and optimal performance of your M LTMIRROR LED Round Bathroom Mirror, follow these maintenance guidelines:
- Cleaning the Mirror Surface: Use a soft, lint-free cloth and a non-abrasive glass cleaner. Spray the cleaner onto the cloth, not directly onto the mirror, to avoid liquid seeping into the electrical components.
- Cleaning the Frame: Wipe the frame with a soft, damp cloth. Avoid harsh chemicals or abrasive materials that could damage the finish.
- Electrical Components: Do not attempt to clean or service any internal electrical components. If you suspect an issue, contact customer support.
- Regular Inspection: Periodically check the mounting hardware to ensure the mirror remains securely attached to the wall.
6. Troubleshooting
If you encounter any issues with your mirror, please refer to the following troubleshooting steps:
| Problem | Possible Cause | Solution |
|---|---|---|
| Mirror lights do not turn on. | No power supply; loose connection; faulty wall switch. | Check if the power outlet is working or if the wall switch is on. Verify electrical connections are secure. If hardwired, consult an electrician. |
| Lights turn off randomly or change colors by themselves. | Electrical interference; internal component issue. | Ensure stable power supply. If the issue persists, contact customer support. |
| Mirror does not remember last settings when using a wall switch. | Power interruption; specific wiring configuration. | Ensure consistent power supply. Some wall switch types may interfere with memory function. If hardwired, consult an electrician to verify wiring. |
| Anti-fog function is not working. | Defogger not activated; internal fault. | Ensure the defogger touch button has been pressed. If activated and still not working, contact customer support. |
7. Specifications
| Feature | Detail |
|---|---|
| Brand | M LTMIRROR |
| Model | 24 Inch LED Round Bathroom Mirror |
| Shape | Round |
| Product Dimensions | 24"L x 24"W |
| Thickness | 1.26 inches |
| Frame Material | Acrylonitrile Butadiene Styrene (ABS) |
| Mounting Type | Wall Mount |
| Special Features | 3 color setting and dimmable, Moisture Resistant, Touch Sensor, Fully Enclosed Structure, Wall Switch Control, Anti-Fog |
| Material | Glass |
| Item Weight | 10.8 Pounds |
| UPC | 792871734725 |
8. Warranty and Support
For warranty information or technical support, please refer to the product packaging or contact the retailer where the product was purchased. Keep your proof of purchase for any warranty claims.


