1. Introduction
This manual provides comprehensive instructions for the safe and correct installation, operation, and maintenance of the KASINGS Oven Range Infinite Switch Replacement, model JCEC20210402. Please read this manual thoroughly before beginning any work to ensure proper function and to prevent potential hazards. Keep this manual for future reference.
2. Product Overview
The KASINGS Oven Range Infinite Switch is a replacement component designed to restore proper heat control to your electric oven or range burner. This switch regulates the power supplied to the heating element, allowing for variable temperature settings from low to high. It is compatible with various oven models, including but not limited to:
- JB645RK4SS
- JB645RK5SS
- JB650DF5BB
- JB650DF5CC
- JB650DF5WW
- JB650EF5ES
- JB650SF5SS
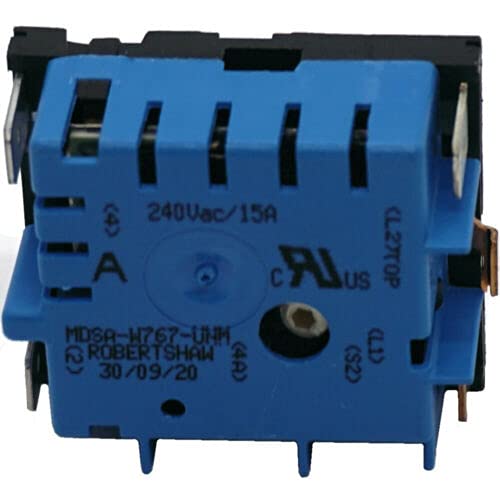
Figure 2.1: KASINGS Oven Range Infinite Switch Replacement. This image shows the general appearance of the replacement infinite switch, which is crucial for controlling the heat of an oven or range burner.
3. Safety Information
WARNING: Electrical shock hazard. Disconnect power before servicing. Failure to do so can result in serious injury or death.
- Always disconnect the appliance from its power source (unplug or turn off circuit breaker) before attempting any installation, maintenance, or repair.
- Wear appropriate personal protective equipment, including safety glasses and gloves.
- If you are not experienced with electrical repairs, it is recommended to seek assistance from a qualified appliance technician.
- Ensure all wiring connections are secure and correctly matched to prevent electrical shorts or malfunctions.
- Do not operate the appliance if any wiring is exposed or damaged.
4. Installation Instructions
Follow these steps carefully to replace the infinite switch in your oven range.
4.1. Tools Required
- Screwdriver (Phillips and/or Flathead)
- Nut driver or Wrench set
- Needle-nose pliers
- Wire strippers (if new terminals are needed)
- Multimeter (optional, for testing)
4.2. Preparation
- Disconnect Power: Locate the circuit breaker for your oven range and turn it OFF. Verify power is off by attempting to turn on a burner.
- Access the Control Panel: Depending on your oven model, you may need to remove screws from the back panel or the front control panel to gain access to the infinite switches.
- Document Wiring: Before disconnecting any wires, take a clear photograph of the existing wiring connections on the old infinite switch. This will serve as a crucial reference for connecting the new switch. Alternatively, label each wire with tape corresponding to its terminal on the old switch.
4.3. Removing the Old Switch
- Disconnect Wires: Carefully pull each wire off its terminal on the old switch. Use needle-nose pliers if terminals are tight.
- Remove Mounting Screws: Unscrew the mounting screws or nuts that secure the infinite switch to the control panel.
- Remove Old Switch: Gently pull the old switch out from the control panel.
4.4. Installing the New Switch
- Position New Switch: Insert the new KASINGS infinite switch into the opening in the control panel, ensuring the shaft aligns correctly with the knob opening.
- Secure New Switch: Fasten the new switch with the mounting screws or nuts removed earlier. Ensure it is securely in place.
- Connect Wires: Refer to your photograph or labels and connect each wire to the corresponding terminal on the new infinite switch. Ensure all connections are firm and fully seated.
4.5. Post-Installation
- Reassemble Control Panel: Carefully reattach the control panel or back panel, ensuring no wires are pinched.
- Restore Power: Turn the circuit breaker for your oven range back ON.
- Test Functionality: Test each burner controlled by the newly installed switch to ensure it heats up correctly and responds to the knob's settings (low, medium, high).
5. Operating Instructions
The infinite switch itself does not have direct user-facing controls beyond its connection to the oven's control knob. Once installed, its operation is integrated into the standard use of your oven range:
- Turn the corresponding burner knob to the desired heat setting (e.g., Low, Medium, High).
- The infinite switch will regulate the power to the heating element, cycling it on and off to maintain the selected heat level.
- For precise temperature control, refer to your oven range's original user manual.
6. Maintenance
The KASINGS Oven Range Infinite Switch is designed for durability and typically requires minimal maintenance after proper installation.
- Regular Inspection: Periodically, when the appliance is disconnected from power, inspect the wiring connections to the switch for any signs of loosening, corrosion, or damage.
- Cleaning: Keep the area around the control panel and switches clean and free from grease or debris. Use a mild, non-abrasive cleaner and a soft cloth. Ensure the appliance is unplugged before cleaning.
- Avoid Over-tightening: When reassembling, do not overtighten screws, as this can damage components or the control panel.
7. Troubleshooting
If you encounter issues after replacing the infinite switch, consider the following common troubleshooting steps:
| Problem | Possible Cause | Solution |
|---|---|---|
| Burner does not heat up. |
|
|
| Burner heats only on high or low, no variable control. |
|
|
| Burner stays on after turning knob off. |
|
|
If these steps do not resolve the issue, it is recommended to consult a qualified appliance technician.
8. Specifications
| Attribute | Detail |
|---|---|
| Brand | KASINGS |
| Model Number | JCEC20210402 |
| Part Number | JCEC20269200004 |
| ASIN | B092W7LFLL |
| Compatibility | Compatible with various oven models including JB645RK4SS, JB645RK5SS, JB650DF5BB, JB650DF5CC, JB650DF5WW, JB650EF5ES, JB650SF5SS. |
9. Warranty Information
This KASINGS Oven Range Infinite Switch Replacement comes with a Fit and Function Guarantee. This ensures that the part will fit the specified models and perform its intended function upon proper installation. For specific details regarding warranty claims or returns, please refer to the purchase documentation or contact the seller directly.
10. Support
For further assistance, technical questions, or if you require support beyond the scope of this manual, please contact the seller or a qualified appliance repair professional. When contacting support, please have your product model number (JCEC20210402) and purchase information readily available.