1. Introduction
The Retevis RA619 is a versatile two-way radio designed for reliable communication in various outdoor and recreational settings. It features a compact design, Bluetooth headset compatibility, multiple charging options, and essential safety functions like vibration alerts and an SOS button. This manual provides detailed instructions for the proper setup, operation, and maintenance of your RA619 walkie talkie.

Image 1.1: The Retevis RA619 walkie talkie with its included Bluetooth headset, showcasing its compact design and accessories.
2. What's in the Box
Upon unpacking your Retevis RA619 walkie talkie, please verify that all the following items are included:
- 2x Retevis RA619 Bluetooth Walkie Talkie
- 2x Wireless Bluetooth Headset
- 2x Charging Dock
- 2x USB Charging Cable
- 2x Battery Cover with Li-ion Battery
- 1x User Manual

Image 2.1: A visual representation of all components included in the Retevis RA619 walkie talkie package.
3. Product Overview
Familiarize yourself with the various parts and controls of your Retevis RA619 walkie talkie.

Image 3.1: Detailed diagram illustrating the physical components and control buttons of the RA619 walkie talkie and its Bluetooth headset.
3.1 Walkie Talkie Components
- Antenna: For transmitting and receiving signals.
- Torch Light: Integrated LED flashlight for illumination.
- Volume Knob: Rotates to adjust speaker volume and powers the unit on/off.
- LCD Display: Shows channel number, battery status, and feature indicators.
- Speaker/Microphone Jacks: For external audio accessories.
- PTT Button (Push-to-Talk): Press and hold to transmit your voice.
- Mode Button: Cycles through different operating modes.
- Menu Button: Accesses settings and options.
- Up/Down Buttons: Navigate menus and adjust settings (e.g., channel selection).
- Monitor Button (MON): Temporarily disables squelch to listen for weak signals.
- Call Button: Initiates a call tone.
- SOS Button: Activates emergency alarm function.
- Speaker: For audio output.
3.2 Bluetooth Headset Components
- High Volume Button: Increases headset volume.
- Low Volume Button: Decreases headset volume.
- ON/OFF Switch: Powers the headset on or off.
- PTT Button: Activates transmission when connected to the walkie talkie.
4. Setup
4.1 Battery Installation and Charging
The RA619 walkie talkie offers flexible power options, including a rechargeable lithium-ion battery and compatibility with AA batteries.
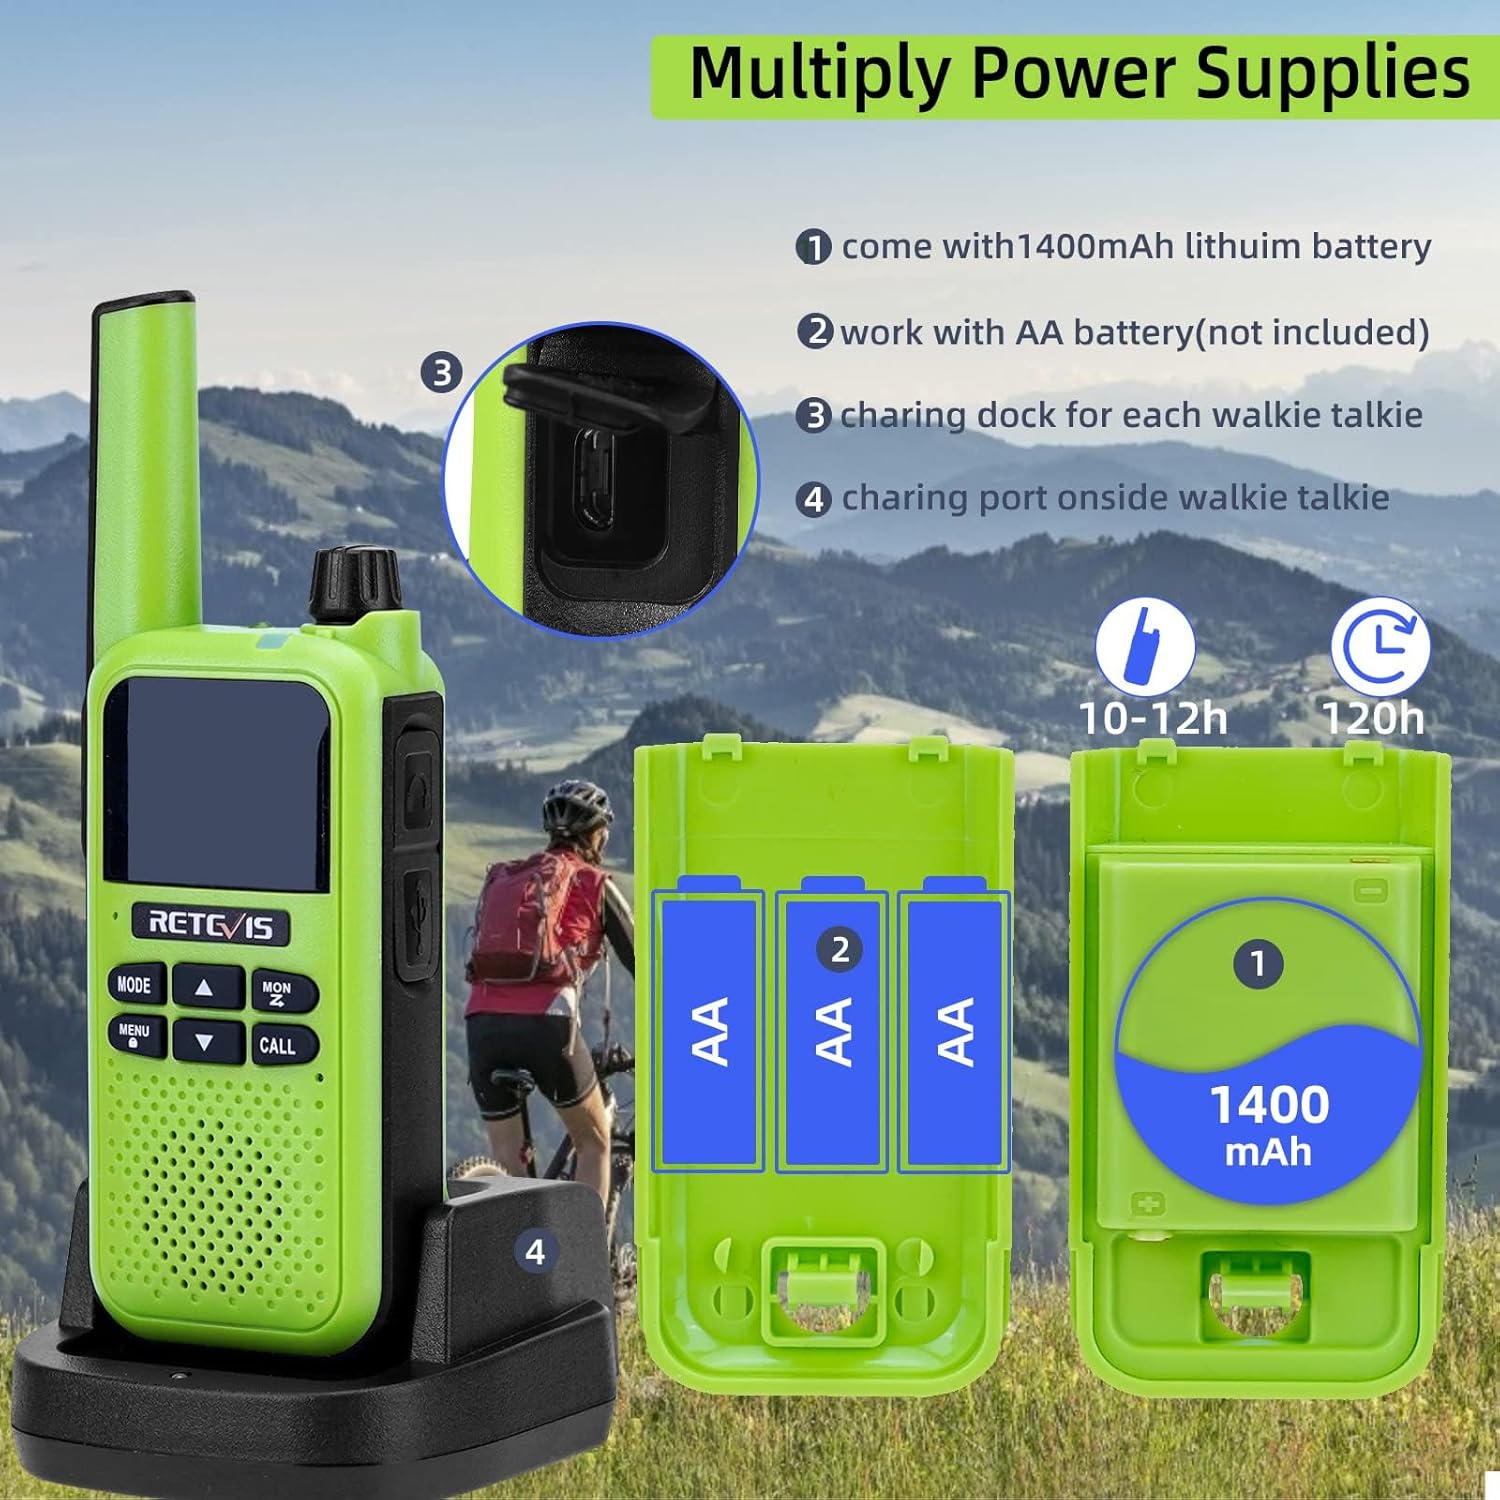
Image 4.1: Illustration of the various power supply methods for the RA619, including the 1400mAh lithium battery, AA battery compartment, charging dock, and micro USB port.
- Lithium-Ion Battery: The walkie talkie comes with a 1400mAh lithium-ion battery pack. Insert this battery into the compartment on the back of the radio and secure it with the provided battery cover.
- AA Batteries (Not Included): Alternatively, you can power the walkie talkie using 3 AA batteries. Open the battery compartment, insert the AA batteries according to the polarity markings, and close the cover.
- Charging via Dock: Place the walkie talkie into the charging dock. Connect the USB charging cable to the dock and a suitable USB power source. The charging indicator will show the charging status.
- Charging via Micro USB: For direct charging, connect the micro USB charging cable to the port on the side of the walkie talkie and a USB power source.
A full charge typically takes 10-12 hours and provides approximately 120 hours of standby time.
5. Operating Instructions
5.1 Power On/Off and Volume Adjustment
- To power on the walkie talkie, rotate the Volume Knob clockwise until you hear a click.
- To power off, rotate the Volume Knob counter-clockwise until you hear a click.
- Adjust the volume by rotating the Volume Knob clockwise to increase and counter-clockwise to decrease.
5.2 Channel Selection
The RA619 supports 16 channels for communication.
- Press the MENU button to enter the menu.
- Use the UP or DOWN arrow buttons to navigate to the channel selection option.
- Press MENU again to select the channel.
- Use the UP or DOWN arrow buttons to choose your desired channel (1-16).
- Press MENU to confirm your selection, then press MODE to exit the menu.
5.3 Push-to-Talk (PTT) Communication
- Ensure both walkie talkies are on the same channel.
- Press and hold the PTT button on the side of the walkie talkie.
- Speak clearly into the microphone.
- Release the PTT button to listen for a response.
5.4 VOX (Voice Operated Exchange) Function
The VOX function allows for hands-free communication, activating transmission when it detects your voice.

Image 5.1: A user on a motorcycle communicating hands-free, demonstrating the VOX feature of the RA619 walkie talkie.
- To activate VOX, press the MENU button, navigate to the VOX setting, and select your desired sensitivity level.
- When using a headset, ensure VOX is enabled on the walkie talkie for hands-free operation.
5.5 Bluetooth Headset Pairing
The RA619 walkie talkie can be paired with the included Bluetooth headset for wireless communication.

Image 5.2: A Retevis RA619 walkie talkie and its Bluetooth headset, with a background depicting outdoor activity, highlighting its hands-free capability.

Image 5.3: Visual guide demonstrating the simple steps to pair the RA619 walkie talkie with its Bluetooth headset by pressing the dedicated Bluetooth button.
- Ensure both the walkie talkie and the Bluetooth headset are powered on.
- Press and hold the Bluetooth button on the side of the walkie talkie until the pairing indicator flashes.
- The headset should automatically connect. A confirmation tone or indicator light will signal a successful connection.
5.6 Call Vibration Function
The RA619 features a vibration alert for incoming calls, useful in noisy environments or when discretion is required.

Image 5.4: The RA619 walkie talkie vibrating, indicating an incoming call, useful for discreet alerts in various settings.

Image 5.5: A visual representation of the RA619's vibration alert feature, ensuring notifications are received even in challenging conditions.
To enable or disable the vibration function, access the menu settings and locate the 'Vibration' option.
5.7 SOS Emergency Function
In emergency situations, the SOS function can be activated to alert others.

Image 5.6: Close-up of the RA619 showing the dedicated SOS button and the LED torch button.

Image 5.7: A scenario depicting the use of the RA619's SOS emergency function after an accident, highlighting its safety utility.
Press and hold the dedicated SOS button to activate the emergency alarm. This will transmit an alert signal to other radios on the same channel.
5.8 LED Flashlight
The integrated LED flashlight provides illumination in dark environments.

Image 5.8: The RA619 walkie talkie illuminating a dark camping area with its built-in LED flashlight.
Press the dedicated Torch Light button to turn the flashlight on or off.
5.9 Wireless Copy Function
The wireless copy function allows for quick and simultaneous duplication of settings between multiple RA619 walkie talkies.

Image 5.9: Diagram illustrating the wireless copy function, enabling quick synchronization of settings across multiple RA619 units.

Image 5.10: Two RA619 walkie talkies demonstrating the wireless copy feature, simplifying setup for multiple devices.
Refer to the specific instructions in the full user manual for detailed steps on initiating and completing the wireless copy process.
6. Maintenance
- Cleaning: Use a soft, damp cloth to clean the exterior of the walkie talkie. Avoid using harsh chemicals or abrasive cleaners.
- Storage: Store the walkie talkie in a cool, dry place away from direct sunlight and extreme temperatures when not in use for extended periods. Remove batteries if storing for several months.
- Battery Care: Fully charge the lithium-ion battery before first use. Avoid overcharging or completely draining the battery to prolong its lifespan.
- Water Resistance: Note that the Retevis RA619 is not water resistant. Avoid exposure to rain, splashes, or immersion in water to prevent damage.
7. Troubleshooting
If you encounter issues with your Retevis RA619 walkie talkie, refer to the following common problems and solutions:
| Problem | Possible Cause | Solution |
|---|---|---|
| No power | Battery depleted or incorrectly installed. | Charge the battery or replace AA batteries. Ensure batteries are correctly inserted. |
| Cannot transmit or receive | Incorrect channel, out of range, or low battery. | Verify both radios are on the same channel. Move closer to the other radio. Charge battery. |
| Poor audio quality | Volume too low, interference, or microphone/speaker obstruction. | Adjust volume. Move away from sources of interference. Ensure microphone and speaker are clear. |
| Bluetooth headset not pairing | Headset not in pairing mode or too far from radio. | Ensure headset is on and in pairing mode. Bring headset closer to the walkie talkie. |
If the problem persists after attempting these solutions, please contact Retevis customer support for further assistance.
8. Specifications
| Feature | Detail |
|---|---|
| Model Number | EUA9217BX2 |
| Brand | Retevis |
| Colour | Green |
| Number of Channels | 16 |
| Frequency Range | 446.00625-446.19375 MHz |
| Talking Range Maximum | 1.5 Mile (approximately 2.4 km) |
| Battery Type | 1400mAh Lithium Ion (included) or 3x AA (not included) |
| Voltage | 3.7 Volts |
| Product Dimensions | 3.4D x 5.5W x 15.8H centimetres |
| Weight | 325 g |
| Water Resistance Level | Not Water Resistant |
| Special Features | Call Vibration, Emergency Alarm, Bluetooth Headset, VOX, LED Flashlight, Wireless Copy |
9. Safety Information
- Do not operate the radio in explosive atmospheres (e.g., near flammable gas, dust particles, metallic powders).
- Do not attempt to disassemble or modify the radio. Repairs should only be performed by authorized service personnel.
- Use only approved batteries and chargers to prevent damage and ensure safety.
- Keep the radio and its accessories out of reach of small children.
- Avoid prolonged exposure to direct sunlight or extreme temperatures.
- Do not immerse the radio in water, as it is not water resistant.
10. Warranty and Support
For warranty information and customer support, please refer to the documentation provided with your purchase or visit the official Retevis website. Contact details for support are typically available on the manufacturer's website.