
1. Introduction
Thank you for choosing the Caliber HPG318DAB Portable DAB+/FM Radio. This device offers high-quality digital and analog radio reception, a compact design for portability, and convenient alarm functions. This manual provides essential information for the safe and efficient use of your radio.
2. Safety Information
- Read all instructions carefully before use and retain for future reference.
- Do not expose the device to rain, moisture, or extreme temperatures.
- Avoid placing the device near heat sources or in direct sunlight.
- Do not disassemble or attempt to repair the device yourself. Refer all servicing to qualified personnel.
- Use only the provided charging cable and adapter.
- Keep out of reach of children.
3. Package Contents
Ensure all items are present in the package:
- Caliber HPG318DAB Portable DAB+/FM Radio Unit
- User Manual
- USB Charging Cable
- Power Adapter
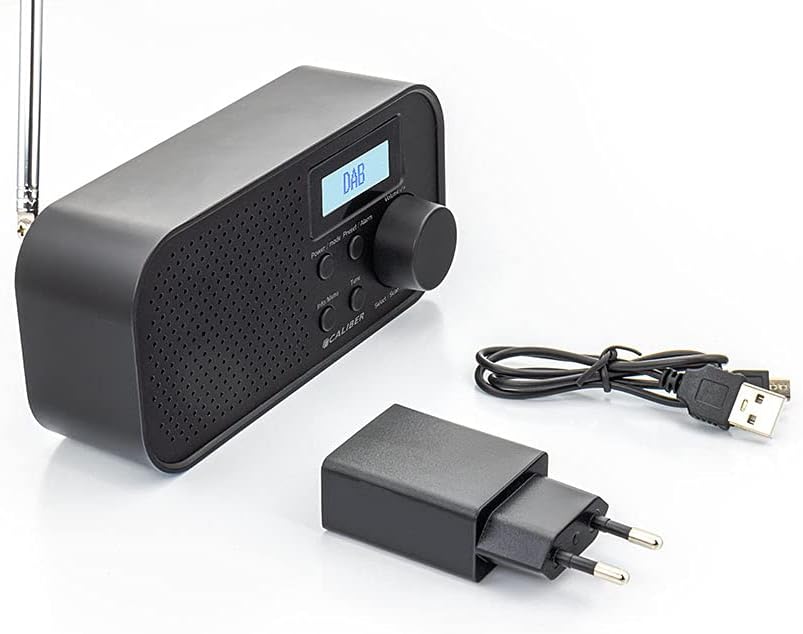
Image: Caliber HPG318DAB radio unit, USB charging cable, and power adapter.
4. Product Overview
4.1 Front Panel Controls
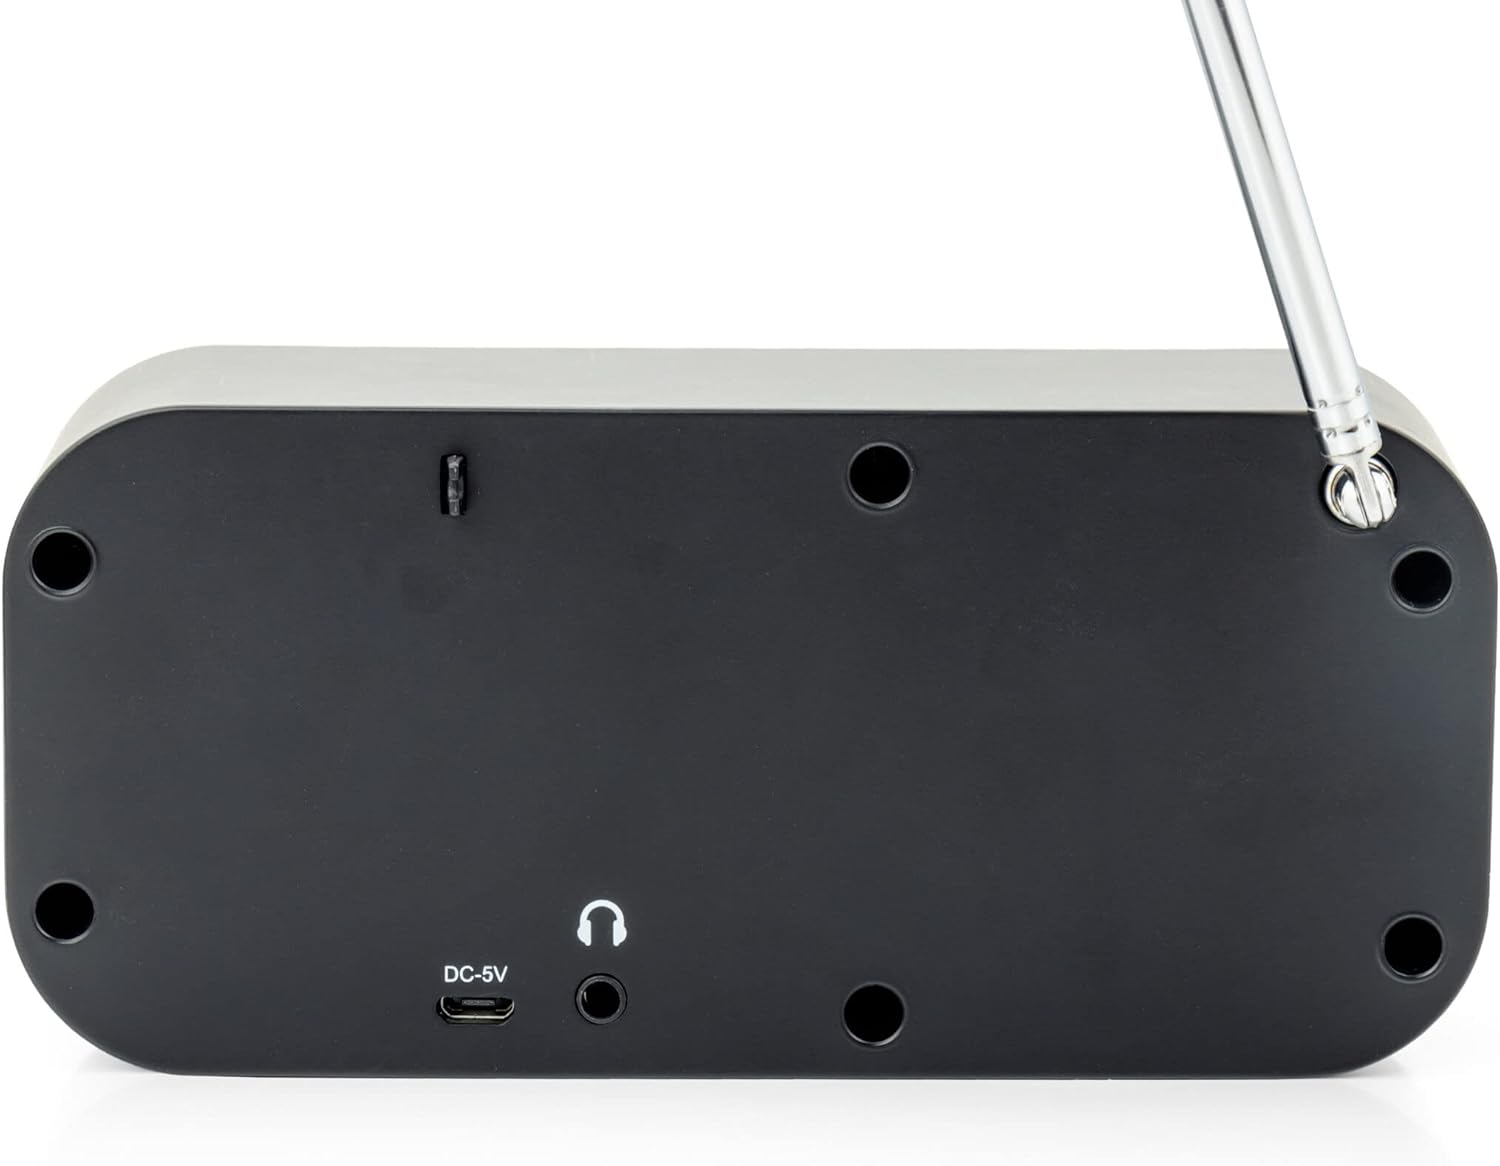
Image: Front view of the Caliber HPG318DAB radio, highlighting the LCD screen, speaker grille, and control buttons.
- LCD Screen: Displays station information, time, and menu options.
- Power/Mode Button: Turns the radio on/off and switches between DAB+ and FM modes.
- Menu/Info Button: Accesses menu settings and displays additional information.
- Preset/Alarm Button: Saves/recalls preset stations and sets alarm functions.
- Select/Scan Button: Confirms selections and initiates station scans.
- Snooze Button: Temporarily silences the alarm.
- Volume Knob: Adjusts the audio volume.
- Speaker Grille: Audio output.
4.2 Rear Panel Connections

Image: Rear view of the Caliber HPG318DAB radio, showing the DC-5V charging port, 3.5mm headphone jack, and telescopic antenna.
- DC-5V Input: Connect the USB charging cable here.
- 3.5mm Headphone Jack: For connecting headphones or earphones.
- Telescopic Antenna: Extend for optimal radio reception.
5. Setup
5.1 Charging the Battery
The Caliber HPG318DAB features a built-in rechargeable battery, providing up to 8 hours of playback on a full charge.
- Connect the small end of the provided USB charging cable to the DC-5V Input port on the rear of the radio.
- Connect the larger end of the USB cable to the provided power adapter.
- Plug the power adapter into a standard wall outlet.
- The charging indicator on the LCD screen will show the charging status. Once fully charged, the indicator will change.
Note: It is recommended to fully charge the battery before first use.
5.2 Antenna Adjustment
For optimal radio reception, fully extend the telescopic antenna located on the rear of the device. Adjust its position to improve signal strength if reception is poor.
6. Operating Instructions
6.1 Power On/Off and Mode Selection
- To turn the radio ON, press and hold the Power/Mode button.
- To turn the radio OFF, press and hold the Power/Mode button again.
- To switch between DAB+ and FM modes, short press the Power/Mode button while the radio is on. The current mode will be displayed on the LCD screen.
6.2 DAB+ Radio Operation
- Switch to DAB+ mode using the Power/Mode button.
- The radio will automatically perform a full scan for available DAB+ stations upon first use or if no stations are found. To initiate a manual scan, press the Menu/Info button, navigate to 'Full Scan', and press Select/Scan.
- Use the Volume Knob to scroll through the list of available stations. Press Select/Scan to select a station.
- To save a station as a preset (up to 10 presets): While listening to a station, press and hold the Preset/Alarm button. Use the Volume Knob to select a preset number (1-10), then press Select/Scan to confirm.
- To recall a preset station: Short press the Preset/Alarm button, use the Volume Knob to select the desired preset number, then press Select/Scan.
- Press the Menu/Info button to view additional information (e.g., program type, signal strength, time) provided by Radio Data System (RDS).
6.3 FM Radio Operation
- Switch to FM mode using the Power/Mode button.
- To automatically scan for stations: Press and hold the Select/Scan button. The radio will scan and stop at the next strong station.
- To manually tune: Rotate the Volume Knob to adjust the frequency in small increments.
- To save a station as a preset (up to 10 presets): While listening to a station, press and hold the Preset/Alarm button. Use the Volume Knob to select a preset number (1-10), then press Select/Scan to confirm.
- To recall a preset station: Short press the Preset/Alarm button, use the Volume Knob to select the desired preset number, then press Select/Scan.
- Press the Menu/Info button to view additional information (e.g., station name, program type) provided by Radio Data System (RDS).
6.4 Volume Control
Rotate the large Volume Knob clockwise to increase the volume and counter-clockwise to decrease it.
6.5 Headphone Use
Connect any standard 3.5mm headphones or earphones to the 3.5mm Headphone Jack on the rear of the radio for private listening. The internal speaker will automatically mute when headphones are connected.
6.6 Alarm Functions
The radio includes alarm clock and sleep timer functions.
Setting the Alarm Clock:
- Press and hold the Preset/Alarm button until the alarm setup menu appears.
- Use the Volume Knob to navigate through options like Alarm 1, Alarm 2, Time, Source (Buzzer/DAB/FM), and Volume. Press Select/Scan to confirm each setting.
- Set the desired alarm time, choose your preferred alarm source (buzzer, DAB+ station, or FM station), and set the alarm volume.
- Ensure the alarm is set to 'On' in the menu.
Using the Snooze Function:
When the alarm sounds, press the Snooze button to temporarily pause the alarm for a short period (e.g., 9 minutes). The alarm will sound again after the snooze period.
Setting the Sleep Timer:
- Press the Menu/Info button.
- Navigate to the 'Sleep' option using the Volume Knob and press Select/Scan.
- Select the desired sleep timer duration (e.g., 15, 30, 45, 60, 90 minutes, or Off). The radio will automatically turn off after the selected time.
7. Maintenance
7.1 Cleaning
To clean the radio, use a soft, dry cloth. Do not use abrasive cleaners, waxes, or solvents as they may damage the finish.
7.2 Storage
When not in use for extended periods, store the radio in a cool, dry place away from direct sunlight and extreme temperatures. Ensure the battery is partially charged before storage to maintain its lifespan.
7.3 Battery Care
To prolong the life of the built-in Lithium-ion battery, avoid fully discharging it frequently. Charge the radio regularly, even if not in constant use.
8. Troubleshooting
| Problem | Possible Cause | Solution |
|---|---|---|
| Radio does not turn on. | Battery is depleted. | Connect the radio to power using the USB cable and adapter to charge the battery. |
| Poor radio reception (DAB+/FM). | Antenna not extended or poor signal area. | Fully extend the telescopic antenna and adjust its position. Try moving the radio to a different location. |
| No sound. | Volume is too low or headphones are connected. | Increase the volume using the Volume Knob. Disconnect headphones if you want sound from the speaker. |
| Alarm does not sound. | Alarm not set correctly or turned off. | Check alarm settings (time, source, volume, 'On' status) in the menu. |
9. Specifications
| Feature | Specification |
|---|---|
| Model Number | HPG318DAB |
| Dimensions (L x W x H) | 15 x 4 x 6.5 cm |
| Weight | 255 g |
| Power Source | Battery-Powered (1 Lithium-ion battery required) |
| Battery Life | Up to 8 hours |
| Supported Radio Bands | DAB+, FM |
| Connectivity Technology | AUX (for headphones), USB (for charging) |
| Maximum Speaker Output | 25 Watt |
| Material | Plastic |
| Color | Black |
| Special Features | Portable, Alarm Function, RDS, LCD Screen |
10. Warranty and Support
For warranty information and customer support, please refer to the documentation provided with your purchase or visit the official Caliber website. Keep your proof of purchase for any warranty claims.


