
1. Important Safety Information
Please read all instructions carefully before using the appliance. Keep this manual for future reference. Always follow basic safety precautions to reduce the risk of fire, electric shock, or injury to persons.
- Ensure the washing machine is properly grounded.
- Do not operate the machine if the power cord or plug is damaged.
- Keep children and pets away from the appliance during operation.
- Do not wash items that are soiled with flammable substances.
- Always unplug the machine before cleaning or performing maintenance.
- Do not open the lid during a wash cycle, especially during high-temperature programs.
2. Product Overview
Familiarize yourself with the components of your Midea Top Load Washing Machine.

Front View: This image shows the sleek, white exterior of the Midea TW 7.83i diN washing machine from the front, highlighting its compact design and the access panel at the bottom.

Angled Top View: An overhead angled view showcasing the top panel with the control knob and digital display, along with the lid handle.

Lid Open View: This image displays the washing machine with its top lid open, revealing the drum and the detergent dispenser compartment.

Control Panel: A detailed view of the control panel, showing the program selection knob, digital display, and various function buttons for temperature, spin speed, and start/pause.
3. Installation and Setup
3.1 Unpacking
Carefully remove all packaging materials, including the polystyrene base and any protective film. Retain packaging for future transport if needed.
3.2 Location Requirements
Place the washing machine on a firm, level surface. Ensure there is adequate space around the appliance for ventilation and access. The dimensions of the unit are approximately 895 mm (H) x 490 mm (W) x 690 mm (D).

Slim Line Design: This diagram illustrates the compact dimensions of the washing machine, highlighting its slim profile (490mm width) which allows it to save up to 25% space compared to conventional front-loading machines of similar capacity.
3.3 Connecting Water and Drain
Connect the water inlet hose to a cold water tap with a 3/4-inch thread. Ensure the connection is tight to prevent leaks. Position the drain hose into a standpipe or over the edge of a sink, ensuring it is securely fixed to prevent displacement during operation.
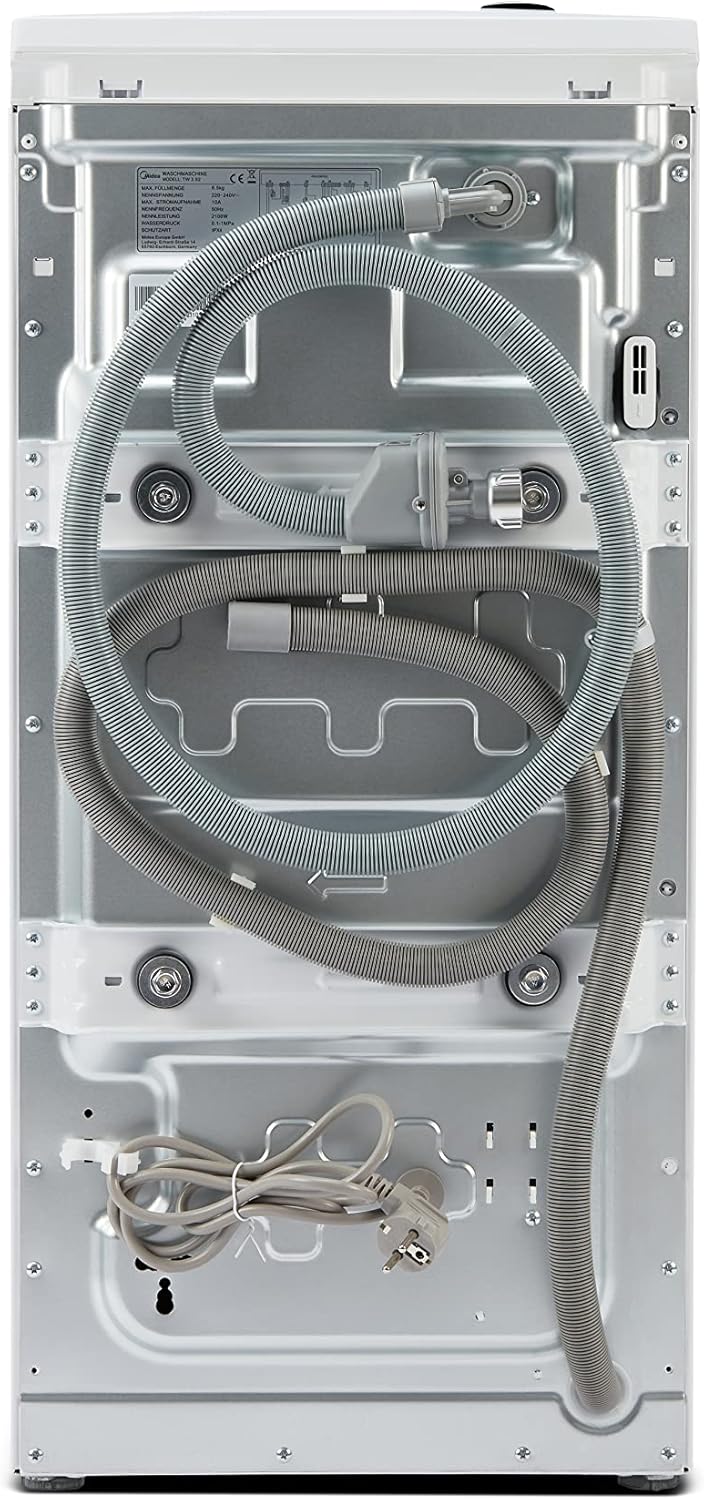
Rear Connections: The back of the washing machine, showing the water inlet hose, drain hose, and power cable neatly arranged. This view is crucial for understanding the setup of water supply and drainage.
3.4 Leveling the Appliance
Use a spirit level to ensure the machine is perfectly level. Adjust the adjustable feet at the bottom of the machine until it is stable and does not wobble. Proper leveling reduces noise and vibration during operation.
3.5 Power Connection
Plug the power cord into a grounded electrical outlet. Ensure the voltage and frequency of your power supply match the specifications of the washing machine (240 Volts, 2000 Watts).
4. Operating Instructions
4.1 Loading Laundry
Open the top lid using the soft opener mechanism. Load laundry loosely into the drum, ensuring not to overload the machine. The maximum capacity is 8 kg.
4.2 Adding Detergent
Add the appropriate amount of detergent and fabric softener to the designated compartments in the dispenser. Refer to your detergent packaging for recommended dosages.
4.3 Program Selection
Turn the program selection knob on the control panel to choose your desired wash program. Available programs include:
- Cotton
- Synthetics
- Mixed Wash
- Jeans
- Sportswear
- 20°C
- Baby Care
- Drum Cleaning
- My Program (customizable)
- Quick Wash 15'
- Quick Wash 45'
- ECO 40-60
- Intensive
- Wool
- Rinse & Spin
- Spin Only
Additional functions such as temperature, spin speed, and delay start can be adjusted using the buttons next to the display.
4.4 Starting a Cycle
Press the 'Start/Pause' button to begin the selected wash cycle. The display will show the remaining time.
4.5 Special Features
- Soft Opener: Gently opens the drum doors at the touch of a button, preventing injury.
- Automatic Balance: Detects and corrects any imbalance in the drum during the spin cycle, ensuring smooth operation.
- BLDC Inverter Technology: Provides quiet and energy-efficient operation.
- Gentle Drum: The unique honeycomb surface texture of the drum protects and cleans textiles with a fine water film between the drum and the fabric, aiding in efficient stain removal.

90°C Drum Cleaning: This image illustrates the drum cleaning process, where swirling water at high temperature and speed flushes through the inner and outer drum, effectively removing any remaining dirt particles and ensuring optimal hygiene.

Soft Open: An innovative mechanism that allows the drum to be opened softly, effortlessly, and elegantly, minimizing the risk of injury.

Gentle Drum: This diagram highlights the novel honeycomb design of the drum, which, with its unique surface, helps water flow efficiently through clothes to dissolve stains, providing gentle yet effective cleaning.
5. Maintenance and Care
5.1 Cleaning the Exterior
Wipe the exterior of the washing machine with a soft, damp cloth. Do not use abrasive cleaners or solvents.
5.2 Cleaning the Detergent Dispenser
Regularly remove and clean the detergent dispenser drawer to prevent residue buildup. Rinse it under running water and dry thoroughly before reinserting.
5.3 Drum Cleaning
Utilize the dedicated 'Drum Cleaning' program (90°C) periodically to remove any dirt, detergent residue, and bacteria from the drum, ensuring optimal hygiene and preventing odors.
5.4 Filter Cleaning
Check and clean the drain pump filter regularly to prevent blockages. Refer to the diagram in the appliance for the filter location, typically at the bottom front.
6. Troubleshooting
Before contacting customer service, please refer to the following table for common issues and their solutions.
| Problem | Possible Cause | Solution |
|---|---|---|
| Machine does not start | No power; Lid not closed; Program not selected | Check power supply; Close lid securely; Select a program and press Start/Pause |
| Excessive vibration/noise | Machine not level; Transit bolts not removed; Uneven load | Adjust feet to level; Remove all transit bolts; Redistribute laundry evenly |
| Water leakage | Hose connections loose; Drain hose blocked; Detergent overdose | Tighten hose connections; Clear drain hose; Use correct detergent amount |
| Water not draining | Drain hose kinked/blocked; Filter blocked | Straighten/clear drain hose; Clean drain pump filter |
| Poor washing results | Overloading; Incorrect detergent; Wrong program | Reduce load; Use appropriate detergent; Select suitable program |
7. Specifications
Detailed technical specifications for the Midea TW 7.83i diN Top Load Washing Machine.
| Specification | Value |
|---|---|
| Brand | Midea |
| Model | TW 7.83i diN |
| Capacity | 8 Kilograms |
| Product Dimensions (H x W x D) | 895 x 490 x 690 mm |
| Item Weight | 56 Kilograms |
| Maximum Rotational Speed | 1300 RPM |
| Noise Level (Spin) | 80 dB |
| Annual Energy Consumption | 62 Kilowatt Hours per 100 cycles |
| Energy Efficiency Class | C |
| Installation Type | Freestanding |
| Access Location | Top Load |
| Voltage | 240 Volts |
| Wattage | 2000 Watts |
| Number of Standard Cycles | 15 |
| Special Features | Soft Opener, Drum Cleaner, Inverter Motor, Quick Wash (15/45 min), Automatic Balance |

Energy Label: This image displays the EU energy label for the Midea TW 7.83i diN, indicating its energy efficiency class C, 8.0 kg capacity, 62 kWh per 100 cycles, 48 liters water consumption per cycle, and 80 dB noise level during spin.
For more detailed product information, you can refer to the official EPREL database:
8. Warranty and Support
8.1 Warranty Information
This product comes with a standard manufacturer's warranty. Please refer to the warranty card included with your appliance for specific terms and conditions, including the warranty period and coverage details.
8.2 Customer Support
If you encounter any issues that cannot be resolved using the troubleshooting guide, or if you require technical assistance, please contact Midea customer support. Contact details can typically be found on the Midea official website or in your product documentation.


