1. Introduction
This manual provides detailed instructions for the setup, operation, and maintenance of your BALILA Wireless Lavalier Microphone System, model BA-CM1. This system is designed to capture clear audio for various applications, including video recording, vlogging, interviews, and live streaming.
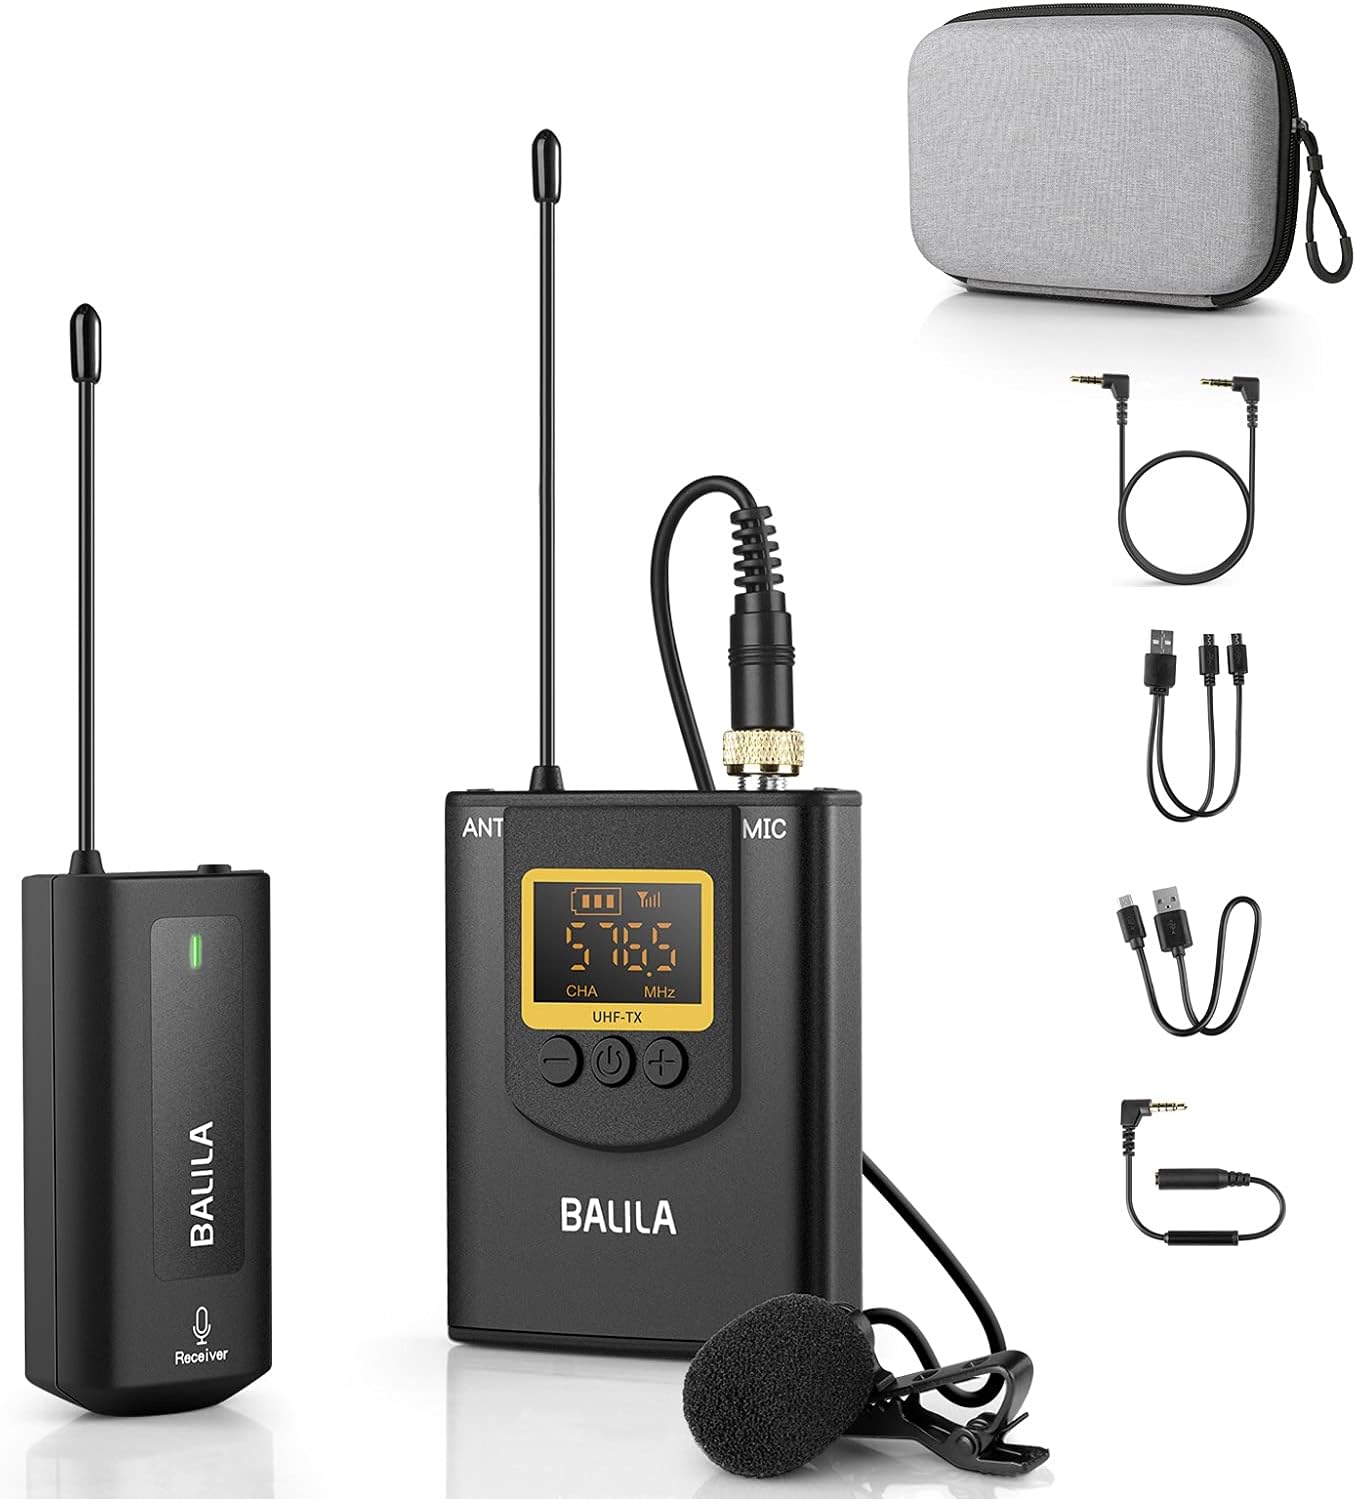
Figure 1: BALILA Wireless Lavalier Microphone System, showing the receiver, transmitter with lavalier mic, charging case, and various cables.
2. Package Contents
Please verify that all items listed below are included in your package:
- 2 x Transmitters (TX)
- 1 x Receiver (RX)
- 1 x Charging Case
- 2 x Windshields
- 1 x USB-C Charging Cable
- 1 x 3.5mm TRS to TRS Camera Cable
- 1 x 3.5mm TRS to TRRS Phone Cable
Figure 2: All components included in the BALILA Wireless Lavalier Microphone System package.
3. Product Overview
3.1 Transmitter (TX)
The transmitter converts audio signals from the lavalier microphone into a wireless signal for transmission to the receiver. It features a display for channel and battery status, and controls for volume adjustment.

Figure 3: Transmitter (TX) components and controls, including microphone input, antenna, display, power button, and volume controls.
- Microphone Input Socket: Connects the lavalier microphone.
- Antenna: For wireless signal transmission.
- Display: Shows channel, battery level, and signal strength.
- Power Button: Turns the unit on/off and initiates pairing.
- Volume Buttons (+/-): Adjusts microphone input volume.
- Micro USB 5V Charging Port: For charging the transmitter.
3.2 Receiver (RX)
The receiver captures the wireless audio signal from the transmitter and outputs it to your recording device. It includes a monitoring port for real-time audio verification.

Figure 4: Receiver (RX) components and indicators, including power button, working indicator, Micro USB charging port, monitor headset socket, antenna, and 3.5mm microphone output.
- Power Button: Turns the unit on/off.
- Working Indicator: Shows operational status and pairing status.
- Micro USB 5V Charging Port: For charging the receiver.
- Monitor Headset Socket: For real-time audio monitoring with headphones.
- Antenna: For wireless signal reception.
- 3.5mm Microphone Output: Connects to your recording device (camera, smartphone, PC).
4. Setup Instructions
4.1 Charging the Devices
Before first use, fully charge both the transmitter(s) and receiver. Use the provided USB-C charging cable to connect the devices to a 5V USB power source. The charging indicator will typically show red while charging and turn off or change color when fully charged.
4.2 Pairing the Microphone Kit
The microphone kit is typically pre-paired at the factory. If re-pairing is necessary, follow these steps:
- Ensure the receiver is turned off.
- On the transmitter, press and hold the "-" button and the "power button" simultaneously for 3 seconds. The display on the transmitter will flash.
- Turn on the receiver. Its indicator light will flash 3-4 times.
- Short press the power button on the transmitter. The receiver's indicator light will turn solid green, indicating successful pairing.

Figure 5: Visual guide for pairing the transmitter and receiver.
4.3 Connecting to Recording Devices
Connect the receiver to your recording device using the appropriate cable:
- For Cameras (DSLR, Camcorder, GoPro): Use the 3.5mm TRS to TRS camera cable. Connect one end to the receiver's 3.5mm output and the other to your camera's microphone input.
- For Smartphones (Android, iPhone): Use the 3.5mm TRS to TRRS phone cable. Connect the TRS end to the receiver's 3.5mm output and the TRRS end to your smartphone's headphone/microphone jack. Note: iPhones without a 3.5mm jack will require an official Lightning to 3.5mm adapter (not included). Android phones with USB-C only may require a USB-C to 3.5mm adapter (not included).
- For Laptops/PCs: Use the 3.5mm TRS to TRS camera cable or a suitable adapter if your computer has separate microphone and headphone jacks.

Figure 6: Connection methods for different recording devices.
5. Operating Instructions
5.1 Powering On/Off
- To power on, press and hold the power button on both the transmitter and receiver until their displays/indicators light up.
- To power off, press and hold the power button on both units until they shut down.
5.2 Adjusting Volume
On the transmitter, use the "+" and "-" buttons to adjust the microphone input volume. Monitor the audio output to ensure optimal levels without distortion.
5.3 Noise Cancellation
This microphone system features a noise-canceling chip designed to reduce ambient noise. The system automatically applies noise cancellation to enhance voice clarity. No manual activation is typically required for this feature.
5.4 Real-time Audio Monitoring
To monitor your audio in real-time, plug a pair of headphones into the "Monitor headset socket" on the receiver. This allows you to verify audio quality and levels during recording.

Figure 7: Using the real-time audio monitor feature with headphones.
6. Maintenance
6.1 Cleaning
Wipe the devices with a soft, dry cloth. Do not use liquid cleaners or solvents, as they may damage the product. Keep the microphone head clean and free of debris.
6.2 Storage
Store the microphone system in a cool, dry place, away from direct sunlight and extreme temperatures. Use the provided charging case for protection during storage and transport.
6.3 Battery Care
To prolong battery life, avoid fully discharging the devices frequently. Recharge them regularly, even if not in use for extended periods (e.g., once every 3 months).
7. Troubleshooting
If you encounter issues with your BALILA Wireless Lavalier Microphone System, please refer to the common problems and solutions below. For more detailed assistance, consult the official Troubleshooting Guide PDF.
Official Troubleshooting Guide: Download PDF
Common Issues and Solutions:
- No Sound/Low Volume:
- Ensure both transmitter and receiver are powered on and fully charged.
- Verify that the transmitter and receiver are successfully paired (solid green indicator on receiver).
- Check all cable connections between the receiver and your recording device. Ensure the correct cable (TRS for cameras, TRRS for smartphones) is used and fully inserted.
- Adjust the volume on the transmitter using the +/- buttons.
- Check the microphone input settings and volume levels on your recording device.
- Static/Interference:
- Ensure the transmitter and receiver are within the specified operating range (up to 262 ft / 80m).
- Avoid obstacles between the transmitter and receiver that might block the signal.
- Minimize proximity to other wireless devices or strong electromagnetic fields that could cause interference.
- If using multiple wireless systems, ensure they are operating on different channels to prevent crosstalk.
- Difficulty Pairing:
- Follow the pairing instructions in Section 4.2 carefully.
- Ensure both devices are sufficiently charged before attempting to pair.
- If the transmitter was accidentally switched to a different channel (e.g., CHB), reset it to CHA by pressing "-" and "+" simultaneously for about 10 seconds while powered on, then re-attempt pairing.
- Short Battery Life:
- Ensure devices are fully charged before use.
- Battery performance can degrade over time with repeated charge cycles.
- Operating in very cold environments can temporarily reduce battery life.
8. Specifications
| Feature | Specification |
|---|---|
| Model Number | BA-CM1 |
| Microphone Form Factor | Lavalier |
| Connectivity Technology | 2.4G Wireless |
| Polar Pattern | Omnidirectional |
| Frequency Response | 20 Hz to 20 KHz |
| Signal-to-Noise Ratio | 70 dB |
| Number of Channels | 20 |
| Operating Range | Up to 262 ft (80m) |
| Latency | Approximately 0ms |
| Power Source | Battery Powered (1 Lithium Polymer battery included per unit) |
| Battery Capacity | 650mAh (Built-in) |
| Hardware Platform | Laptop, PC, Smartphone |
| Material | Plastic |
| Item Weight (Transmitter/Receiver) | Approx. 9.5g (each) |
| UPC | 659514772202 |
9. Warranty and Support
BALILA products are designed for reliability and performance. For information regarding warranty coverage, please refer to the documentation included with your purchase or contact BALILA customer support.
If you require further assistance or have questions not covered in this manual, please visit the official BALILA store or contact their customer service department.
BALILA Store: Visit BALILA on Amazon


