
Introduction
Thank you for choosing the GAN XIN 5-Inch 6-Digit LED Race Timing Clock. This manual provides detailed instructions for the setup, operation, and maintenance of your new timing device. Please read this manual thoroughly before use to ensure proper functionality and longevity of the product.

Image: The GAN XIN LED Race Timing Clock in a typical sporting event setting.
Product Features
- Large LED Display: Features 5-inch LED digits for clear visibility up to 124 feet (38 meters).
- Multiple Display Colors: Available in red, yellow, blue, green, and white.
- Durable Construction: Built with a professional circuit board for low failure rate and an aluminum alloy frame for reliability.
- Versatile Functions: Includes Clock (12/24 hour), Countdown, Count Up, and Stopwatch modes.
- Dual Control Options: Easily operated via an included remote control (up to 40ft range) or the "GX_Remote" mobile application (Bluetooth, up to 50ft range) for iOS and Android.
- Audible Alerts: Equipped with a buzzer (80-85 decibels) to signal the end of countdown/count up cycles.
- Flexible Installation: Supports wall-mounting (bracket and screws included) or tripod installation (tripod sold separately).
Setup
1. Unpacking and Inspection
Carefully remove all components from the packaging. Inspect the clock and accessories for any signs of damage. Contact customer service if any parts are missing or damaged.
2. Power Connection
Connect the provided power adapter to the clock and then plug it into a standard electrical outlet. The clock will power on automatically.
3. Remote Control Battery Installation
Open the battery compartment on the back of the remote control. Insert two AAA batteries (not included), ensuring correct polarity. Close the compartment.
4. Mounting Options
- Wall-Mounting: Use the included wall-mount bracket and screws to securely attach the clock to a wall. Ensure the mounting surface is sturdy enough to support the clock's weight.
- Tripod Installation: If using a tripod (ASIN: B0B1QP5RTR, sold separately), attach the clock to the tripod mount. Ensure the tripod is stable before use.

Image: Clock dimensions, illustrating the 27-inch length, 7.4-inch height, and 5-inch LED digit size.
Operating Instructions
The GAN XIN timing clock offers four primary functions: Clock, Countdown, Count Up, and Stopwatch. Use the remote control or mobile app to switch between modes and adjust settings.
1. Clock Mode
In Clock mode, the display shows the current time in [HH:MM:SS] format.
- To switch between 12-hour and 24-hour formats, press the [A+] key on the remote control.
- Refer to the remote control instructions for setting the current time.
2. Countdown Mode
This mode counts down from a set time [HH:MM:SS] to 00:00:00.
- Enter the desired countdown time using the remote control or app.
- Press [START] to begin the countdown.
- Press [STOP] to pause the countdown. Press [START] again to resume.
- When the countdown reaches 00:00:00, the buzzer will sound.
3. Count Up Mode
This mode counts up from 00:00:00 to a maximum of 99:59:59 [HH:MM:SS].
- Press [START] to begin counting up.
- Press [STOP] to pause the count up. Press [START] again to resume.
- The buzzer will sound if a specific target time is set and reached (refer to advanced settings in the app).
4. Stopwatch Mode
The stopwatch mode displays time in [MM:SS:MS] (minutes:seconds:milliseconds).
- Press [START] to begin the stopwatch.
- Press [STOP] to pause the stopwatch. Press [START] again to resume.
- Press [RESET] to clear the stopwatch to 00:00:00.

Image: Illustration of the clock displaying its four main functions: Clock, Count Up, Countdown, and Stopwatch.
Remote Control and Mobile App Usage
Remote Control
The included remote control allows for easy operation of all clock functions from up to 40 feet away. Ensure the remote has fresh AAA batteries and is pointed towards the clock's receiver.
Mobile Application (GX_Remote)
The "GX_Remote" app is available for iOS and Android devices. It connects via Bluetooth and offers control from up to 50 feet. Search for "GX_Remote" in your device's app store to download and install.
- Ensure Bluetooth is enabled on your mobile device.
- Open the "GX_Remote" app and follow the on-screen instructions to pair with your GAN XIN clock.
- The app provides an intuitive interface for setting modes, times, and other advanced features.
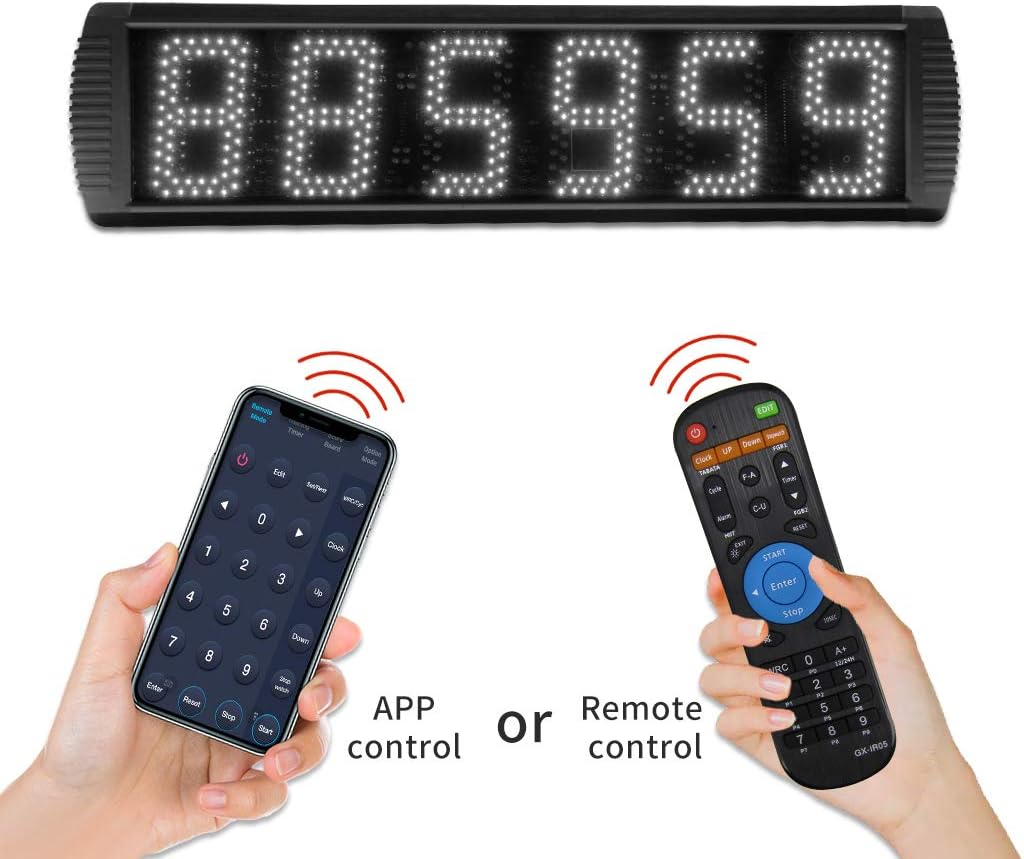
Image: Demonstrates control via either the mobile app or the physical remote control.
Brightness Adjustment
The clock features 5 levels of brightness adjustment to suit various lighting conditions. Use the remote control or mobile app to cycle through the brightness settings until the desired level is achieved.

Image: Visual representation of the 5 levels of brightness adjustment for the LED display.
Maintenance
Cleaning
To clean the clock, gently wipe the display and frame with a soft, dry, or slightly damp cloth. Do not use abrasive cleaners, solvents, or excessive moisture, as these can damage the electronic components.
Environmental Considerations
This product is not waterproof. It is recommended for indoor use or outdoor use only when there is no rain. Avoid exposing the clock to extreme temperatures, direct sunlight for prolonged periods, or high humidity.
Storage
If storing the clock for an extended period, disconnect it from power and remove batteries from the remote control. Store in a cool, dry place.
Troubleshooting
- Clock not powering on: Ensure the power adapter is securely connected to both the clock and a working electrical outlet.
- Remote control not working: Check if the AAA batteries are correctly inserted and have sufficient charge. Ensure there are no obstructions between the remote and the clock.
- App not connecting: Verify that Bluetooth is enabled on your mobile device and that the clock is powered on. Try restarting the app or your device.
- Display issues: If the display is dim or flickering, check the brightness settings. If issues persist, disconnect power for a few minutes and reconnect.
For further assistance, please contact GAN XIN customer support.
Specifications
| Model Number | GS6T-5RGB |
| Display Type | 5-inch 6-Digit LED |
| Product Dimensions (L x W x H) | 27.1" x 7.4" x 1.6" (68.8cm x 18.8cm x 4.1cm) |
| Item Weight | 5 pounds (2.27 kg) |
| Material | Aluminum Alloy Frame |
| Control Methods | Infrared Remote Control, Bluetooth Mobile App ("GX_Remote") |
| Buzzer Sound Level | 80-85 decibels |
| Power Source | AC Power Adapter (included) |
| Color | White LED display (on black frame) |

Image: Internal components and frame details, highlighting the HD display, professional board, and aluminum alloy frame.
Warranty and Support
GAN XIN products are manufactured with quality and reliability in mind. For specific warranty details, please refer to the warranty card included with your product or visit the official GAN XIN website. If you encounter any issues or have questions regarding your timing clock, please contact GAN XIN customer support through their official channels or the retailer where the product was purchased.
Manufacturer: HANGZHOU GANXIN ELECTRONIC CO.LTD
