Introduction
This manual provides essential instructions for the safe and efficient operation, maintenance, and troubleshooting of your FERM PGM1010 Air-Cooled Generator. Please read this manual thoroughly before operating the generator to ensure proper use and to prevent injury or damage.
Safety Instructions
Always observe the following safety precautions to reduce the risk of injury, electric shock, fire, and property damage.
- Carbon Monoxide Hazard: Generators produce carbon monoxide, a colorless, odorless, poisonous gas. Operate the generator outdoors in a well-ventilated area, far from windows, doors, and vents. Never operate indoors or in enclosed spaces.
- Fire Hazard: Fuel is highly flammable. Refuel in a well-ventilated area with the engine off and cool. Do not smoke or allow open flames near the generator. Store fuel in approved containers.
- Electrical Shock Hazard: Do not operate the generator in wet conditions. Ensure all electrical connections are secure and dry. Use only approved extension cords.
- Hot Surfaces: The generator engine and muffler become very hot during operation and remain hot for a period after shutdown. Avoid contact with hot surfaces to prevent burns.
- Children and Pets: Keep children and pets away from the generator, especially during operation.
- Grounding: Ensure the generator is properly grounded according to local electrical codes.
- Overload Protection: Do not overload the generator. The PGM1010 has an overload switch for safe working.
Product Overview and Components
Familiarize yourself with the main components of your FERM PGM1010 generator.
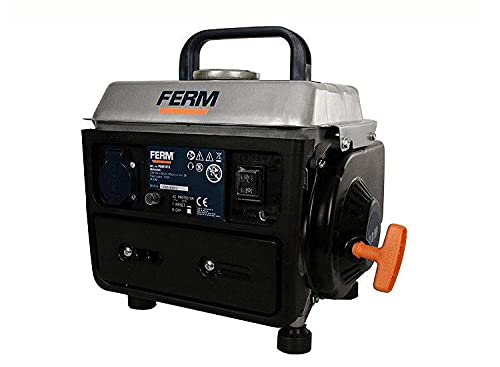
Image: Front view of the FERM PGM1010 generator, showing the control panel with the AC outlet, AC protector switch, and engine start/stop switch. The pull-start handle is visible on the right side.
- Fuel Tank Cap: Located on top, for adding fuel.
- Pull Start Handle: Used to manually start the engine.
- AC Outlet: For connecting electrical devices.
- AC Protector Switch (Circuit Breaker): Protects against overload. Resets after tripping.
- Engine Switch: Controls engine operation (ON/OFF).
- Carrying Handle: For easy transport.
- Shock Absorbing Feet: Reduces vibration during operation.
Setup and Preparation
- Unpacking: Carefully remove the generator from its packaging. Inspect for any shipping damage.
- Placement: Place the generator on a firm, level surface outdoors in a well-ventilated area, away from combustible materials and at least 1 meter (3 feet) from buildings or other equipment.
- Fueling:
- The PGM1010 uses a gasoline and oil mixture (50:1 ratio).
- Mix unleaded gasoline with 2-stroke engine oil in a separate, approved fuel container.
- Ensure the engine is off and cool before refueling.
- Open the fuel tank cap and carefully pour the fuel mixture into the tank. Do not overfill.
- Securely close the fuel tank cap.
- Grounding: Connect a grounding wire from the generator's grounding terminal to a suitable ground source, as per local electrical regulations.
Operating Instructions
Starting the Generator:
- Ensure all electrical appliances are disconnected from the generator.
- Set the engine switch to the "ON" position.
- If the engine is cold, apply choke (refer to specific choke lever location on your unit, usually near the carburetor).
- Pull the starter handle firmly and smoothly until the engine starts. Do not let the rope snap back.
- Once the engine starts, gradually push the choke lever back to the "OFF" position as the engine warms up.
- Allow the generator to run for a few minutes to stabilize before connecting electrical loads.
Connecting Electrical Loads:
- Plug your appliances into the AC outlet.
- Do not exceed the rated output of 700 W or the maximum output of 800 W. Overloading will trip the AC protector switch.
- If the AC protector switch trips, disconnect some appliances, then press the "RESET" button on the switch to restore power.
Stopping the Generator:
- Disconnect all electrical appliances from the generator.
- Allow the generator to run for a few minutes without load to cool down.
- Set the engine switch to the "OFF" position.
Maintenance
Regular maintenance ensures the longevity and reliable operation of your generator.
- Spark Plug: Inspect and clean the spark plug regularly. Replace if worn.
- Air Filter: Clean the air filter element periodically. Replace if damaged.
- Fuel Filter: Check and clean the fuel filter as needed.
- Fuel System: If storing the generator for an extended period, drain the fuel tank and carburetor to prevent fuel degradation and clogging.
- General Cleaning: Keep the generator clean and free of dirt and debris. Use a dry cloth to wipe down surfaces.
- Storage: Store the generator in a clean, dry, well-ventilated area, away from direct sunlight and extreme temperatures.
Troubleshooting
| Problem | Possible Cause | Solution |
|---|---|---|
| Engine does not start | No fuel or incorrect fuel mixture Engine switch OFF Spark plug faulty Choke not applied (cold engine) | Add correct fuel mixture Set engine switch to ON Clean or replace spark plug Apply choke for cold starts |
| No power output | AC protector switch tripped Overload Loose connections | Press RESET button Reduce connected load Check and secure all connections |
| Engine runs rough | Stale fuel Dirty air filter Incorrect spark plug gap | Drain and replace with fresh fuel mixture Clean or replace air filter Adjust or replace spark plug |
If problems persist after attempting these solutions, please contact customer support.
Technical Specifications
- Model Number: PGM1010
- Type: Generator
- Power Source: Petrol
- Rated Output: 700 W
- Maximum Output: 800 W
- AC Current: 3 A
- Engine: Air-cooled, 2-stroke
- Fuel: Gasoline and oil mixture (50:1)
- Tank Volume: 4.5 Liters
- Operating Hours (full tank): Approximately 8 hours
- Gross Weight: 17.06 kg
- Item Weight: 17.1 Kilograms
- Package Dimensions: 61 x 35 x 1.6 cm
- Special Features: Portable, Overload switch, Shock absorbing feet
- Manufacturer: Ferm
- Origin: China
Warranty and Support
For warranty information, technical support, or service inquiries, please refer to the documentation provided with your purchase or contact your local FERM dealer or customer service center. Keep your purchase receipt as proof of purchase.


