Introduction
Thank you for choosing the BEBIRD M9 Pro Wireless Ear Otoscope. This device is designed to provide a clear, visual inspection of your ear canal and assist in safe earwax removal. Equipped with a 1080P HD camera, 6 LED lights, and smart temperature control, it offers a safe and effective solution for personal ear care. This manual provides essential information for setup, operation, maintenance, and troubleshooting to ensure optimal performance and user safety.
Key Features:
- 1080P HD Camera & 360° Wide Angle: Provides clear, detailed views of the ear canal.
- Smart Temperature Control: Maintains a non-inductive temperature of 25°C for the otoscope and 32°C for the handle, mimicking human body temperature for comfort.
- IP67 Waterproof Lens: Allows for direct washing of the 3.5mm lens for easy cleaning.
- Rechargeable Battery: 350mAH battery with magnetic charging base, providing up to 60 days of usage (10 mins/use) on a single 1.5-hour charge.
- Wide Compatibility: Connects wirelessly via Wi-Fi to Android phones, iPhones, and iPads using the dedicated 'Bebird' APP.
- Silicone Ear Spoons: Smooth, appropriately angled silicone ear spoons for effective and safe earwax removal.
Package Contents
The BEBIRD M9 Pro package includes the following items:
- BEBIRD M9 Pro Wireless Ear Otoscope
- Magnetic Charging Base
- USB Charging Cable
- Variety of Silicone Ear Spoons (17 accessories in total)
- Cleaning Brush
- User Manual (this document)
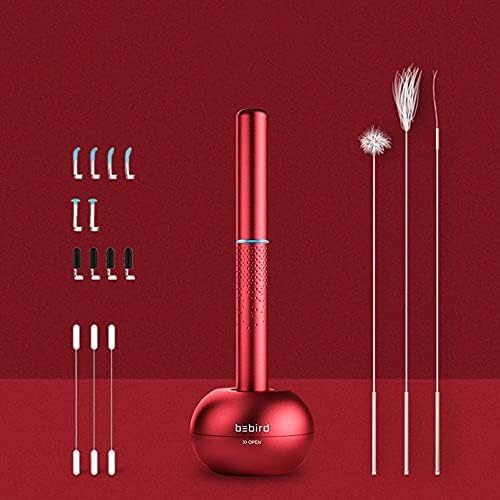
Image: Contents of the BEBIRD M9 Pro package, including the otoscope, charging base, and a selection of ear spoons and cleaning tools.
Setup Guide
- Charge the Device:
Place the BEBIRD M9 Pro otoscope onto its magnetic charging base. Connect the USB charging cable to the base and a power source. The device features fast charging technology, requiring approximately 1.5 hours for a full charge.

Image: The BEBIRD M9 Pro device on its magnetic charging base, illustrating its 350mAh rechargeable battery and fast charging capability.
- Download the 'Bebird' APP:
Scan the QR code provided in the product packaging or visit the official Bebird website to download and install the 'Bebird' application on your Android phone, iPhone, or iPad. Ensure you download the correct version for your device.
Official App Download Link: http://www.bebird.cn/app/en.html

Image: Instructions for downloading the Bebird app via QR code and connecting the device to your mobile phone's Wi-Fi.
- Connect via Wi-Fi:
Open the 'Bebird' APP. Power on the device by removing the cap (it automatically turns on). Go to your mobile phone's Wi-Fi settings and connect to the Wi-Fi network named "bebird-XXXX" (where XXXX is a unique identifier for your device). Once connected, return to the Bebird APP and press "Start" to begin using the device.
Operating Instructions
- Attach Ear Spoon:
Select the appropriate silicone ear spoon from the provided accessories. Gently attach it to the tip of the otoscope. Ensure it is securely fastened.

Image: Detailed view of the ear spoon attachment mechanism, showing how to securely fit it onto the otoscope.
- Begin Inspection:
Carefully insert the otoscope into your ear canal while observing the live feed on the Bebird APP. The 6 LED lights will illuminate the area, and the 1080P HD camera will provide a clear view. The device's smart gyroscope ensures a stable 360° view regardless of the device's orientation.

Image: The BEBIRD M9 Pro in use, demonstrating the visual inspection process with the live feed displayed on a connected smartphone.

Image: A visual representation of the otoscope's 360-degree free view, ensuring a stable image regardless of device rotation.
- Earwax Removal:
Using the silicone ear spoon, gently and slowly remove any visible earwax. Always maintain a clear view on the app and avoid pushing earwax deeper into the canal. If you experience any discomfort or pain, stop immediately.
- Multi-Purpose Use:
The BEBIRD M9 Pro can also be used for inspecting other areas such as the nose, mouth, scalp, and even pet skin. Ensure the lens is clean before each use and exercise caution.

Image: The BEBIRD M9 Pro demonstrating its versatility for inspecting ears, nose, mouth, and even pet ears.
- Temperature Control:
The device is designed with intelligent temperature control to prevent discomfort. The otoscope tip maintains a non-inductive temperature of 25°C (77°F), and the handle stays at 32°C (89.6°F), matching human palm temperature.

Image: Illustration of the BEBIRD M9 Pro's smart temperature control, maintaining optimal temperatures for user comfort and safety.
Maintenance and Care
- Cleaning the Lens:
The 3.5mm lens is IP67 waterproof and can be washed directly with water. After each use, especially when used in different areas, clean the lens thoroughly to ensure hygiene and clear vision for future use. Use the provided cleaning brush for stubborn debris.

Image: A close-up view of the otoscope lens and ear spoon, emphasizing their design for easy cleaning.
- Cleaning Ear Spoons:
The silicone ear spoons should be cleaned with soap and water or an alcohol wipe after each use. Ensure they are completely dry before storing.
- Storage:
After cleaning and drying, store the otoscope and its accessories in the magnetic charging base. The base is designed for convenient storage of the ear spoons at the bottom.

Image: The BEBIRD M9 Pro otoscope and its charging base, demonstrating how accessories can be conveniently stored within the base.
- Battery Care:
To prolong battery life, avoid fully discharging the device frequently. Charge it when the battery indicator on the app shows low power.
Troubleshooting
| Problem | Possible Cause | Solution |
|---|---|---|
| Device not turning on. | Low battery; Cap not removed. | Charge the device fully. Ensure the protective cap is completely removed. |
| Cannot connect to Wi-Fi. | Incorrect Wi-Fi network selected; Device not powered on; App not open. | Ensure the device is on. Select the correct "bebird-XXXX" Wi-Fi network. Restart the Bebird APP. |
| Image is blurry or unclear. | Lens is dirty; Incorrect focal distance. | Clean the lens thoroughly. Adjust the distance between the lens and the ear canal (optimum focal length is 15-20mm). |
| App crashes or freezes. | App version outdated; Device's operating system issue. | Update the Bebird APP to the latest version. Restart your mobile device. |
| Device gets hot. | Prolonged use; Environmental factors. | The device has smart temperature control. If it feels unusually hot, discontinue use and allow it to cool down. Contact support if the issue persists. |
For further assistance, please refer to the 'Help' section within the Bebird APP or contact customer support.
Specifications
| Feature | Detail |
|---|---|
| Model Number | M9PRO |
| Product Dimensions | 5.5 x 0.51 x 0.51 inches; 6.2 ounces |
| Camera Resolution | 1080P HD |
| Lens Diameter | 3.5mm |
| LED Lights | 6 |
| Battery Capacity | 350mAH Lithium Ion |
| Charging Time | Approx. 1.5 hours |
| Usage Time | Up to 60 days (10 mins per usage) |
| Otoscope Temperature | 25°C (77°F) |
| Handle Temperature | 32°C (89.6°F) |
| Waterproof Rating | IP67 (lens only) |
| Compatibility | Android, iPhone, iPad |
Warranty and Support
Warranty Information:
- 30-Day Money Back Guarantee: Full money back for quality problems within 30 days of purchase.
- 12-Month Manufacturer Warranty: Covers manufacturing defects for 12 months from the date of purchase.
Customer Support:
For any questions, technical support, or warranty claims, please contact BEBIRD customer service. You can typically find contact information within the Bebird APP's 'Help' or 'About Us' section, or on the official BEBIRD website. Expect an email reply within 24 hours.


