1. Introduction
This manual provides essential instructions for the safe and effective operation of your FOXSUR FBC-122406-D Smart Car Battery Charger. This fully automatic 7-stage battery charger is designed to charge and maintain various battery types, including Calcium, Gel, Lithium, LiFePo4, AGM, and Wet batteries. It features automatic charging protection against overcharging and includes a repair function for drained and sulfated batteries.

Image 1.1: The FOXSUR FBC-122406-D Smart Car Battery Charger, showing its main unit, battery clamps (red for positive, black for negative), and power plug.
2. Safety Information
Please read and understand all safety instructions before using the charger. Failure to follow these instructions may result in electric shock, fire, or serious injury.
- Always turn off the power source before connecting or disconnecting the charger to the battery.
- Ensure proper ventilation during charging.
- Do not expose the charger to rain or excessive moisture.
- Avoid charging frozen batteries.
- Keep out of reach of children.
- This charger is designed for 12V/24V batteries within the 6Ah-120Ah range.
- The charger cannot activate a completely dead battery or repair a severely damaged battery. It also cannot restore a battery to 100% new condition.
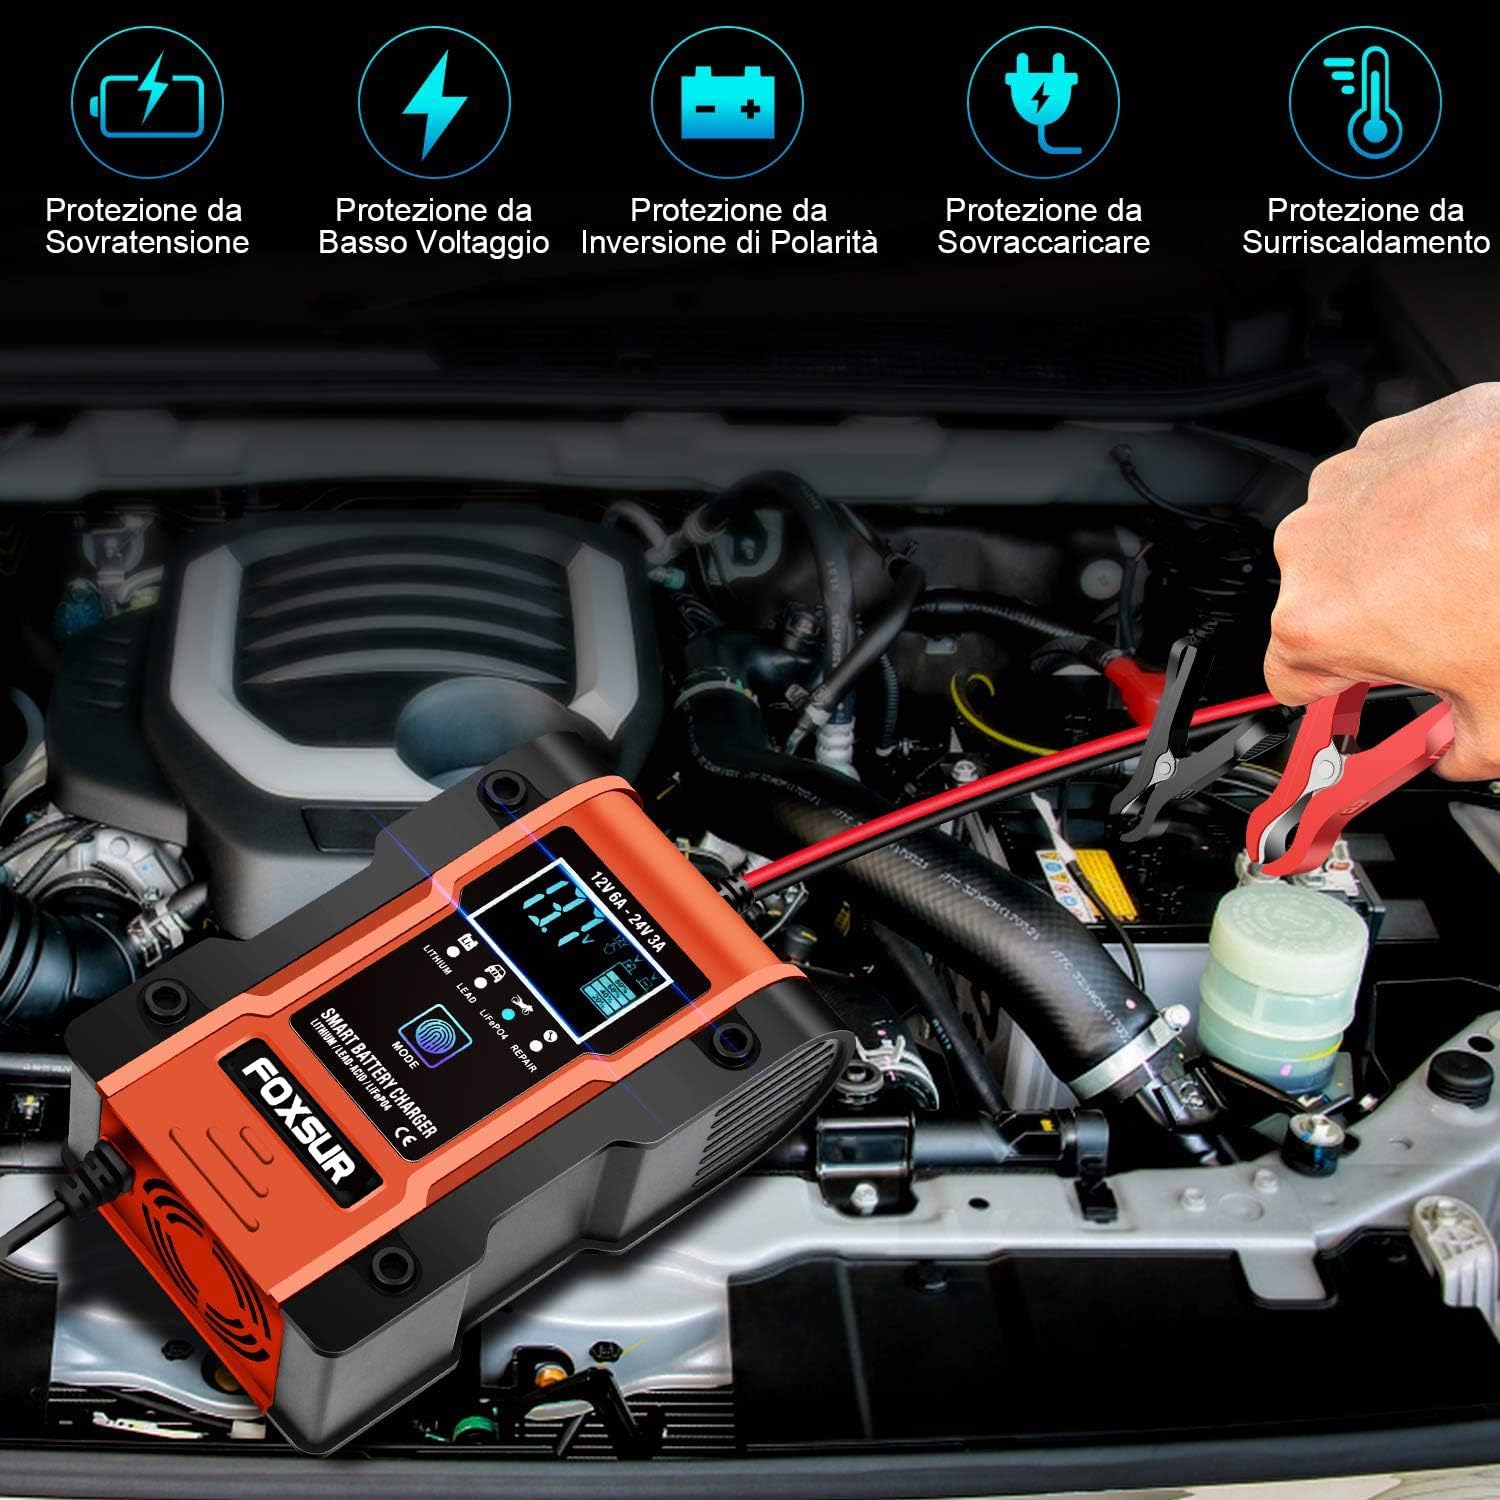
Image 2.1: The charger features multiple protections including over-voltage, low voltage, reverse polarity, overload, and over-temperature protection.
3. Setup and Connection
Follow these steps to safely connect the charger to your battery:
- Step 1: Connect Battery Clamps. Connect the black clamp to the battery's negative (-) terminal. Connect the red clamp to the battery's positive (+) terminal. Ensure a secure connection.
- Step 2: Plug in the Charger. After connecting the clamps, plug the charger's power cord into a suitable AC power socket (100-240V AC, 50-60Hz).
The charger will automatically detect the battery voltage (12V or 24V) and begin the charging process.

Image 3.1: Visual guide for connecting the black clamp to the negative terminal and the red clamp to the positive terminal, followed by plugging the charger into a power outlet.
4. Operating Instructions
4.1. Automatic Charging Process
The FOXSUR charger operates with a 7-stage automatic charging process. Once connected and powered, it will automatically analyze the battery and select the appropriate charging mode. The charger protects against overcharging, allowing it to remain connected indefinitely for maintenance.
4.2. Mode Selection
The charger features a "MODE" button to select specific battery types or the repair function. Press the "MODE" button to cycle through the available options. After 30 seconds of charging, the mode button will lock. To change the mode again, disconnect and reconnect the battery clamps.
- Lithium Batteries Mode: For charging 12V or 24V Lithium batteries with Battery Management Systems (BMS) only. The Lithium LED will illuminate.
- Lead-Acid Batteries Mode: For AGM, GEL, SLA, WET, DEEP CYCLE, EFB, and Calcium batteries.
- Motorcycle and LiFePO4 Batteries Mode: Specifically for motorcycle batteries and LiFePO4 batteries.
- Repair Mode (16 hours): An advanced battery recovery mode for repairing and storing old, idle, damaged, stratified, or sulfated batteries. Note that not all batteries can be recovered, and this mode is primarily for motorcycle and car batteries.

Image 4.1: The mode selection interface, detailing options for Lithium, Lead-Acid, LiFePO4, and Repair functions.
4.3. LCD Display
The intelligent digital display shows real-time charging status and battery information.
- Voltage: Displays the current battery voltage.
- Current: Shows the charging current.
- Desulphation: Indicates when the desulphation process is active.
- Battery Full: Indicates when the battery is fully charged.
- Wrong Polarity: Alerts if the battery clamps are connected incorrectly.
- Temperature: Displays indoor temperature.
- Mode Indicators: Shows selected mode (Summer, Winter, etc.).
- Charge Display: A five-stage visual indicator showing battery charge level (20%, 40%, 60%, 80%, Completed).
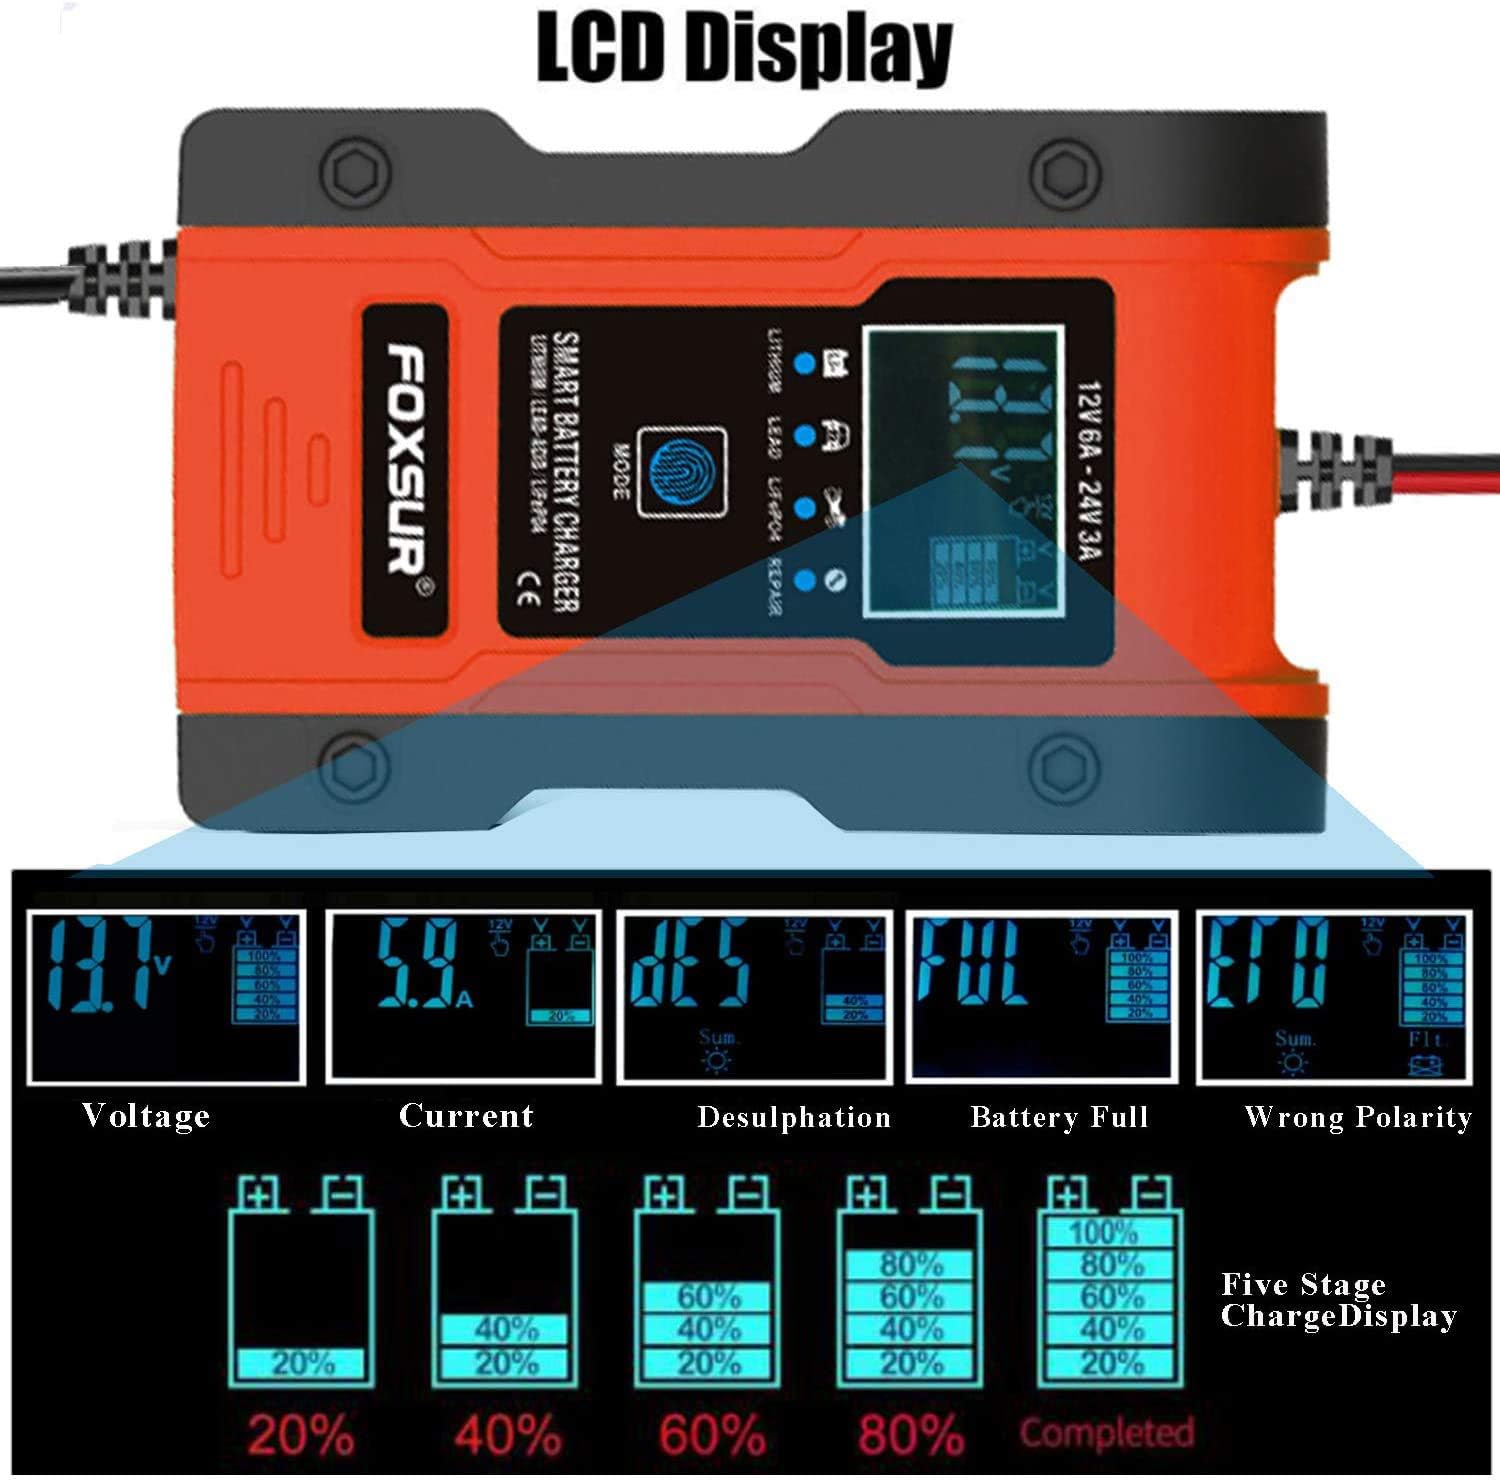
Image 4.2: The LCD display provides comprehensive information on the charging process and battery status.

Image 4.3: The charger is compatible with Lithium, Lead-Acid, and LiFePO4 batteries, suitable for a wide range of vehicles and equipment.
5. Maintenance
Proper maintenance ensures the longevity and optimal performance of your battery charger.
- Cleaning: Disconnect the charger from power and battery before cleaning. Wipe the exterior with a soft, dry cloth. Do not use solvents or abrasive cleaners.
- Storage: Store the charger in a cool, dry place when not in use. Ensure cables are neatly coiled and not kinked.
- Cooling Fan: The charger is equipped with a cooling fan to dissipate heat during operation. Ensure the fan vents are not obstructed.

Image 5.1: The integrated cooling fan actively dissipates heat, ensuring stable performance and extending the charger's lifespan.
6. Troubleshooting
If you encounter issues with your charger, refer to the following common problems and solutions:
- Charger not turning on:
- Check if the power cord is securely plugged into the AC outlet.
- Ensure the AC outlet is functional.
- "Wrong Polarity" displayed:
- Disconnect the charger from both the battery and power.
- Reconnect the red clamp to the positive (+) terminal and the black clamp to the negative (-) terminal.
- Plug the charger back into the power outlet.
- Battery not charging:
- Verify that the battery clamps have a good connection to the battery terminals.
- Ensure the battery is within the supported voltage (12V/24V) and capacity (6Ah-120Ah) range.
- The charger cannot charge a completely dead battery (below 7.0V minimum start voltage) or a severely damaged battery.
- Charger feels hot:
- This is normal during operation, especially during high-current charging. The cooling fan helps manage temperature.
- Ensure the cooling fan vents are not blocked.
- If the charger becomes excessively hot and shuts down, it may be due to the thermal protection activating (65°C +/- 5°C). Allow it to cool down.
7. Specifications
| Input Voltage | 100-240V AC, 50-60Hz |
| Rated Output | 12V 6A / 24V 3A |
| Minimum Start Voltage | 7.0V |
| Battery Range | 6Ah-120Ah |
| Thermal Protection | 65°C +/- 5°C |
| Efficiency | App. 85% |
| Compliant Standards | CB, CE, IEC60335, EN61000, EN55014 |
| Dimensions (L×W×H) | 160 × 100 × 62 mm |
| Weight | 470g |
| Outer Material | ABS |
| Model Number | FBC-122406-D |
| UPC | 717664182491 |
8. Warranty and Support
Specific warranty information for this product is not provided in the available documentation. For warranty claims or technical support, please contact your retailer or the manufacturer directly. Keep your purchase receipt as proof of purchase.


