1. Introduction
Thank you for purchasing the Arlec 2200W Smart Convection Panel Heater. This manual provides essential information for the safe and efficient operation, installation, and maintenance of your new heater. Please read these instructions thoroughly before use and retain them for future reference.
Important Safety Information
- Always ensure the heater is placed on a stable, level surface or securely wall-mounted.
- Do not cover the heater, as this can lead to overheating and fire risk.
- Keep flammable materials at least 1 meter away from the heater.
- Do not operate the heater near water or in damp environments.
- Unplug the heater from the power outlet when not in use or before cleaning.
- This appliance is not intended for use by persons (including children) with reduced physical, sensory or mental capabilities, or lack of experience and knowledge, unless they have been given supervision or instruction concerning use of the appliance by a person responsible for their safety.
2. Package Contents
Verify that all items are present and in good condition upon opening the package.
- Arlec 2200W Smart Convection Panel Heater (PEH225HA)
- Remote Control
- Wall Mounting Brackets and Screws
- Castor Wheels (for free-standing option)
- User Manual
3. Product Features
The Arlec PEH225HA heater combines efficient heating with smart control capabilities.
- 2200W Convection Heating: Provides rapid and even heat distribution.
- Smart Grid Connect: Wi-Fi enabled for control via smartphone app.
- Adjustable Electronic Thermostat: Maintain desired room temperature.
- 24-Hour Programmable Timer: Schedule heating cycles for convenience.
- LED Touch Control Panel: Intuitive on-device controls.
- Remote Control: Convenient operation from a distance.
- Versatile Installation: Wall-mountable or free-standing with included castor wheels.
- Voice Control Compatibility: Works with Amazon Alexa and Google Assistant.

Image: The Arlec 2200W Smart Convection Panel Heater, highlighting its Grid Connect smart control feature. This image shows the full heater unit with branding and key features.
4. Setup
4.1. Wall Mounting Installation
- Select Location: Choose a suitable wall location, ensuring adequate clearance from flammable materials and power outlets.
- Mark Drilling Points: Use the wall mounting brackets as a template to mark the drilling points on the wall.
- Drill Holes: Drill holes at the marked points and insert wall plugs (if required for your wall type).
- Attach Brackets: Securely fasten the wall mounting brackets to the wall using the provided screws.
- Mount Heater: Carefully lift the heater and hook it onto the wall mounting brackets. Ensure it is securely seated.
4.2. Free-Standing Installation (with Castor Wheels)
- Attach Wheels: Turn the heater upside down on a soft, protected surface. Attach the castor wheels to the designated slots on the base of the heater. Ensure they click securely into place.
- Position Heater: Place the heater upright on a stable, level surface, ensuring it is away from obstacles and flammable materials.
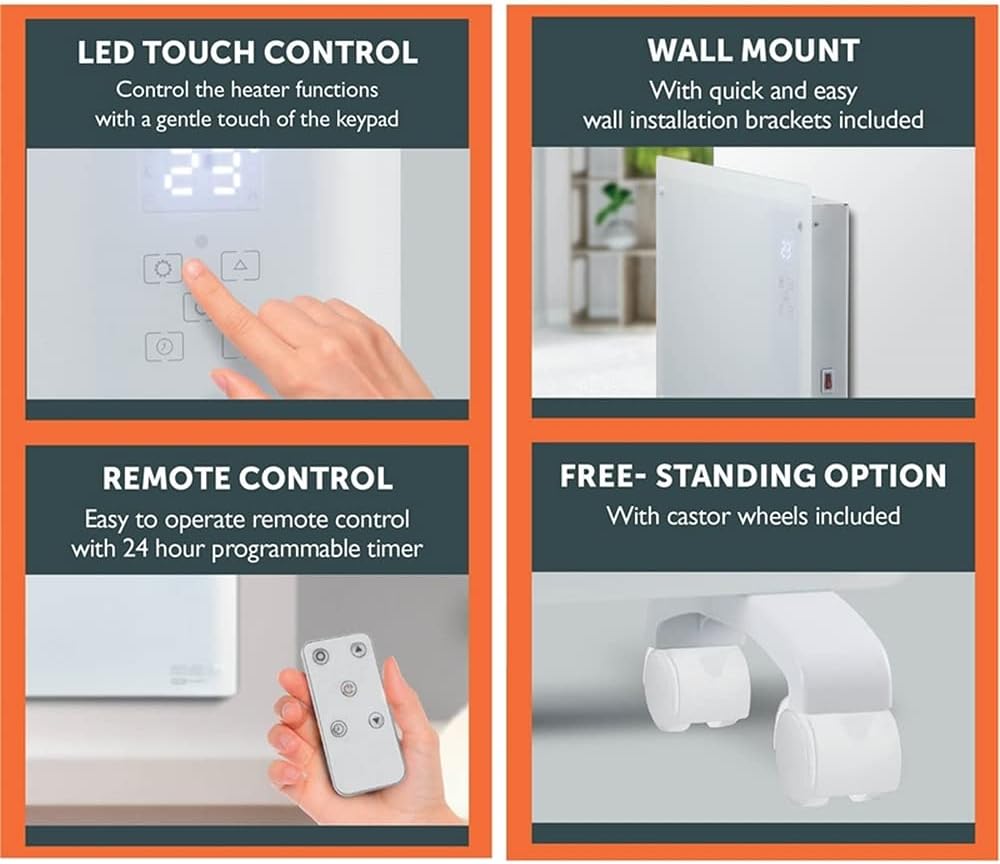
Image: A collage illustrating key features and setup options. Top left shows the LED touch control panel, top right shows the heater wall-mounted, bottom left shows the remote control, and bottom right shows the castor wheels for free-standing use.
5. Operating Instructions
5.1. Powering On/Off
- Manual Control: Press the On/Off button on the LED touch control panel or the remote control.
- App Control: Use the Grid Connect app to toggle the heater power.
5.2. Adjusting Temperature
- Manual Control: Use the Up and Down arrows on the control panel or remote to set the desired temperature. The display will show the target temperature.
- App Control: Adjust the temperature slider within the Grid Connect app.
5.3. Setting the 24-Hour Timer
- Manual Control: Press the Timer button on the control panel or remote. Use the Up and Down arrows to set the desired operating duration (in hours).
- App Control: Access the timer settings within the Grid Connect app to schedule specific on/off times.
5.4. Grid Connect App (Smart Wi-Fi Control)
The Grid Connect app allows you to control your heater from anywhere via your smartphone.
- Download App: Scan the QR code provided or search for "Grid Connect" in the App Store (iOS) or Google Play Store (Android).

Image: This image displays the Grid Connect app interface on a smartphone, demonstrating how to control heater functions like On/Off, Set Schedule, Timer Control, and Temperature. It also includes QR codes for downloading the app from Google Play and the App Store.
- Register/Login: Create an account or log in to your existing Grid Connect account.
- Add Device: Follow the in-app instructions to add your Arlec Smart Convection Panel Heater. This typically involves putting the heater into pairing mode (refer to the app for specific steps).
- Control Heater: Once connected, you can control all main heater functions, including power, temperature, timer, and scheduling.
5.5. Voice Control (Amazon Alexa & Google Assistant)
Integrate your heater with Amazon Alexa or Google Assistant for hands-free control.
- Enable Skill/Action: In your Alexa or Google Home app, search for and enable the "Grid Connect" skill or action.
- Link Account: Link your Grid Connect account to your voice assistant account.
- Discover Devices: Ask your voice assistant to discover new devices.
- Voice Commands: You can now use commands such as:
- "Alexa, turn on the heater."
- "Hey Google, set heater temperature to 22 degrees."
- "Alexa, turn off the heater."
6. Maintenance
6.1. Cleaning
- Always unplug the heater and allow it to cool completely before cleaning.
- Wipe the exterior surfaces with a soft, damp cloth. Do not use abrasive cleaners or solvents.
- Ensure no water enters the internal components.
- Periodically vacuum the air inlets and outlets to remove dust accumulation.
6.2. Storage
- If storing the heater for an extended period, ensure it is clean and dry.
- Store it in its original packaging or a protective cover in a cool, dry place.
7. Troubleshooting
| Problem | Possible Cause | Solution |
|---|---|---|
| Heater does not turn on. | No power supply. Power switch is off. Overheat protection activated. | Check if the power cord is securely plugged in. Ensure the main power switch is on. Unplug, allow to cool for 30 minutes, then plug back in. |
| Heater not heating effectively. | Temperature setting too low. Room size too large for heater capacity. Air inlets/outlets blocked. | Increase the target temperature. Ensure heater is appropriate for the room size. Clear any obstructions from air vents. |
| Wi-Fi connection issues. | Incorrect Wi-Fi password. Heater too far from router. Router issues. | Double-check Wi-Fi password in the app. Move heater closer to the Wi-Fi router or use a Wi-Fi extender. Restart your Wi-Fi router. |
| Remote control not working. | Dead batteries. Obstruction between remote and heater. | Replace batteries in the remote control. Ensure a clear line of sight to the heater's receiver. |
8. Specifications
| Feature | Detail |
|---|---|
| Model | PEH225HA |
| Brand | Arlec |
| Power Output | 2200W |
| Heating Method | Convection |
| Colour | White |
| Control Type | LED Touch, Remote, Grid Connect App, Voice Control |
| Thermostat | Electronic, Adjustable |
| Timer | 24-hour Programmable |
| Mounting Options | Wall Mount, Free-Standing (with wheels) |
| Special Features | Grid Connect (Wi-Fi), Voice Control (Alexa, Google Assistant) |
9. Warranty and Support
Arlec products are manufactured to high-quality standards. This product is covered by a standard manufacturer's warranty against defects in materials and workmanship from the date of purchase. Please refer to the warranty card included with your product for specific terms and conditions.
For technical support, troubleshooting assistance, or warranty claims, please contact Arlec customer service. Contact details can typically be found on the product packaging or the official Arlec website.
Online Resources: For additional information and support regarding the Grid Connect app, visit the official Grid Connect website: Grid Connect Support


