1. Important Safety Instructions
When using electrical appliances, basic safety precautions should be followed, including the following:
- Read all instructions before using the appliance.
- Do not attempt to operate this oven with the door open as this can result in harmful exposure to microwave energy.
- Do not place any object between the oven front face and the door or allow soil or cleaner residue to accumulate on sealing surfaces.
- Do not operate the oven if it is damaged. It is particularly important that the oven door closes properly and that there is no damage to the: (1) door (bent), (2) hinges and latches (broken or loosened), (3) door seals and sealing surfaces.
- The oven should not be adjusted or repaired by anyone except properly qualified service personnel.
- Ensure the appliance is properly grounded.
- Do not heat liquids or other foods in sealed containers as they are liable to explode.
- Only use utensils that are suitable for use in microwave ovens.
- Clean the oven regularly and remove any food deposits.
2. Product Overview
The Sharp R-75MT(S) is a 25-liter microwave oven equipped with a grill function, designed for versatile cooking. It features a stainless steel finish and a mirror finish door, offering both functionality and a modern aesthetic.
Key Features:
- Capacity: 25 Liters
- Power Output: 1000 Watts
- Cooking Functions: Microwave, Grill, Combination Cooking
- Auto Cook Menus: 6 pre-set programs for convenience
- Power Levels: 11 adjustable microwave power levels
- Turntable: 315 mm diameter glass turntable
- Safety: Child Lock function
- Additional Features: Timer function, Auto Defrost
Product Dimensions:
The approximate external dimensions of the oven are: Height 30.5 cm, Width 51.3 cm, Depth 42.5 cm.
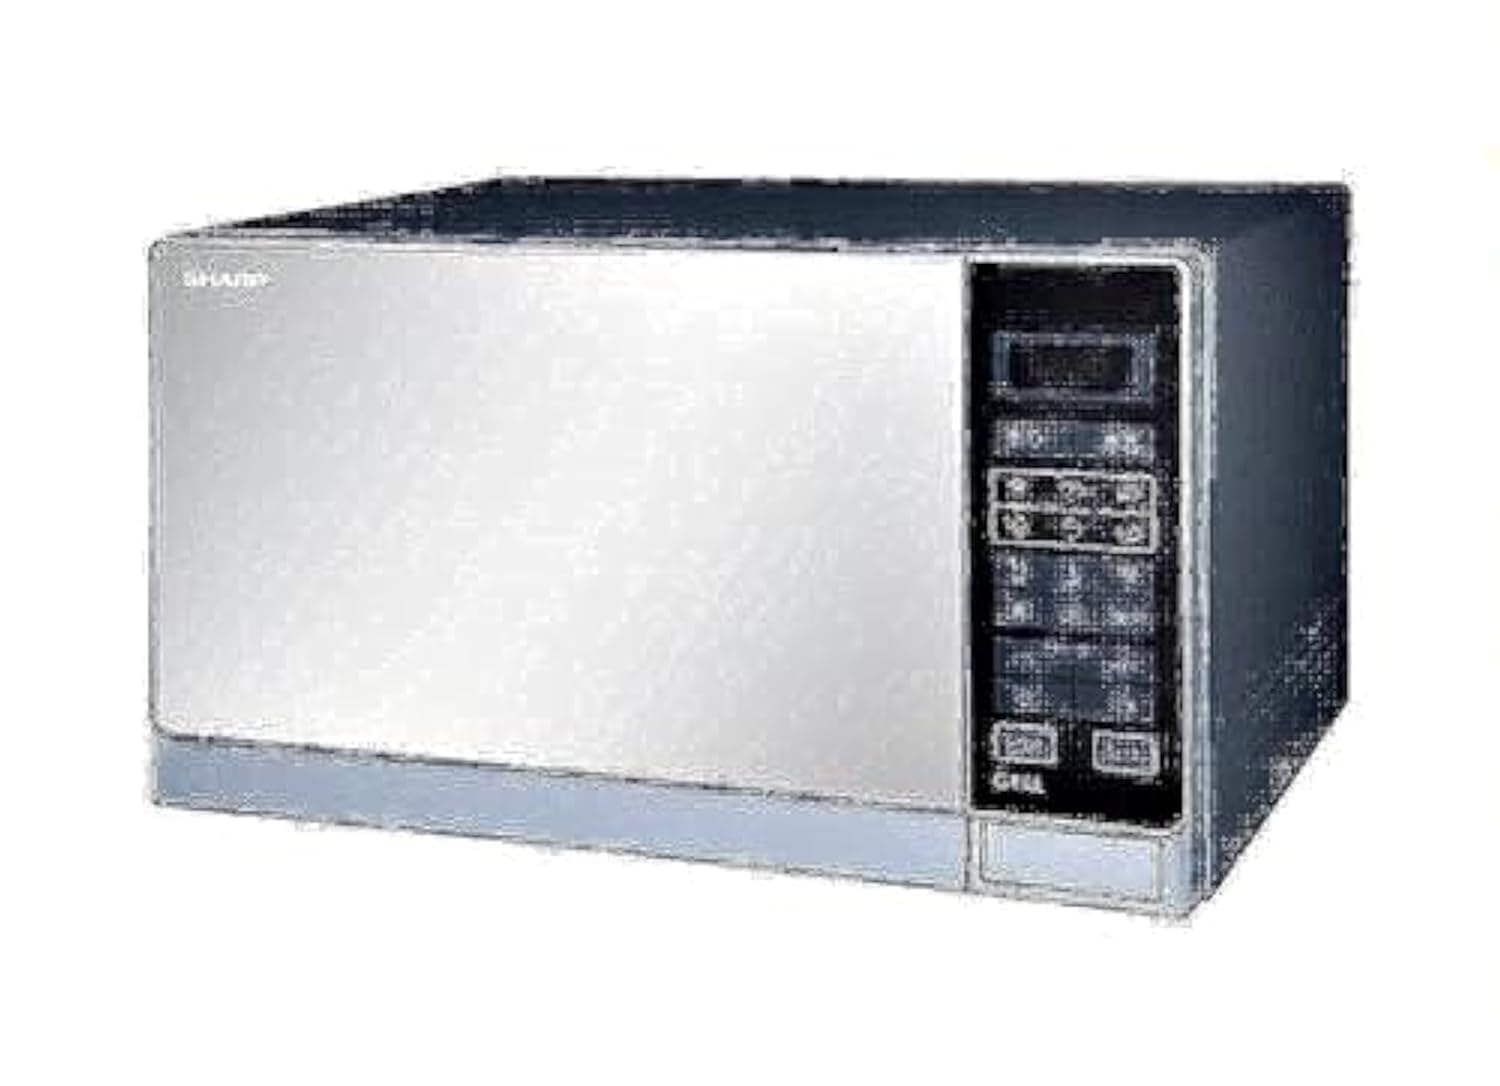
Figure 2.1: Front view of the Sharp R-75MT(S) Microwave Oven with Grill. The oven features a silver finish with a dark control panel on the right side and a mirror-finish door.

Figure 2.2: Side view of the Sharp R-75MT(S) Microwave Oven with Grill, illustrating its approximate dimensions: 51.3cm width, 42.5cm depth, and 30.5cm height.
3. Setup
3.1 Unpacking
- Remove all packaging materials from inside and outside the oven.
- Check the oven for any damage, such as dents or a misaligned door. Do not operate if damaged.
- Retain packaging materials for future transport if needed.
3.2 Placement
- Place the oven on a flat, stable surface strong enough to support its weight (approximately 17.4 kg).
- Ensure adequate ventilation by leaving at least 10 cm of space at the rear, 20 cm at the sides, and 30 cm above the oven.
- Keep the oven away from heat sources, strong magnetic fields, and areas with high humidity.
3.3 Turntable Assembly
- Place the turntable ring securely in the center depression on the oven floor.
- Position the glass turntable tray on top of the ring, ensuring it sits firmly on the central hub.
3.4 Initial Cleaning
Before first use, wipe the interior and exterior of the oven with a damp cloth to remove any dust or manufacturing residues. Ensure all parts are dry before plugging in the appliance.
4. Operating Instructions
4.1 Control Panel Overview
The control panel features a digital display, function buttons, power level selection, time/weight adjustment, and start/stop controls. Refer to the markings on your specific unit for exact button functions.
4.2 Setting the Clock
Typically, press the 'Clock' button, use the number pads or adjustment dial to set the current time, then press 'Clock' again to confirm.
4.3 Microwave Cooking
- Place food in a microwave-safe container on the glass turntable.
- Close the oven door.
- Press the 'Microwave' button or select the desired power level (11 levels available).
- Use the number pads or adjustment dial to set the cooking time.
- Press 'Start' to begin cooking.
4.4 Grill Cooking
- Place food on the metal grill rack (if provided) or a heat-resistant dish.
- Press the 'Grill' button.
- Set the desired grilling time.
- Press 'Start'.
4.5 Combination Cooking (Microwave + Grill)
This function combines microwave and grill heating for faster cooking and browning. Consult your specific model's control panel for combination mode selection (e.g., 'Combi 1', 'Combi 2').
- Place food in a suitable container.
- Select the desired combination cooking mode.
- Set the total cooking time.
- Press 'Start'.
4.6 Auto Cook Menu
The oven includes 6 pre-programmed auto cook menus for common foods. To use:
- Press the 'Auto Cook' button repeatedly or use the number pads to select the desired menu number.
- Enter the food weight or quantity if prompted.
- Press 'Start'.
4.7 Auto Defrost
This feature automatically calculates defrosting time based on food weight.
- Place frozen food in a microwave-safe container.
- Press the 'Defrost' button.
- Enter the weight of the food.
- Press 'Start'.
4.8 Child Lock
To activate the child lock, typically press and hold the 'Stop/Cancel' button for 3 seconds. A lock indicator will appear on the display. To deactivate, repeat the process.
4.9 Timer Function
The timer can be used as a kitchen timer without cooking. Press the 'Timer' button, set the desired time, and press 'Start'.
5. Maintenance and Cleaning
Regular cleaning helps maintain the oven's performance and extends its lifespan. Always unplug the oven before cleaning.
5.1 Cleaning the Interior
- Wipe the oven cavity after each use with a damp cloth to remove food splatters.
- For stubborn stains, place a bowl of water with lemon juice inside and microwave for 2-3 minutes. The steam will loosen the stains, making them easier to wipe away.
- Do not use abrasive cleaners or harsh chemicals.
5.2 Cleaning the Exterior
- Wipe the exterior surfaces with a soft, damp cloth.
- Clean the control panel gently with a slightly damp cloth. Avoid excessive moisture.
5.3 Cleaning the Turntable
- The glass turntable tray and turntable ring can be removed and washed in warm, soapy water or in a dishwasher.
- Ensure they are completely dry before placing them back in the oven.
6. Troubleshooting
If you encounter issues with your microwave oven, refer to the following common problems and solutions before contacting service.
| Problem | Possible Cause | Solution |
|---|---|---|
| Oven does not start | Power cord not plugged in; Door not closed properly; Fuse blown or circuit breaker tripped. | Plug in power cord; Close door securely; Check fuse or reset circuit breaker. |
| Food not heating | Incorrect cooking time/power level; Door not closed properly. | Adjust time/power; Close door securely. |
| Turntable not rotating | Turntable not properly seated; Debris under turntable. | Ensure turntable and ring are correctly positioned; Clean oven floor. |
| Unusual noise during operation | Loose turntable components; Utensils touching oven walls. | Re-seat turntable; Ensure proper placement of dishes. |
| Oven light not working | Light bulb needs replacement. | Contact qualified service personnel for bulb replacement. |
7. Specifications
| Feature | Specification |
|---|---|
| Model Number | R-75MT(S) |
| Capacity | 25 Liters |
| Microwave Power Output | 1000 Watts |
| Installation Type | Freestanding |
| External Dimensions (H x W x D) | 30.5 cm x 51.3 cm x 42.5 cm |
| Weight | 17.4 Kilograms |
| Material (Exterior) | Metal |
| Material (Interior) | Tempered Glass |
| Turntable Diameter | 315 mm |
| Color | Silver |
| Special Features | Auto Cook, Grill, Child Lock, Timer |
8. Warranty and Support
For warranty information, please refer to the warranty card or documentation included with your purchase. Warranty terms and conditions may vary by region and retailer.
For technical support, service, or spare parts, please contact Sharp customer service or an authorized service center in your area. Contact details can typically be found on the manufacturer's official website or in your product documentation.


