1. Introduction
This manual provides detailed instructions for the installation, setup, operation, and maintenance of your GENBOLT GB213X 4K 8MP Dual-Band WiFi Security Camera. Please read this manual thoroughly before using the product to ensure proper functionality and safety. Keep this manual for future reference.
The GENBOLT GB213X is an outdoor security camera featuring 4K 8MP resolution, dual-band 2.4/5GHz Wi-Fi connectivity, color night vision with floodlights, pan/tilt functionality, auto-tracking, and human/vehicle detection. It supports both DC power and Power over Ethernet (PoE) for flexible installation.
2. Package Contents
Verify that all items listed below are included in your package. If any items are missing or damaged, please contact GENBOLT customer support.
- GENBOLT GB213X Security Camera
- Power Adapter (12V/2A)
- Network Cable (1 meter / 3.3ft)
- Waterproof Kit
- Screw Bag (for mounting)
- User Manual

Image: Contents of the GENBOLT GB213X package, including the camera, power adapter, network cable, waterproof kit, screws, and user manual.
3. Product Overview
Familiarize yourself with the components and interfaces of your GENBOLT GB213X camera.
Image: Detailed diagram showing the camera's components: Antenna, Bracket (Ceiling/Wall Installation), ABS Plastic Shell, IR/White LEDs, HD Lens, IR Sensor, Speaker, MicroCard Slot, RESET button, PoE Port, and Power input.
- Antenna: For Wi-Fi signal reception.
- Bracket: Used for mounting the camera on a wall or ceiling.
- ABS Plastic Shell: Durable housing for outdoor use.
- IR/White LEDs: Provide illumination for color night vision and infrared night vision.
- HD Lens: Captures 4K 8MP video.
- IR Sensor: Detects ambient light for automatic night vision activation.
- Speaker: For two-way audio communication and siren alerts.
- MicroCard Slot: For inserting a microSD card for local storage.
- RESET Button: Used to restore factory settings.
- PoE Port: Connects to a PoE switch or injector for both power and data.
- Power Input: Connects to the included 12V/2A power adapter.
4. Installation
The GENBOLT GB213X camera supports both wall and ceiling installations. Choose a location that provides optimal coverage and a stable Wi-Fi signal.
4.1 Mounting Location Considerations
- Ensure the camera has a clear line of sight to the area you wish to monitor.
- Avoid placing the camera directly facing strong light sources, which can affect image quality.
- For Wi-Fi connectivity, ensure the camera is within range of your router.
- Consider power access (DC or PoE) for your chosen location.
4.2 Installation Steps
- Prepare the Mounting Surface: Use the included mounting template (if provided) or the camera base to mark the drill holes on the wall or ceiling.
- Drill Holes: Drill pilot holes at the marked positions. Insert the wall anchors if mounting on masonry or drywall.
- Secure the Camera: Align the camera's bracket with the drilled holes and secure it using the provided screws.
- Connect Power and Network:
- DC Power: Connect the power adapter to the camera's power input and plug it into an outdoor-rated power outlet.
- PoE: Connect a network cable from a PoE switch or injector to the camera's PoE port.
- Adjust Angle: Loosen the adjustment screws on the camera body to set the desired pan and tilt angle, then tighten them to secure the position.

Image: Illustration of the two primary installation methods for the GENBOLT GB213X camera: ceiling installation and wall installation, showing the camera mounted in both orientations on a house exterior.
5. Setup
Follow these steps to connect your camera to your network and set it up using the GENBOLT CAM app.
5.1 App Download and Account Registration
- Download the "GENBOLT CAM" app from your smartphone's app store (iOS App Store or Google Play Store).
- Open the app and register for a new account if you don't have one, or log in with your existing credentials.
5.2 Initial Network Connection (Wired Setup Recommended)
For the first-time setup, a wired connection to your router is recommended for stability.
- Connect the camera to your router using the provided network cable.
- Ensure your smartphone is connected to the same Wi-Fi network as your router.
- In the GENBOLT CAM app, tap the "+" icon to add a new device.
- Select "Search Camera From LAN" or a similar option to find the camera on your local network.
- Once the camera is detected, follow the on-screen prompts to add it to your account.
5.3 Wi-Fi Configuration (2.4GHz & 5GHz Dual-Band)
After initial wired setup, you can configure the camera for wireless operation.
- In the GENBOLT CAM app, go to the camera's settings.
- Find the "Wi-Fi Setting" or "Network Setting" option.
- Select your desired 2.4GHz or 5GHz Wi-Fi network from the list. The camera supports both bands for flexible connectivity.
- Enter the Wi-Fi password accurately.
- Confirm the settings. The camera will attempt to connect to the Wi-Fi network. Once connected, you can disconnect the Ethernet cable.
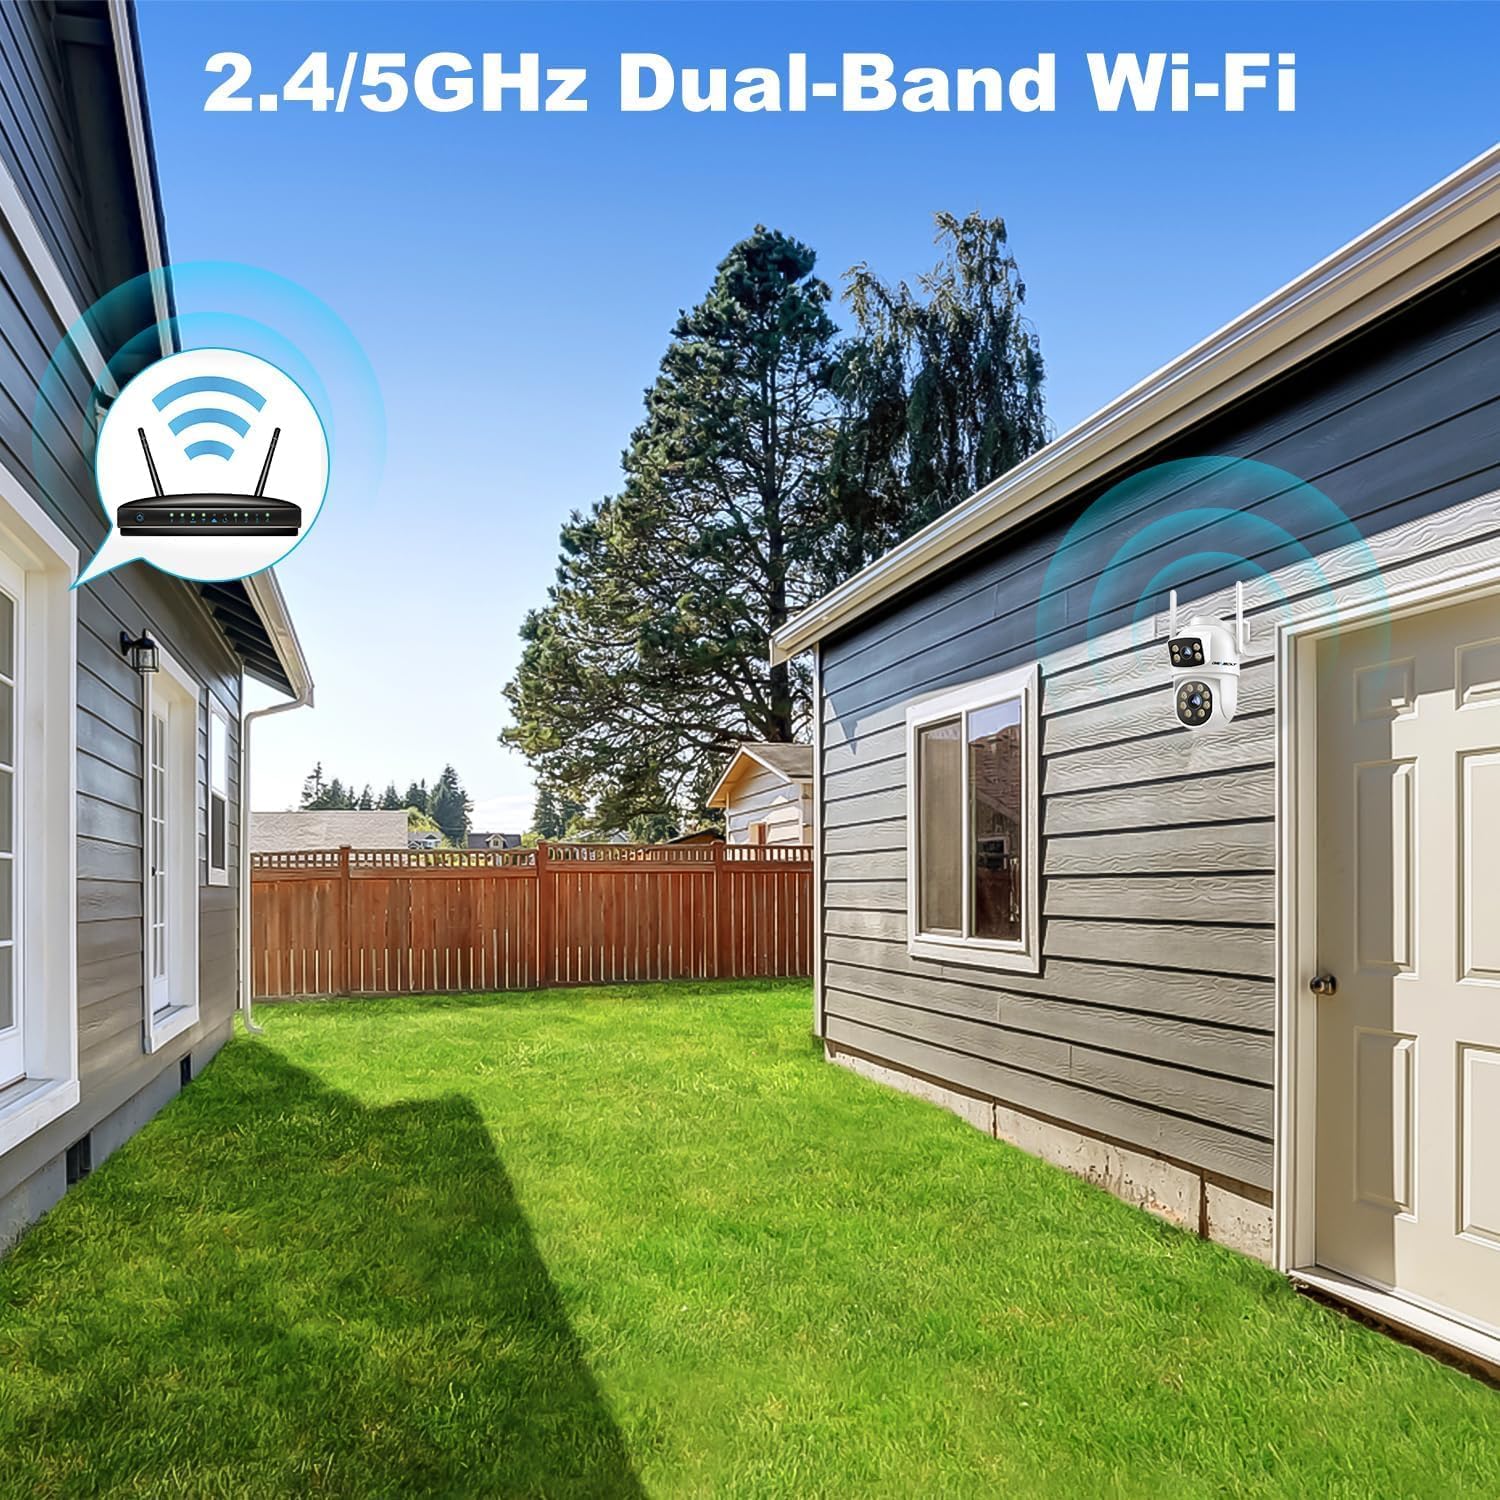
Image: A GENBOLT GB213X camera wirelessly connected to a dual-band 2.4/5GHz Wi-Fi router, illustrating its flexible network connectivity.
6. Operating Instructions
This section details the various functions and features of your GENBOLT GB213X camera.
6.1 Pan, Tilt, and Digital Zoom
Control the camera's viewing angle directly from the GENBOLT CAM app.
- Pan: Rotate the camera horizontally up to 355°.
- Tilt: Adjust the camera vertically up to 90°.
- Digital Zoom: Use pinch-to-zoom gestures in the app to digitally zoom in on specific areas of the video feed (4x digital zoom).
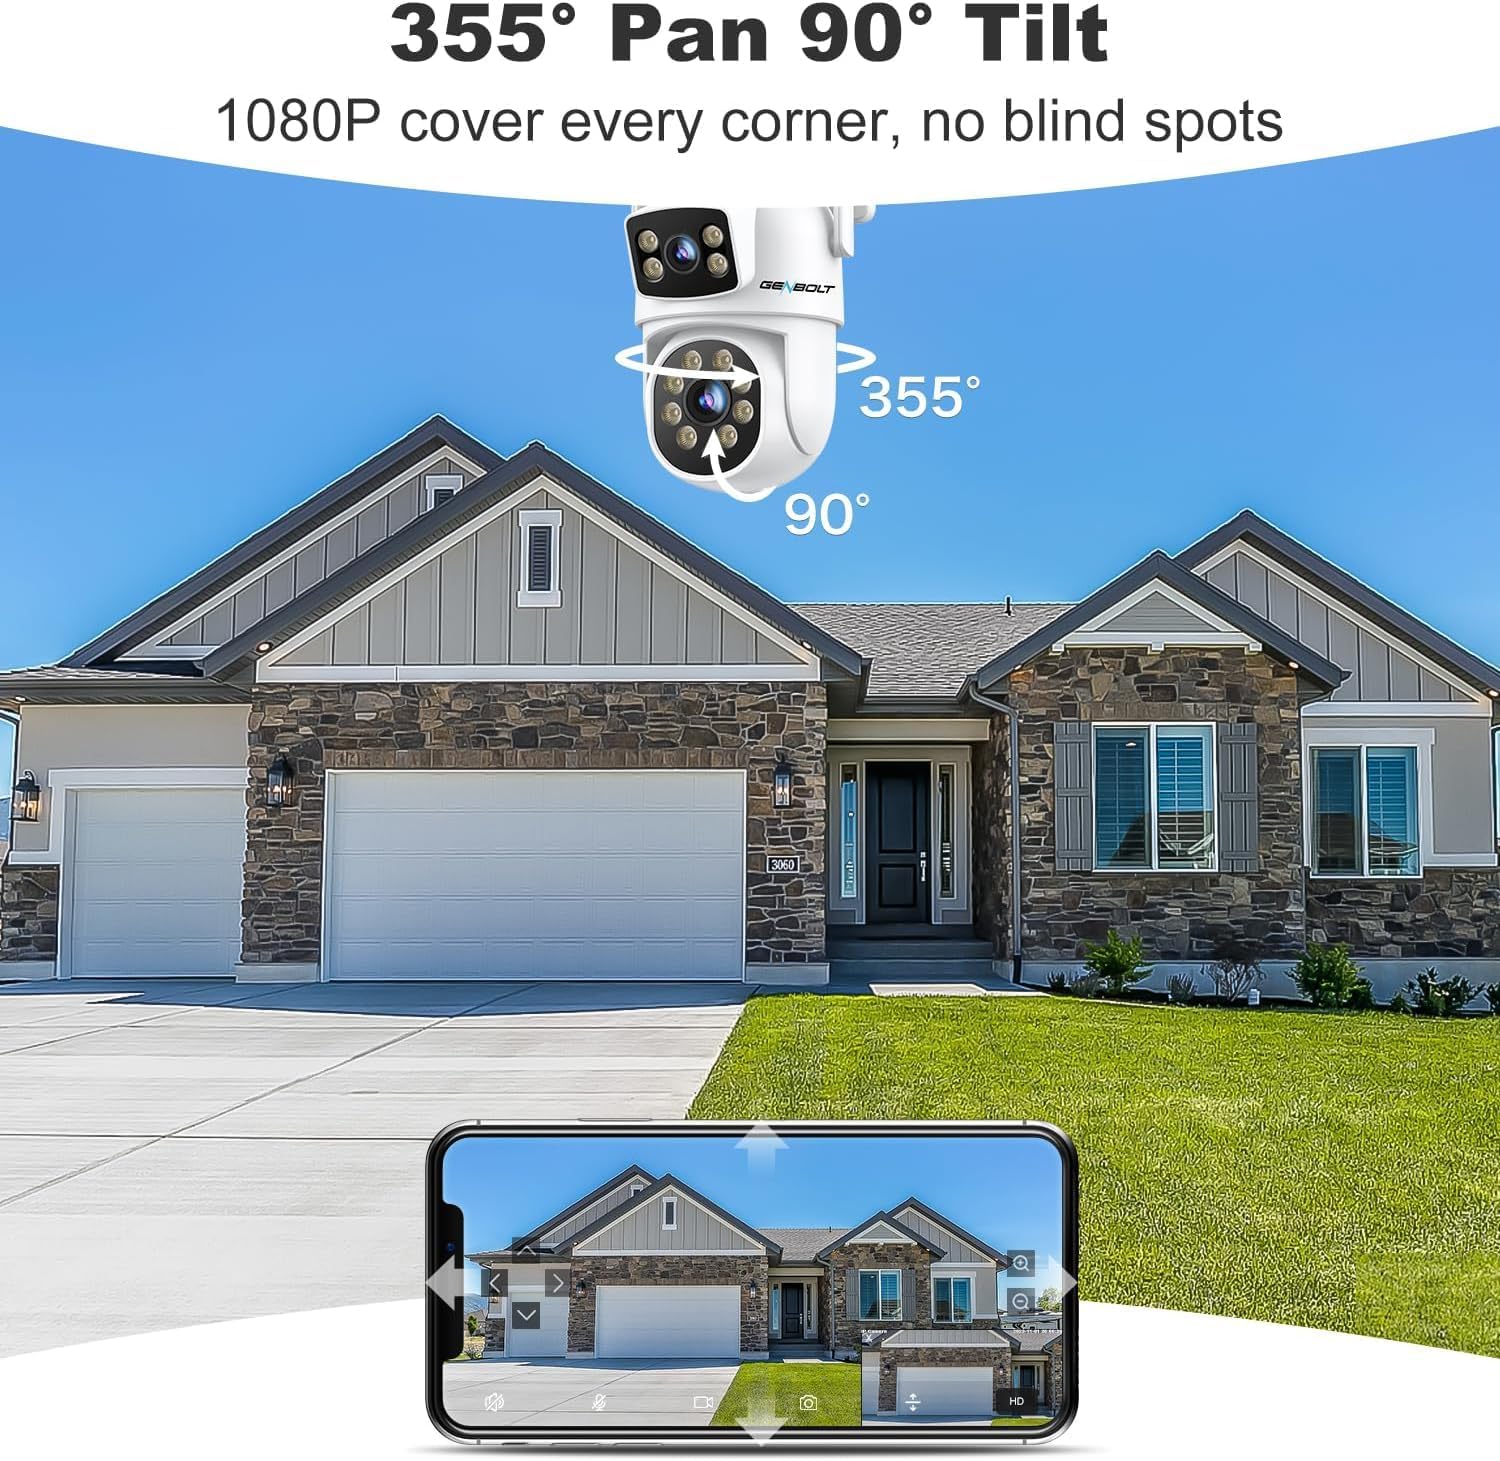
Image: A GENBOLT GB213X camera demonstrating its 355° horizontal pan and 90° vertical tilt range, providing comprehensive coverage.
6.2 Auto Tracking
The camera can automatically track moving subjects within its field of view.
- Enable "Auto Tracking" in the camera settings within the app.
- When a human or vehicle is detected, the camera will automatically adjust its pan/tilt to follow the movement.
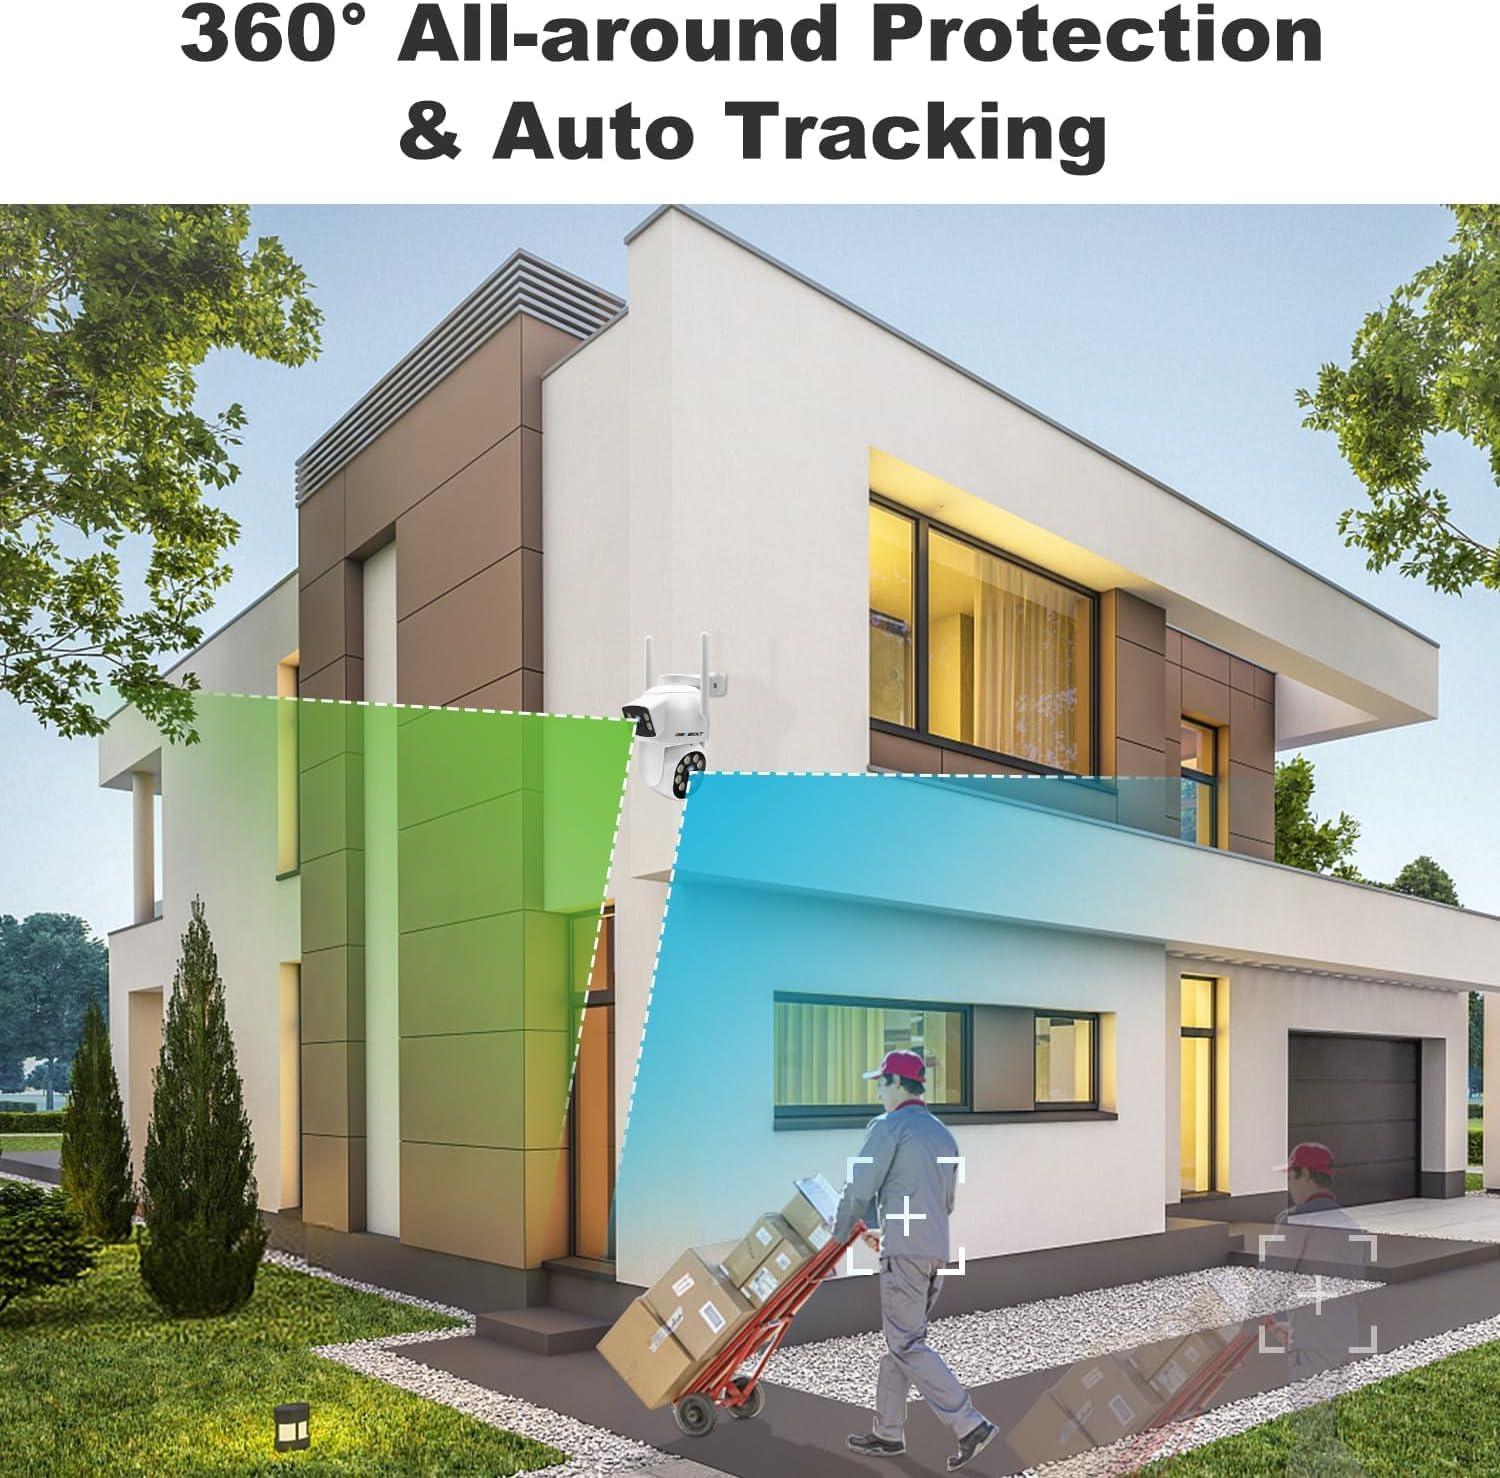
Image: A GENBOLT GB213X camera actively tracking a person walking, highlighting its 360° all-around protection and auto-tracking capabilities.
6.3 Day & Color Night Vision
The camera provides clear video day and night, with advanced color night vision.
- Daytime Vision: Full-color video in well-lit conditions.
- Color Night Vision: Utilizes built-in floodlights to provide full-color video even in low-light or complete darkness, up to 150 feet (40 meters).
- Infrared Night Vision: When floodlights are off, the camera switches to infrared mode for black and white video in darkness.
- You can configure night vision modes (Normal, Color, Auto) in the app settings.
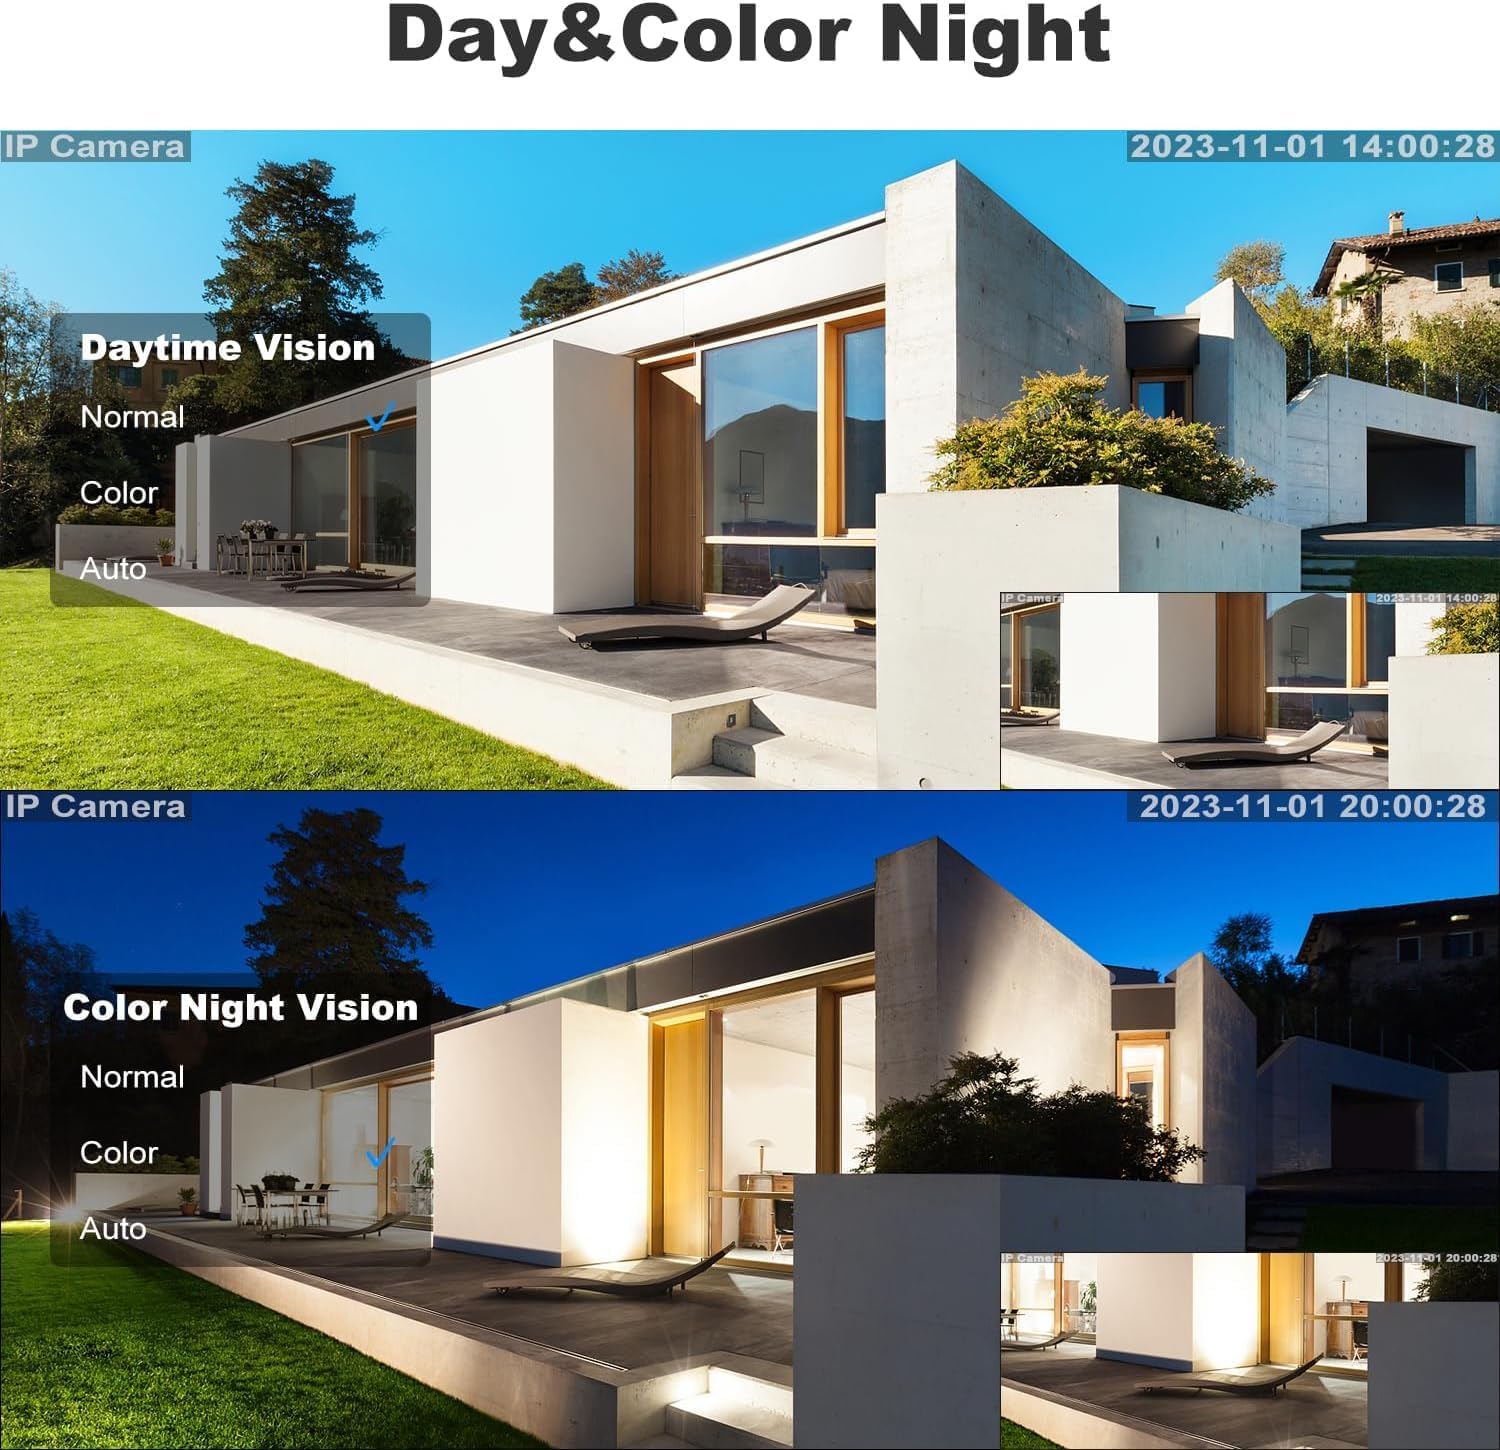
Image: A split view demonstrating the camera's performance in daytime and color night vision modes, showing clear, vibrant images even in darkness.
6.4 Two-Way Audio
Communicate with visitors or deter intruders using the camera's built-in microphone and speaker.
- In the live view interface of the app, tap the microphone icon to speak through the camera's speaker.
- The camera's microphone will capture audio from the monitored area.
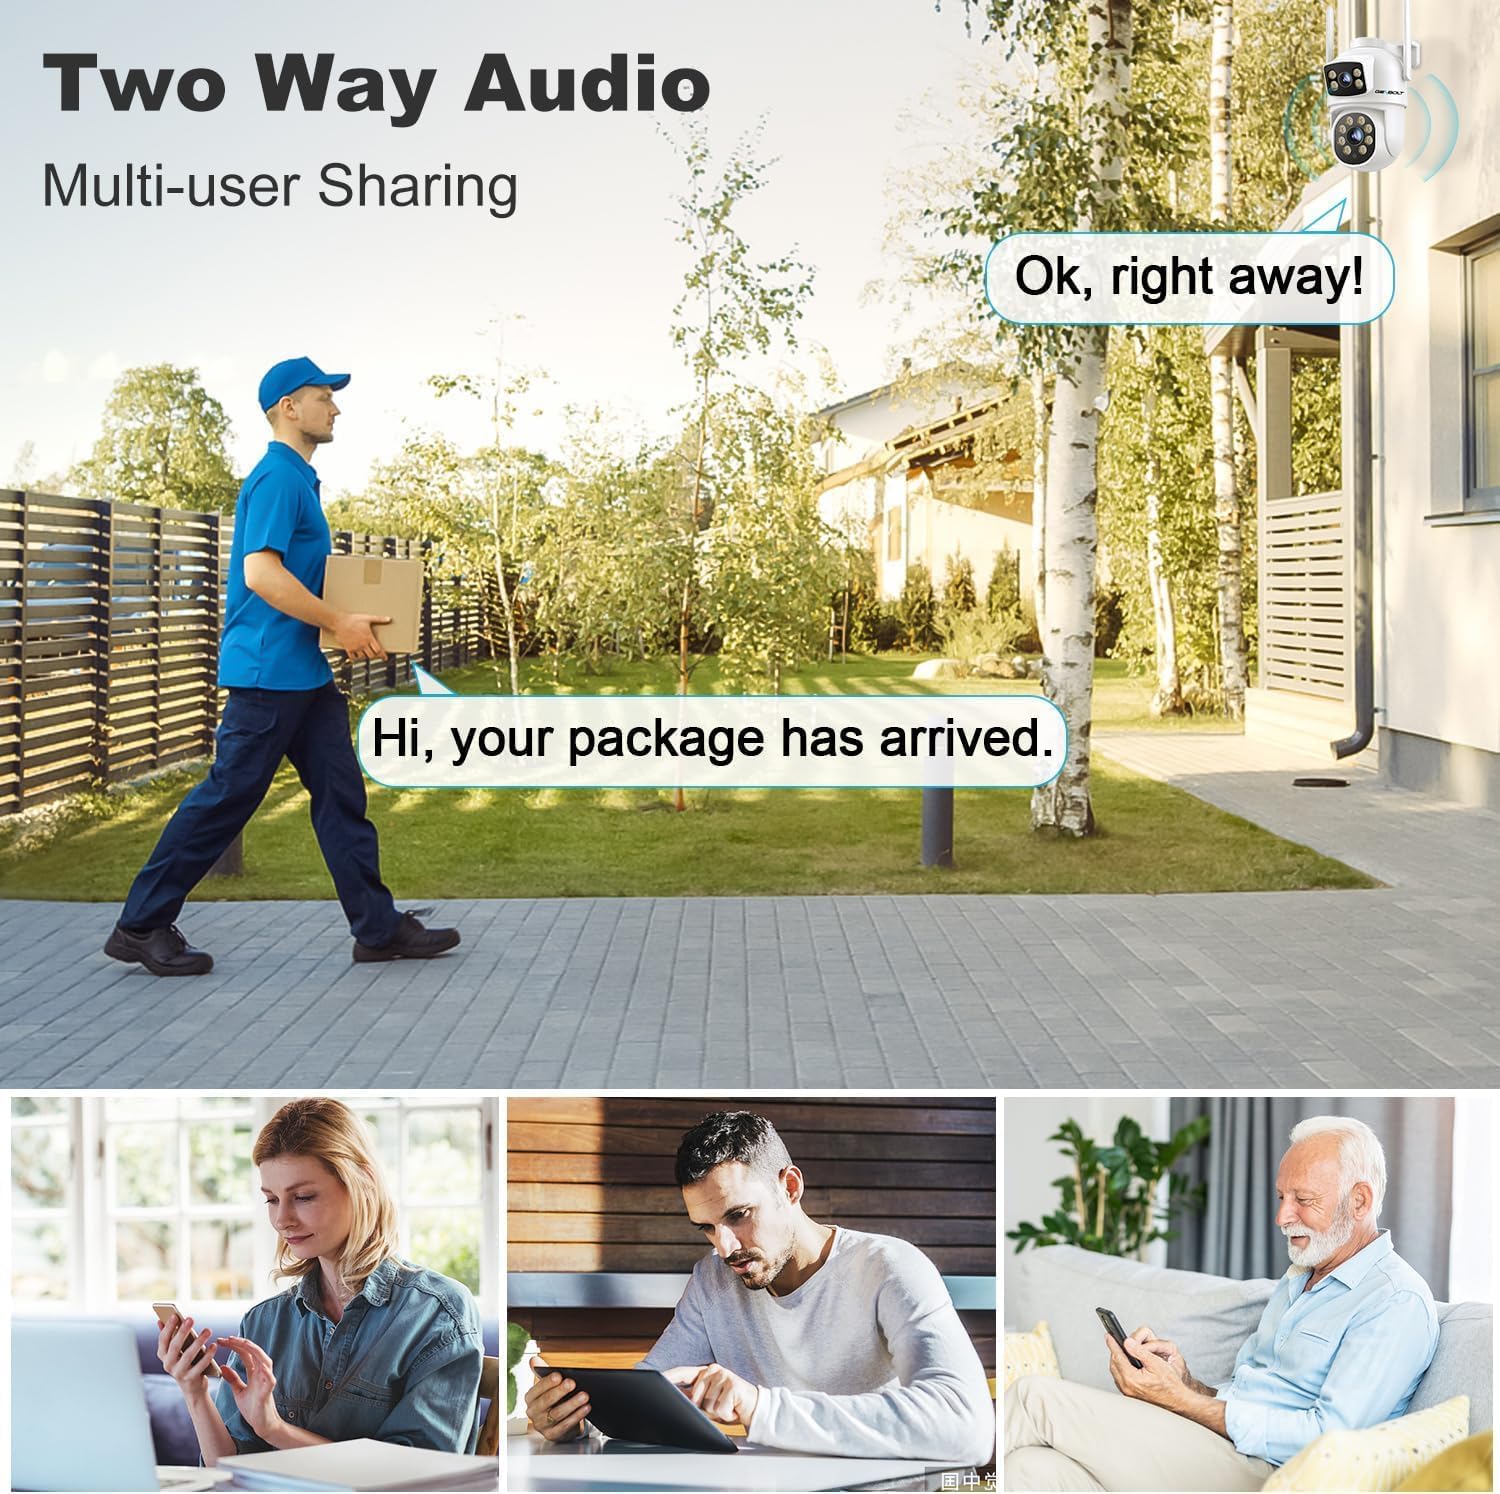
Image: A GENBOLT GB213X camera facilitating two-way audio communication, showing a delivery person speaking to someone inside the house via the camera.
6.5 Humanoid & Vehicle Detection
The camera uses advanced AI to distinguish between humans, vehicles, and other moving objects, reducing false alarms.
- Configure detection zones and sensitivity settings in the app.
- Receive real-time alerts only when a human or vehicle is detected in the specified zones.
6.6 Active Siren & Light Defense
Enhance security with audible and visual deterrents.
- When motion is detected, the camera's floodlights can automatically turn on.
- A customizable siren sound can be triggered to scare off intruders.
- These features can be enabled and configured in the app's alarm settings.
6.7 Bullet & Dome Integrated Linkage
This feature allows the camera to monitor two positions simultaneously, combining a fixed view with a pan/tilt view.
- The camera can maintain a fixed monitoring area while also using its pan/tilt capabilities to track movement in another area.
- This provides broader surveillance coverage from a single device.

Image: An illustration showing how the GENBOLT GB213X camera can monitor two distinct areas simultaneously, one with a fixed lens view and another with a pan/tilt lens view, effectively integrating bullet and dome camera functionalities.
7. Maintenance
Regular maintenance ensures optimal performance and longevity of your camera.
- Cleaning: Gently wipe the camera lens and housing with a soft, damp cloth. Do not use harsh chemicals or abrasive cleaners.
- Firmware Updates: Check the GENBOLT CAM app regularly for firmware updates. Keeping your camera's firmware up-to-date ensures the latest features and security patches.
- Cable Inspection: Periodically inspect power and network cables for any signs of wear or damage. Ensure waterproof connections are secure.
- Storage: If using a microSD card, ensure it is functioning correctly and has sufficient space. Format the card periodically if needed (this will erase all data).
8. Troubleshooting
Refer to this section for solutions to common issues.
8.1 Camera Offline / Cannot Connect to Wi-Fi
- Check Power: Ensure the camera is properly powered on.
- Wi-Fi Signal: Verify that the camera is within range of your Wi-Fi router and the signal is strong.
- Router Settings: Ensure your router is broadcasting a 2.4GHz or 5GHz network (depending on what you selected) and that the Wi-Fi password is correct.
- Reboot: Try restarting both the camera and your router.
- Reset: If issues persist, press and hold the RESET button on the camera for 5-10 seconds to restore factory settings, then reconfigure.
8.2 Poor Image Quality
- Clean Lens: Ensure the camera lens is clean and free from dirt or smudges.
- Lighting: Check for strong backlighting or insufficient lighting in the monitored area. Adjust camera position or add external lighting if necessary.
- Network Bandwidth: Ensure your internet connection has sufficient upload bandwidth for high-resolution streaming.
8.3 False Alarms / Motion Detection Issues
- Detection Zones: Adjust the motion detection zones in the app to exclude areas with irrelevant movement (e.g., trees swaying, busy roads).
- Sensitivity: Lower the motion detection sensitivity in the app settings.
- Human/Vehicle Detection: Ensure Humanoid & Vehicle Detection is enabled if you only want alerts for these specific types of movement.
8.4 SD Card Not Recording
- Card Insertion: Ensure the microSD card is inserted correctly into the slot.
- Format Card: Format the microSD card through the camera settings in the app.
- Card Compatibility: Use a high-quality, compatible microSD card (Class 10 or higher, up to supported capacity).
- Recording Schedule: Check the recording schedule settings in the app to ensure it's configured to record.
9. Specifications
Key technical specifications for the GENBOLT GB213X camera.
| Feature | Specification |
|---|---|
| Model Name | GB213X |
| Brand | GENBOLT |
| Indoor/Outdoor Usage | Outdoor |
| Connectivity Technology | Wireless (Wi-Fi) |
| Wi-Fi Frequency | 2.4GHz & 5GHz Dual-Band |
| Effective Video Resolution | 8MP (4K) |
| Pan Range | 355° |
| Tilt Range | 90° |
| Digital Zoom | 4x |
| Night Vision | Color Night Vision (with Floodlights), Infrared Night Vision |
| Detection Features | Humanoid & Vehicle Detection, Motion Detection |
| Audio | 2-Way Audio |
| Power Source | Corded Electric (12V/2A) or Power over Ethernet (PoE) |
| Mounting Type | Wall Mount, Ceiling Mount |
| International Protection Rating | IP66 |
| Product Dimensions | 5 x 6 x 6 inches |
| Item Weight | 1.96 pounds |
10. Warranty and Support
For warranty information and technical support, please refer to the official GENBOLT website or contact their customer service directly. Keep your purchase receipt as proof of purchase.
GENBOLT Customer Support: Please visit www.genbolt.com/support for FAQs, troubleshooting guides, and contact information.


