
1. Introduction
This manual provides detailed instructions for the safe and efficient operation of your JIOC H011UR Portable FM/USB/SD/AUX Radio Speaker. Please read this manual thoroughly before using the device and retain it for future reference. The JIOC H011UR is a versatile, lightweight, and portable radio speaker designed for daily use, featuring FM radio, MP3 playback via USB and SD card, and an AUX input.
2. Key Features
- FM Radio (87.5-108MHz)
- Automatic Channel Search and Save Function
- MP3 Playback from USB Flash Drives
- MP3 Playback from SD/TF Memory Cards
- 3.5mm AUX Audio Input
- Memory Play by Interrupt Stacking
- Lithium-ion Battery Powered for Extended Use
- Lightweight and Portable Design
3. Package Contents
Please check the package for the following items:
- JIOC H011UR Portable Radio Speaker
- Rechargeable Lithium-ion Battery
- USB Charging Cable
- Power Adapter
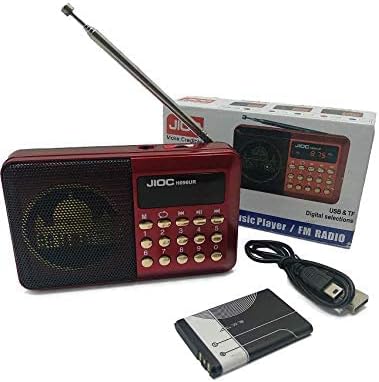
Figure 3.1: JIOC H011UR Radio Speaker and Accessories
This image displays the JIOC H011UR radio speaker in red, alongside its rechargeable battery, a USB charging cable, and the retail packaging. This illustrates the typical contents found within the product box.
4. Controls and Functions

Figure 4.1: Front Panel Controls
This image shows the front of the JIOC H011UR radio, featuring a speaker grille on the left and a control panel on the right. The control panel includes a small display, a 'M' (Mode) button, play/pause, previous/next track buttons, and a numeric keypad (0-9) for direct input or channel selection.

Figure 4.2: Side Panel Ports
This image displays the side of the JIOC H011UR radio, revealing various input/output ports. From top to bottom, these include a micro USB charging port, a 3.5mm AUX input jack, a USB-A port for flash drives, and an SD card slot. A volume control wheel is also visible.
4.1 Front Panel
- Display Screen: Shows current mode, frequency, or track number.
- M (Mode) Button: Switches between FM Radio, USB, SD, and AUX modes.
- Play/Pause Button (►/∎): Plays or pauses audio playback. In FM mode, long press for auto-scan.
- Previous/Next Track Buttons (⏪/⏭): Navigates between tracks in USB/SD mode or tunes FM frequency.
- Numeric Keypad (0-9): Direct input for FM frequencies or track numbers.
4.2 Side Panel
- Volume Control Wheel: Adjusts the audio output level.
- Micro USB Charging Port: For connecting the charging cable.
- 3.5mm AUX Input: Connect external audio devices.
- USB-A Port: Insert USB flash drives for MP3 playback.
- SD/TF Card Slot: Insert SD or TF memory cards for MP3 playback.
4.3 Rear Panel
- Battery Compartment: Houses the rechargeable lithium-ion battery.
- Power Switch: Turns the device ON or OFF.
5. Setup
5.1 Battery Installation
- Locate the battery compartment on the rear of the radio.
- Gently slide the battery compartment cover downwards to open it.
- Insert the provided lithium-ion battery, ensuring the contacts align correctly with the terminals inside the compartment.
- Replace the battery compartment cover until it clicks securely into place.

Figure 5.1: Battery Installation
This image illustrates the rear of the JIOC H011UR radio with its battery compartment open. The rechargeable lithium-ion battery and the compartment cover are shown separately, indicating how to access and install the battery.
5.2 Charging the Battery
- Connect the small end of the USB charging cable to the Micro USB charging port on the side of the radio.
- Connect the larger end of the USB charging cable to the provided power adapter.
- Plug the power adapter into a standard wall outlet.
- The charging indicator light (if present) will illuminate during charging and turn off or change color when fully charged.
- A full charge typically takes 2-3 hours.
Note: It is recommended to fully charge the battery before first use to ensure optimal battery life.
6. Operating Instructions
6.1 Power On/Off
Slide the power switch located on the rear panel to the 'ON' position to turn on the radio. Slide it to 'OFF' to power down.
6.2 Mode Selection
Press the M (Mode) button repeatedly to cycle through the available modes: FM Radio, USB, SD, and AUX. The current mode will be displayed on the screen.
6.3 FM Radio Operation
- Extend the telescopic antenna for better reception.
- Switch to FM mode using the M (Mode) button.
- Automatic Channel Search: Long press the Play/Pause button (►/∎). The radio will automatically scan and save available FM stations.
- Manual Tuning: Use the Previous/Next Track buttons (⏪/⏭) to fine-tune the frequency.
- Direct Frequency Input: Use the numeric keypad to enter a specific FM frequency (e.g., 105.7) and press the Play/Pause button to confirm.
6.4 USB/SD Card Playback
- Insert a USB flash drive into the USB-A port or an SD/TF card into the SD card slot. Ensure the card is inserted correctly.
- The radio should automatically switch to USB or SD mode. If not, press the M (Mode) button to select the correct mode.
- The device will automatically begin playing MP3 files from the storage device.
- Use the Previous/Next Track buttons (⏪/⏭) to skip tracks.
- Press the Play/Pause button (►/∎) to pause or resume playback.
- Memory Play: The device supports memory play by interrupt stacking, meaning it will resume playback from where it left off when powered on again in the same mode.
6.5 AUX Input Operation
- Connect one end of a 3.5mm audio cable (not included) to the AUX input port on the side of the radio.
- Connect the other end of the audio cable to the headphone jack or audio output of your external device (e.g., smartphone, MP3 player).
- Press the M (Mode) button to select AUX mode.
- Control playback and track selection from your external device. The radio's volume control will adjust the output level.
6.6 Volume Adjustment
Rotate the volume control wheel on the side panel to increase or decrease the audio volume.
7. Maintenance
- Cleaning: Use a soft, dry cloth to clean the exterior of the radio. Do not use liquid cleaners or abrasive materials.
- Storage: When not in use for extended periods, store the radio in a cool, dry place away from direct sunlight and extreme temperatures.
- Battery Care: To prolong battery life, avoid fully discharging the battery frequently. Charge the battery regularly, even if the radio is not in use.
- Water Exposure: This device is not waterproof. Avoid exposure to water or high humidity.
8. Troubleshooting
| Problem | Possible Cause | Solution |
|---|---|---|
| No power | Battery is discharged or not installed correctly. | Ensure battery is correctly installed and fully charged. Check power switch position. |
| Poor FM reception | Antenna not extended or weak signal. | Fully extend the telescopic antenna. Try repositioning the radio. Perform an auto-scan. |
| USB/SD card not playing | Incorrect mode, unsupported file format, or faulty card/drive. | Ensure the radio is in USB/SD mode. Check if files are MP3 format. Try a different USB drive or SD card. Ensure the card/drive is inserted correctly. |
| No sound from AUX input | Incorrect mode, cable not connected, or external device volume too low. | Switch to AUX mode. Check 3.5mm cable connection. Increase volume on both the radio and the external device. |
| Buttons unresponsive | Temporary software glitch or low battery. | Turn the radio off and then on again. Charge the battery. |
9. Specifications

Figure 9.1: Product Dimensions
This image provides a visual representation of the JIOC H011UR radio speaker with its key dimensions indicated: approximately 14.81 cm in length, 8 cm in height, and 4.39 cm in depth, highlighting its compact and portable size.
- Model: H011UR
- Brand: JIOC
- Color: Black and Red
- Item Weight: 514 g
- Package Dimensions: 14.1 x 7.9 x 4.6 cm
- Item Dimensions (L x W x H): 148 x 80 x 44 mm
- Power Source: Battery Powered (Lithium-ion)
- Connectivity Technology: USB
- Hardware Interface: 3.5mm Audio, USB
- Tuner Technology: FM
- Radio Bands Supported: FM (87.5-108MHz)
- Compatible Devices: Earphone (via AUX input)
- Special Features: Lightweight, Portable
- Recommended Uses: Music, News, Sports Broadcast
10. Warranty and Support
For warranty information or technical support, please refer to the contact details provided with your purchase documentation or visit the official JIOC website. Keep your purchase receipt as proof of purchase for any warranty claims.