1. Introduction
This manual provides detailed instructions for the installation, operation, and maintenance of your AWOW Smart Home ZigBee3.0 Radiator Thermostat (Model TV01). This device is designed to offer precise temperature control for your heating system, enhancing comfort and energy efficiency in your home. It integrates with ZigBee gateways and is compatible with popular smart home platforms like Tuya, Smart Life, Amazon Alexa, and Google Assistant.

Image 1.1: AWOW Smart Radiator Thermostat
2. Safety Information
- Read all instructions carefully before installation and use.
- Keep the device away from water and high humidity environments.
- Do not attempt to disassemble or repair the device yourself. Contact qualified personnel for service.
- Ensure batteries are inserted with correct polarity. Dispose of used batteries responsibly.
- This device is intended for indoor use only.
3. Package Contents
Verify that all components are present in the package:
- AWOW Smart Radiator Thermostat (Model TV01)
- ZigBee Gateway
- Door/Window Contact Sensor (if included in kit)
- Valve Adapters (e.g., RAV, RA, RAVL types)
- 2 x AA Batteries
- User Manual
4. Setup
4.1. Thermostat Installation
- Remove Existing Thermostat: Turn off your heating system. Unscrew and remove your old radiator thermostat head.
- Select Adapter: Identify the correct adapter for your radiator valve. The kit includes adapters for various valve types (e.g., Danfoss, Giacomini, Caleffi). Refer to the compatibility diagram below.
- Install Adapter: Securely attach the chosen adapter to your radiator valve. Ensure it clicks into place firmly.
- Insert Batteries: Open the battery compartment of the AWOW Smart Radiator Thermostat and insert the two AA batteries, observing correct polarity.
- Mount Thermostat: Screw the AWOW Smart Radiator Thermostat onto the installed adapter. Tighten it until it is secure but do not overtighten.

Image 4.1: Connector Compatibility Diagram
4.2. ZigBee Gateway Setup
The ZigBee Gateway acts as the central hub for your smart thermostats. It connects to your home Wi-Fi network and allows communication with the thermostats via the ZigBee 3.0 protocol.
- Power On: Connect the ZigBee Gateway to a power source using the provided adapter.
- Network Connection: Follow the instructions in the app (Section 4.3) to connect the gateway to your home Wi-Fi network. It is recommended to place the gateway as close as possible to your Wi-Fi router for stable connection.

Image 4.2: ZigBee 3.0 Gateway Connection and Dimensions
4.3. App Setup and Pairing
The AWOW Smart Radiator Thermostat works with the Tuya Smart or Smart Life application.
- Download App: Download the "Tuya Smart" or "Smart Life" app from your smartphone's app store (iOS or Android).
- Register/Login: Create an account or log in to your existing account.
- Add Gateway: In the app, tap '+' to add a new device. Select 'Gateway' or 'Control Hub' and follow the on-screen instructions to connect your ZigBee Gateway to the app.
- Add Thermostat: Once the gateway is added, select the gateway in the app and then choose to add a sub-device. Put your thermostat into pairing mode (usually by pressing and holding a button on the thermostat until an icon flashes). The app will detect and add the thermostat.
- Add Door/Window Sensor (Optional): If you have a door/window sensor, add it as a sub-device to the gateway following similar steps.

Image 4.3: App Interface for Smart Thermostat Control
5. Operating Instructions
5.1. Manual Control
You can adjust the temperature directly on the thermostat unit:
- Use the '+' and '-' buttons to increase or decrease the target temperature.
- Press the 'Mode' button to cycle through different operating modes (e.g., Automatic, Manual, Holiday).

Image 5.1: Manual Temperature Adjustment
5.2. App Control
The Tuya Smart or Smart Life app provides comprehensive control over your thermostat:
- Temperature Adjustment: Set the desired temperature from 5°C to 30°C. You can also set an offset temperature (±5°C) to calibrate the thermostat's reading with the actual room temperature.
- Scheduling: Create custom heating schedules for up to 5 periods per day. Choose from three weekly modes: workday + weekend, one week, or every day.
- Operating Modes: Switch between Automatic, Manual, and Holiday modes. Additionally, select between Economy and Comfort modes for optimized heating.
- Multi-Thermostat Control: A single ZigBee gateway can control multiple smart radiator thermostats, allowing you to manage heating in different rooms independently.

Image 5.2: App-based Scheduling

Image 5.3: Multi-Room Control with ZigBee Gateway
5.3. Voice Control
Integrate your thermostat with voice assistants for convenient control:
- Compatibility: The thermostat is compatible with Amazon Alexa and Google Assistant.
- Commands: Use voice commands such as "Alexa, set the living room thermostat to 24 degrees Celsius" or "Hey Google, turn up the heat in the bedroom."

Image 5.4: Voice Control Integration
5.4. Advanced Features
- Open Window/Door Detection: If a connected door/window sensor detects an open window or door, the app will send a push notification, and the heating can automatically turn off to save energy.
- Child Lock: Activate the parental control feature to prevent unauthorized changes to the thermostat settings.
- Frost Protection: The thermostat automatically activates heating if the temperature drops below a set threshold (e.g., 5°C) to prevent pipes from freezing.
- Calcification Protection: This feature periodically opens and closes the valve to prevent calcification buildup, ensuring smooth operation.
- Quick Heating: Utilize the quick heating function to rapidly warm up a room when needed.
- Quiet Operation: The thermostat is designed for ultra-quiet operation, ensuring minimal disturbance.
- Backlit Screen: The display features a backlight for easy readability in low-light conditions.
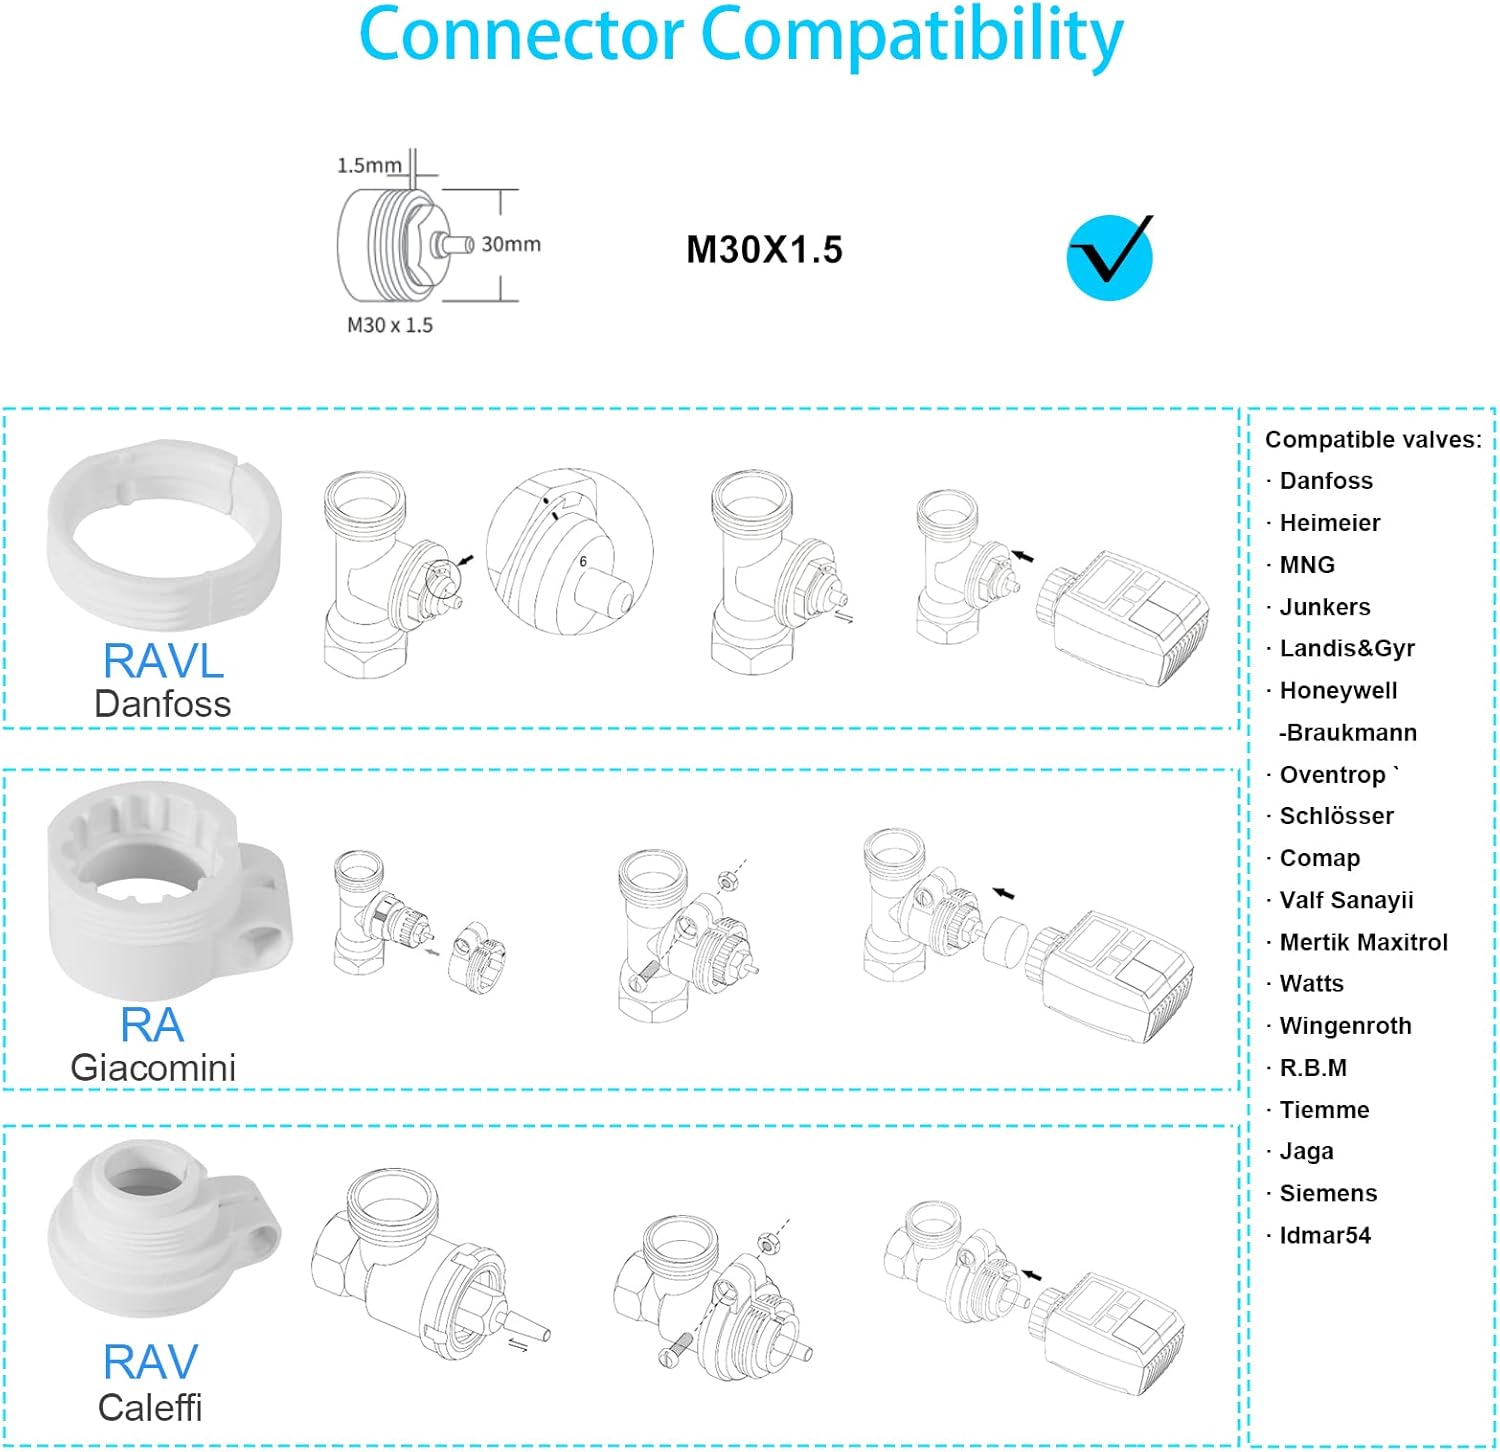
Image 5.5: Open Window/Door Detection

Image 5.6: Child Lock Feature

Image 5.7: Energy Saving Overview
6. Maintenance
6.1. Battery Replacement
The thermostat is powered by two AA batteries, which typically last 2-3 years. When the battery level is low, an indicator will appear on the display. To replace batteries:
- Carefully remove the thermostat from the radiator valve.
- Open the battery compartment.
- Remove the old batteries and insert new AA batteries, ensuring correct polarity.
- Reattach the thermostat to the radiator valve.
6.2. Cleaning
To clean the thermostat, wipe it with a soft, dry cloth. Do not use abrasive cleaners or solvents, as these can damage the device.
7. Troubleshooting
- Thermostat not responding: Check battery level. Ensure the thermostat is properly paired with the ZigBee Gateway and the gateway is connected to Wi-Fi.
- Inaccurate temperature reading: Adjust the offset temperature in the app to calibrate the thermostat with an external thermometer.
- Gateway offline: Verify the gateway's power supply and Wi-Fi connection. Restart the gateway and your router if necessary.
- Thermostat not heating: Check if the valve is fully open. Ensure the target temperature is set higher than the current room temperature. Check for frost protection or open window detection activation.
- Difficulty pairing: Ensure the thermostat is in pairing mode. Move the thermostat closer to the gateway during pairing. Reset the thermostat if necessary (refer to device-specific reset instructions).
8. Specifications
| Feature | Specification |
|---|---|
| Model Number | TV01 |
| Brand | AWOW |
| Connectivity Technology | ZigBee 3.0 (Thermostat to Gateway), Wi-Fi (Gateway to Router) |
| Temperature Control Range | 5-30°C |
| Offset Temperature Range | ±5°C |
| Power Source | 2 x AA Batteries (included) |
| Battery Life | Up to 2-3 years |
| Dimensions (L x W x H) | 5.53 x 5.4 x 9.83 cm |
| Item Weight | 580 g |
| Controller Type | Google Assistant, Amazon Alexa, App Control |
| Backlight | Yes |
9. Warranty and Support
AWOW products are designed for reliability and performance. For warranty information, technical support, or service inquiries, please refer to the contact details provided with your purchase documentation or visit the official AWOW website. Keep your proof of purchase for warranty claims.


