Introduction
The Toshiba TY-WCR10 is a versatile device combining a dual alarm clock, FM radio, Bluetooth audio streaming, and Qi wireless charging capabilities. It is designed to provide convenient timekeeping, audio entertainment, and device charging in a compact form factor.
Key features include:
- Qi wireless charging for compatible devices.
- Dual alarm with snooze function.
- Bluetooth 5.0 for wireless audio streaming.
- USB charging port for non-Qi devices.
- Built-in FM radio (87.5 - 105.0 MHz).
- Large 3 cm LED display with 3 brightness levels.
- Clock memory backup using 2 AA batteries (not included).

Figure 1: Front view of the Toshiba TY-WCR10. This image displays the device's main interface, including the digital time display and the array of control buttons located on its top surface.
Setup
1. Power Connection
Connect the supplied AC power adapter to the DC IN jack located at the rear of the unit, then plug the adapter into a standard wall outlet. The unit will power on and the display will illuminate.
2. Battery Backup (Optional)
For clock memory backup during power outages, insert two (2) AA batteries (not included) into the battery compartment on the bottom of the unit. Ensure correct polarity (+/-) as indicated inside the compartment. These batteries only maintain time and alarm settings; they do not power the unit's main functions.
3. Initial Time Setting
Upon first power-up or after a power reset without backup batteries, the display will flash. To set the time:
- Press and hold the TIME SET button until the hour digits begin to flash.
- Use the TUN- or TUN+ buttons to adjust the hour. Pay attention to the PM indicator if setting a PM time.
- Press the TIME SET button again to confirm the hour and move to the minute setting. The minute digits will flash.
- Use the TUN- or TUN+ buttons to adjust the minutes.
- Press the TIME SET button one more time to save the time and exit time setting mode.
Operating Instructions
Control Buttons Overview
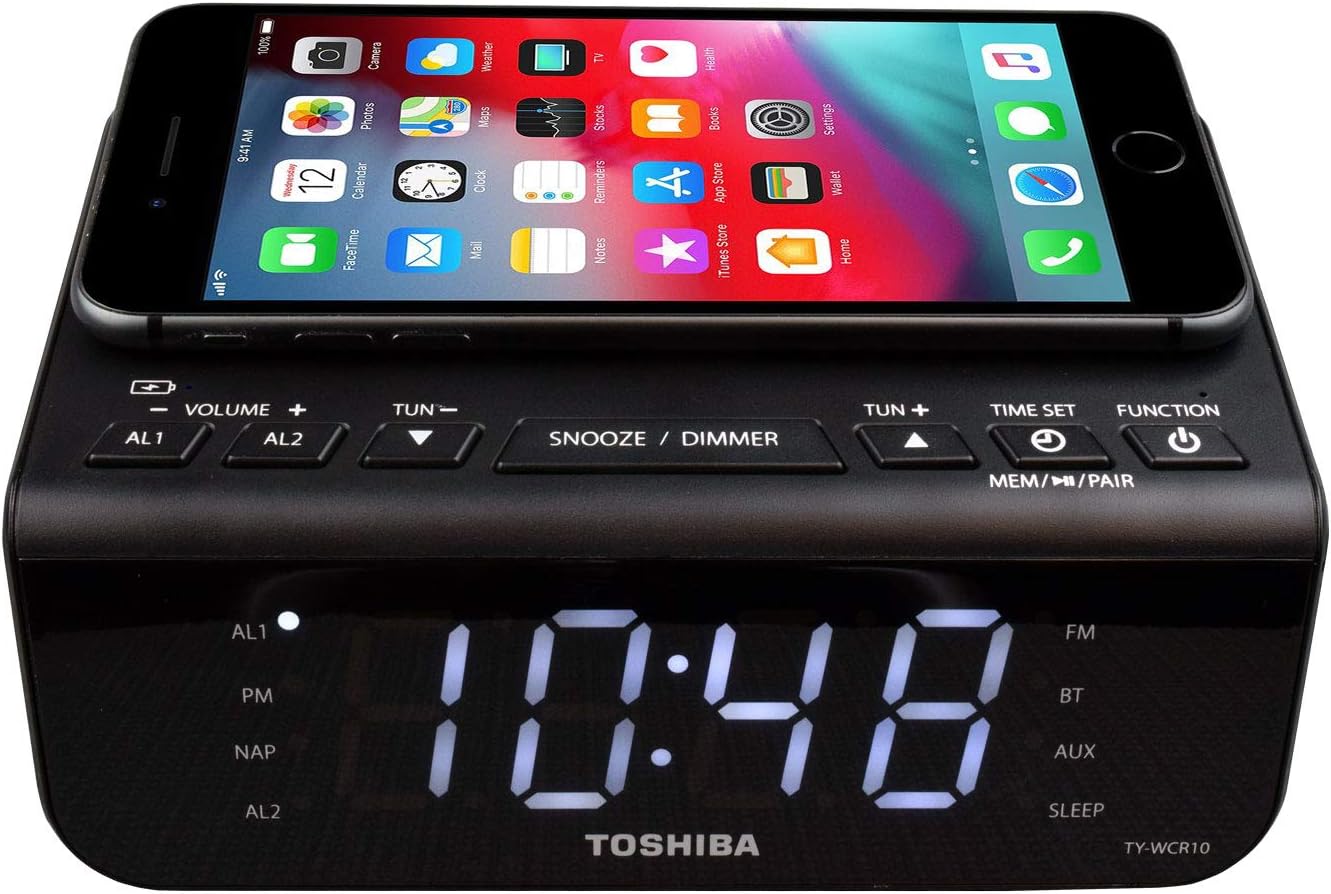
Figure 2: Top view of the Toshiba TY-WCR10 with a smartphone on the charging pad. This image highlights the layout of the control buttons and the integrated Qi wireless charging area.
- VOLUME +/-: Adjusts audio volume.
- AL1 / AL2: Sets and activates Alarm 1 and Alarm 2.
- TUN- / TUN+: Adjusts radio frequency; navigates menus; adjusts time/alarm settings.
- SNOOZE / DIMMER: Snoozes active alarm; adjusts display brightness.
- TIME SET: Enters time setting mode.
- MEM / PAIR: Saves radio presets; initiates Bluetooth pairing.
- FUNCTION (Power Button): Turns unit on/off; cycles through FM, Bluetooth, AUX modes.
Setting Alarms
The unit features two independent alarms (AL1 and AL2).
- Press and hold the AL1 or AL2 button until the alarm hour digits flash.
- Use TUN- or TUN+ to set the desired alarm hour.
- Press the AL1 or AL2 button again to confirm the hour and set minutes.
- Use TUN- or TUN+ to set the desired alarm minutes.
- Press the AL1 or AL2 button again to select the alarm source (FM radio or Buzzer). Use TUN- or TUN+ to choose.
- Press the AL1 or AL2 button one more time to save the alarm setting. The corresponding alarm indicator (AL1 or AL2) will light up on the display.
To turn off an active alarm, press the FUNCTION button. To temporarily silence an alarm, press SNOOZE / DIMMER. The alarm will sound again after approximately 9 minutes.
Display Dimmer
Press the SNOOZE / DIMMER button repeatedly to cycle through the three brightness levels of the LED display (High, Medium, Low) or to turn the display off.
FM Radio Operation
- Press the FUNCTION button repeatedly until "FM" appears on the display.
- Extend the FM antenna located at the rear of the unit for optimal reception.
- Press TUN- or TUN+ briefly to fine-tune the frequency.
- Press and hold TUN- or TUN+ to automatically scan for the next available station.
- To save a station as a preset: While listening to the desired station, press and hold the MEM / PAIR button until "P01" (or the next available preset number) flashes. Use TUN- or TUN+ to select the desired preset number, then press MEM / PAIR again to confirm.
- To recall a preset station: Briefly press the MEM / PAIR button to cycle through saved presets.
Bluetooth Operation
- Press the FUNCTION button repeatedly until "BT" appears on the display. The Bluetooth indicator will flash, indicating pairing mode.
- On your Bluetooth-enabled device (smartphone, tablet, etc.), enable Bluetooth and search for available devices.
- Select "TY-WCR10" from the list of found devices.
- Once paired, the Bluetooth indicator on the unit will stop flashing and remain solid. You can now play audio from your device through the TY-WCR10.
- To disconnect or pair with a new device, press and hold the MEM / PAIR button until the Bluetooth indicator flashes again.
Qi Wireless Charging
The TY-WCR10 features a Qi wireless charging pad on its top surface.

Figure 3: Angled view of the Toshiba TY-WCR10 with a smartphone charging wirelessly. This image demonstrates the wireless charging functionality with a compatible device.
- Ensure the TY-WCR10 is powered on and connected to AC power.
- Place your Qi-compatible smartphone or device directly onto the charging pad area marked with the Qi logo.
- Align the device centrally on the pad. Charging will begin automatically, and your device's screen should indicate charging status.
- If charging does not start, reposition the device on the pad. Some phone cases may interfere with wireless charging and might need to be removed.
Note: Wireless charging efficiency can vary based on device placement and case thickness.
USB Charging Port
A 5.0V USB charging port is located on the rear of the unit. This port allows you to charge non-Qi compatible devices using their standard USB charging cable. Simply connect your device's USB cable to this port and the other end to your device.
Maintenance
Cleaning
To clean the unit, gently wipe the surfaces with a soft, dry cloth. Do not use abrasive cleaners, waxes, or solvents as they may damage the finish. Avoid spraying liquids directly onto the unit.
Battery Replacement (Backup)
If the clock time or alarm settings are lost during a power outage, the AA backup batteries may need replacement. Open the battery compartment on the bottom of the unit, remove the old batteries, and insert two new AA batteries, observing correct polarity. Dispose of old batteries responsibly.
Troubleshooting
| Problem | Possible Cause | Solution |
|---|---|---|
| Unit does not power on. | Power adapter not connected or faulty outlet. | Ensure AC adapter is securely plugged into the unit and a working wall outlet. Try a different outlet. |
| Display is dim or off. | Dimmer function activated. | Press the SNOOZE / DIMMER button repeatedly to adjust brightness. |
| Alarm does not sound. | Alarm not set or volume too low. | Verify alarm time and source are correctly set. Increase volume. Ensure alarm indicator (AL1/AL2) is lit. |
| Poor FM radio reception. | Antenna not extended or weak signal. | Fully extend the FM antenna. Reposition the unit for better reception. |
| Bluetooth device cannot pair. | Unit not in pairing mode or device too far. | Ensure unit is in "BT" mode with flashing indicator. Move device closer. Disconnect from other Bluetooth devices. |
| Wireless charging not working. | Device not Qi-compatible, misaligned, or case interference. | Ensure device supports Qi. Reposition device centrally on the pad. Remove thick phone cases. |
Specifications
- Brand: TOSHIBA
- Model: TY-WCR10
- Display Type: Digital LED
- Power Source: AC Power Adapter (main), 2 x AA Batteries (backup, not included)
- Radio Frequency: FM 87.5 - 105.0 MHz
- Bluetooth Version: 5.0
- USB Charging Port Output: 5.0V
- Wireless Charging: Qi Standard
- Product Dimensions: 50 x 50 x 28 cm (approximate)
- Item Weight: 662 Grams (approximate)
- Special Features: Dual Alarm, FM Radio, Bluetooth, Qi Wireless Charging, USB Charging Port, Display Dimmer
Warranty and Support
This product is covered by a manufacturer's warranty. For specific warranty terms and conditions, please refer to the documentation included with your purchase or visit the official TOSHIBA website.
For technical support, troubleshooting assistance, or service inquiries, please contact TOSHIBA customer support through their official channels. Contact information can typically be found on the product packaging or the TOSHIBA brand website.
Please retain your proof of purchase for warranty claims.


