1. Introduction
This manual provides detailed instructions for the installation, operation, and maintenance of your StarSat SR-6030HD Full HD Satellite Receiver. Please read this manual thoroughly before using the device to ensure proper functionality and to prevent damage.
2. Safety Information
- Ensure the power supply voltage matches the requirements specified on the device.
- Do not expose the receiver to rain, moisture, or extreme temperatures.
- Avoid blocking ventilation openings to prevent overheating.
- Do not attempt to open or repair the device yourself. Refer all servicing to qualified personnel.
- Keep the device away from strong magnetic fields.
3. Package Contents
Carefully unpack your StarSat SR-6030HD receiver and check for the following items:
- StarSat SR-6030HD Satellite Receiver
- Remote Control
- IR/External Display (with 5000 channel indicator)
- 12V Power Adapter
- HDMI Cable
- AV Cable
- AAA Batteries (2x)
- Mount Bracket for Receiver
- Double Tape for External Display
- Double Tape for Mount Bracket
- Warranty Card
- User Manual (this document)

Image 3.1: Contents included in the StarSat SR-6030HD package.
4. Product Overview
4.1 Front and Side View

Image 4.1: Front view of the StarSat SR-6030HD receiver, showing the StarSat logo and model number.
4.2 Rear and Side Panel Connections
The receiver features various ports for connectivity. Familiarize yourself with these connections before setup.
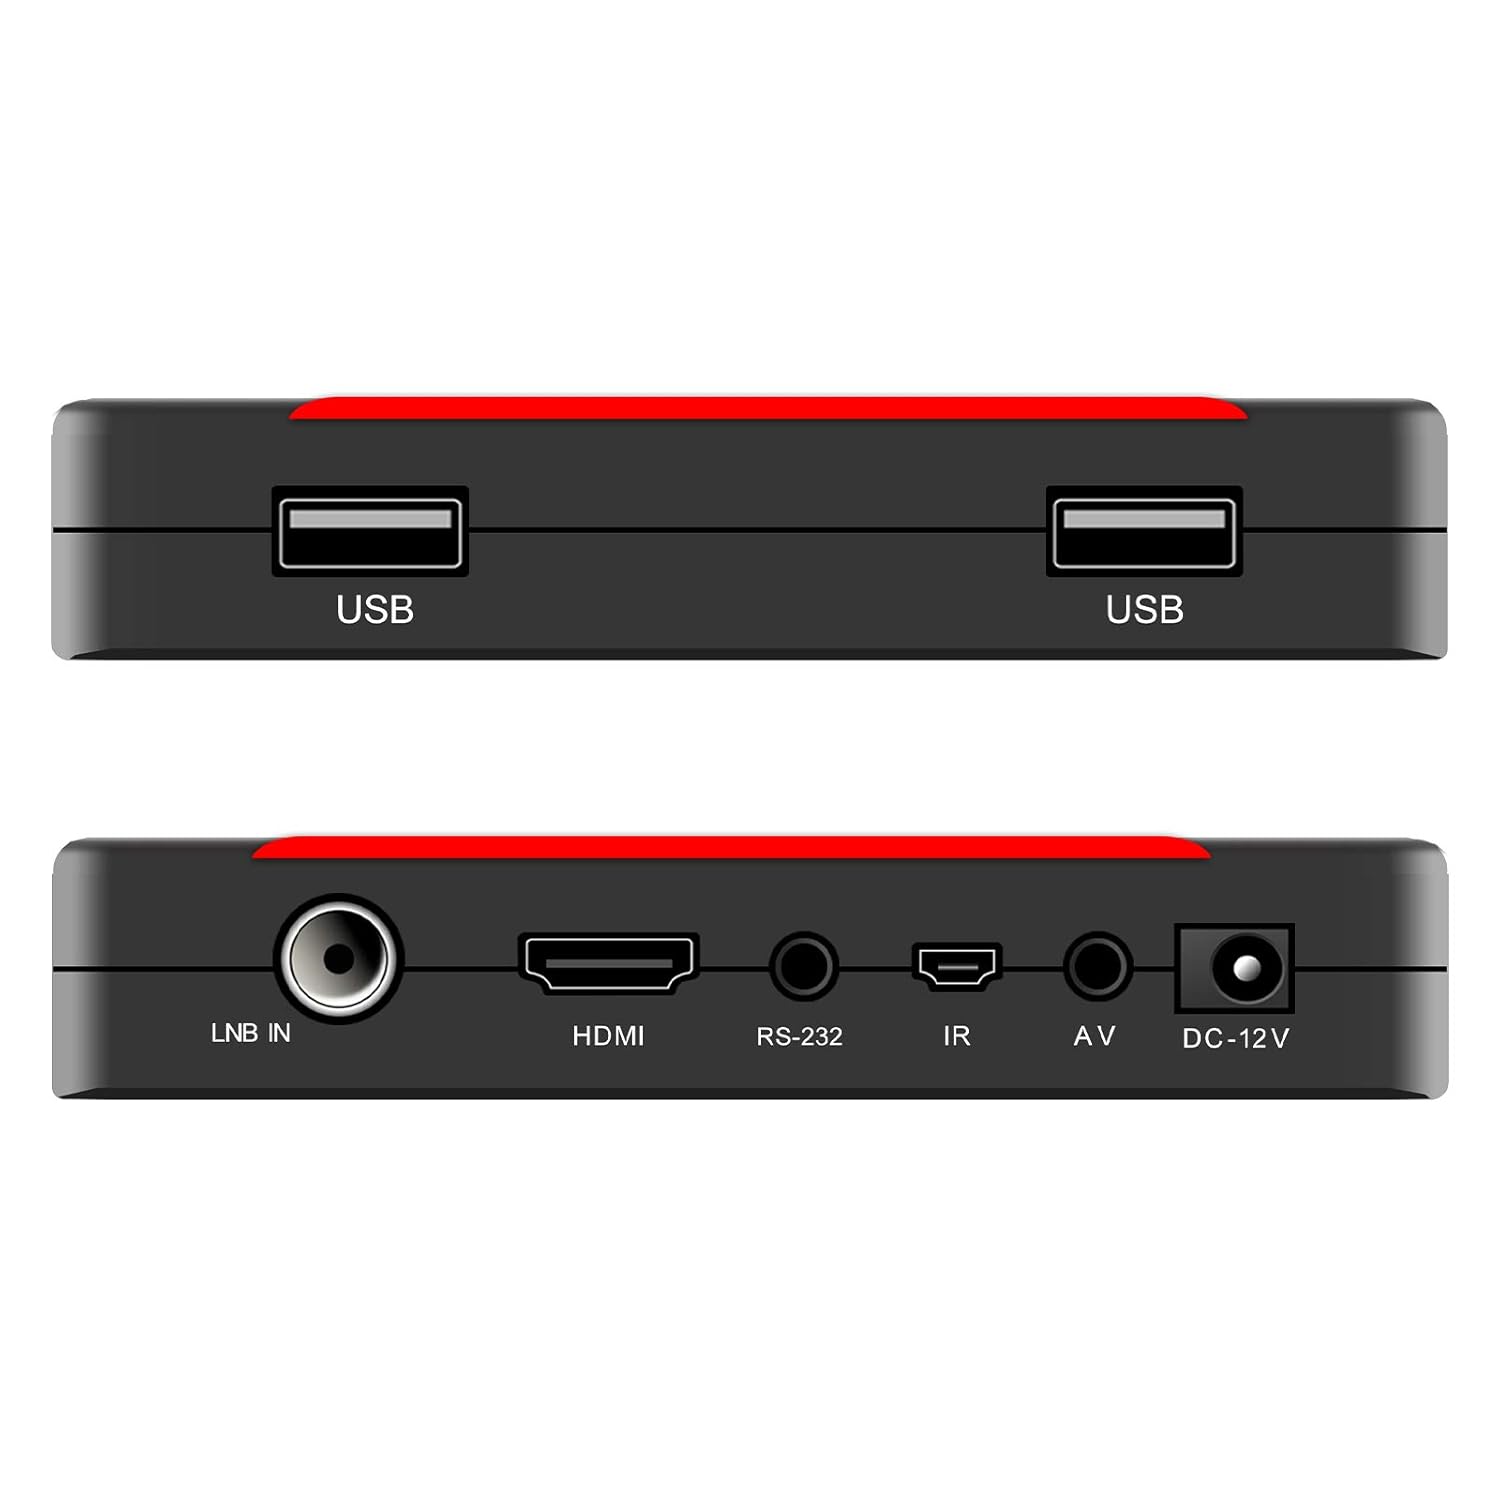
Image 4.2: Top and bottom views of the receiver, highlighting the USB ports on one side and LNB IN, HDMI, RS-232, IR, AV, and DC-12V ports on the other.
- LNB IN: Connects to your satellite dish.
- HDMI OUT: Connects to your TV for high-definition video and audio.
- AV OUT: Connects to older TVs using composite video and stereo audio cables.
- USB 2.0 (x2): For connecting external storage devices (PVR, multimedia playback) or a Wi-Fi adapter.
- IR/EXTERNAL DISPLAY: Connects the external display unit.
- RS-232: For service and software updates.
- DC 12V: Power input for the receiver.
5. Setup
Follow these steps to connect your StarSat SR-6030HD receiver:

Image 5.1: Diagram illustrating the connection points for the StarSat SR-6030HD receiver, including satellite dish, TV, power, and USB devices.
- Connect Satellite Dish: Connect the coaxial cable from your satellite dish to the LNB IN port on the receiver.
- Connect to TV:
- For High Definition: Use the provided HDMI cable to connect the HDMI OUT port on the receiver to an HDMI input on your television.
- For Standard Definition: Use the provided AV cable to connect the AV OUT ports on the receiver to the corresponding AV inputs on your television.
- Connect External Display: Plug the IR/External Display unit into the IR/EXTERNAL DISPLAY port.
- Connect Power: Connect the 12V Power Adapter to the DC 12V port on the receiver, then plug the adapter into a power outlet.
- Optional Wi-Fi: If using Wi-Fi, connect a compatible USB Wi-Fi adapter (not included) to one of the USB 2.0 ports.
- Power On: Turn on your television and select the correct HDMI or AV input source. The receiver will power on automatically.
6. Operating Instructions
6.1 Initial Setup and Channel Scan
- Upon first power-on, the receiver may guide you through an initial setup wizard. Follow the on-screen prompts.
- Navigate to the 'Installation' or 'Channel Search' menu using the remote control.
- Select 'Automatic Scan' to search for all available channels from your connected satellite. This process may take several minutes.
- Alternatively, use 'Manual Scan' for specific transponder settings.
6.2 Menu Navigation
- Press the MENU button on the remote control to access the main menu.
- Use the ARROW buttons (Up/Down/Left/Right) to navigate through menu options.
- Press OK to confirm a selection or enter a sub-menu.
- Press EXIT or BACK to return to the previous screen or exit the menu.
6.3 Electronic Program Guide (EPG)
The receiver supports a 7-day EPG. Press the EPG button on your remote to view program schedules. You can browse programs, set reminders, or schedule recordings directly from the EPG.
6.4 PVR (Personal Video Recorder) Function
To use the PVR function, connect a USB storage device (e.g., USB flash drive or external hard drive) to one of the USB 2.0 ports. The device must be formatted correctly (FAT32 or NTFS).
- Press the REC button on the remote to start recording the current program.
- Press the STOP button to end the recording.
- Scheduled recordings can be set via the EPG or the PVR menu.
6.5 Multimedia Playback
The receiver supports playback of various multimedia files (video, audio, images) from a connected USB storage device.
- Connect your USB device.
- Navigate to the 'Multimedia' or 'USB' menu.
- Select the desired file type (e.g., Video, Music, Photo) and browse your files.
- Press OK to play the selected file.
7. Advanced Features
7.1 DiSEqC Settings
The receiver supports DiSEqC 1.0/1.1/unicable/1.2/1.3 (USALS). These settings are crucial for controlling multiple LNBs or motorized satellite dishes.
- Access the 'Antenna Setup' or 'DiSEqC Settings' menu.
- Configure the DiSEqC switch type and port assignments according to your satellite installation.
- For USALS, enter your geographical coordinates for automatic dish positioning.
7.2 Wi-Fi Connectivity
The StarSat SR-6030HD supports Wi-Fi connectivity with an external USB Wi-Fi adapter (not included).
- Connect a compatible USB Wi-Fi adapter to a USB port.
- Navigate to the 'Network Settings' menu.
- Select 'Wi-Fi' and scan for available networks.
- Select your network and enter the password to connect.
- Once connected, you can access internet-based features like YouTube, Weather Forecast, and Google Maps (if supported by the firmware).
7.3 Software Upgrade
It is recommended to keep your receiver's software updated for optimal performance and new features. Software upgrades can be performed via USB.
- Download the latest software file from the official StarSat website to a USB flash drive.
- Insert the USB flash drive into a USB port on the receiver.
- Navigate to the 'System' or 'Tools' menu and select 'Software Upgrade' or 'USB Upgrade'.
- Select the software file from your USB device and confirm the upgrade. Do not power off the receiver during the upgrade process.
8. Troubleshooting
If you encounter issues with your receiver, refer to the following common problems and solutions:
| Problem | Possible Cause | Solution |
|---|---|---|
| No Picture/Sound | Incorrect TV input selected; Loose HDMI/AV cables; Receiver not powered on. | Select correct TV input; Check cable connections; Ensure receiver is powered. |
| No Signal | LNB cable disconnected; Satellite dish misalignment; Incorrect satellite settings. | Check LNB cable connection; Verify dish alignment; Perform channel scan. |
| Remote Control Not Working | Dead batteries; Obstruction between remote and receiver; IR sensor blocked. | Replace batteries; Remove obstructions; Ensure IR sensor is clear. |
| Cannot Connect to Wi-Fi | Incorrect Wi-Fi password; USB Wi-Fi adapter not connected or incompatible; Router issues. | Verify password; Ensure adapter is connected and compatible; Restart router. |
If the problem persists after trying these solutions, please contact StarSat customer support.
9. Specifications
Key technical specifications for the StarSat SR-6030HD receiver:
- Model: SR-6030HD
- Tuner Technology: Satellite (DVB-S/S2)
- Video Decoding: MPEG-4, H.264/AVC, MPEG-2, MPEG-1
- Display Modes: 1080p, 1080i, 720p, 570p, 576i
- Screen Format: 4:3 / 16:9 Auto
- HDMI: Version 1.3 Supported
- USB Ports: 2x USB 2.0
- DiSEqC Support: 1.0 / 1.1 / Unicable / 1.2 / 1.3 (USALS)
- Channel Capacity: Up to 6000 channels (TV & Radio)
- EPG: 7 Days Electronic Program Guide
- PVR: Supported via External USB
- Multimedia Playback: Supported via USB
- Wi-Fi: Supported (requires external USB Wi-Fi device, not included)
- Special Features: Digital Display, Multi-language Menu, Teletext, Subtitle
- Item Weight: Approximately 390 g
- Package Dimensions: Approximately 20.4 x 12.2 x 6.8 cm
10. Maintenance
- Cleaning: Use a soft, dry cloth to clean the receiver. Do not use liquid or aerosol cleaners.
- Ventilation: Ensure the receiver has adequate ventilation. Do not place it in an enclosed cabinet without airflow.
- Storage: If storing the device for an extended period, disconnect it from power and store it in a cool, dry place.
11. Warranty and Support
The StarSat SR-6030HD receiver typically comes with a 1-year service warranty. Please refer to the warranty card included in your package for specific terms and conditions.
For technical support, troubleshooting beyond this manual, or warranty claims, please contact your local StarSat dealer or the official StarSat customer service channels.


