1. Introduction
Thank you for choosing the Cecotec EnergySilence Aero 480 Ceiling Fan. This manual provides essential information for the safe installation, operation, and maintenance of your new ceiling fan. Please read this manual thoroughly before installation and keep it for future reference.
The EnergySilence Aero 480 is designed to provide efficient air circulation and integrated lighting for your living space. It features a powerful 65W copper motor, a 106 cm diameter for wide coverage, three reversible blades for year-round use, and three speed settings, all controllable via a convenient remote.
2. Safety Instructions
Always follow basic safety precautions when using electrical appliances to reduce the risk of fire, electric shock, and personal injury.
- Read all instructions before installing or using the fan.
- Ensure the power supply is disconnected at the main circuit breaker before installation or maintenance.
- Installation must be performed by a qualified electrician in accordance with local electrical codes.
- The mounting structure must be capable of supporting a minimum of 4.6 kg (the weight of the fan).
- Do not insert fingers or any objects into the fan blades while the fan is operating.
- Ensure the fan blades are at least 2.3 meters (7.5 feet) from the floor and 0.5 meters (1.6 feet) from any wall or obstruction.
- Do not operate the fan with a damaged power cord or plug.
- This appliance is not intended for use by persons (including children) with reduced physical, sensory or mental capabilities, or lack of experience and knowledge, unless they have been given supervision or instruction concerning use of the appliance by a person responsible for their safety.
- Children should be supervised to ensure that they do not play with the appliance.
3. Package Contents
Carefully unpack your ceiling fan and check that all items are included. If any parts are missing or damaged, contact Cecotec customer service.
- Fan Motor Assembly
- Fan Blades (3)
- Blade Holders/Brackets
- Downrod and Canopy
- Mounting Bracket
- Light Kit with Diffuser
- Remote Control with Wall Mount
- Hardware Pack (screws, washers, wire nuts)
- User Manual
4. Setup and Installation
Follow these steps for proper installation. Professional installation is recommended.
4.1 Pre-Installation Checks
- Turn off power at the circuit breaker.
- Ensure the ceiling joist or support structure can hold the fan's weight.
- Verify that the electrical box is suitable for fan support.
4.2 Mounting the Bracket
Secure the mounting bracket to the ceiling electrical box using the provided screws. Ensure it is firmly attached and level.
4.3 Assembling the Motor and Downrod
Insert the downrod through the canopy and coupling cover. Feed the motor wires through the downrod. Secure the downrod to the motor assembly with the provided pin and screw.
4.4 Wiring the Fan
Carefully connect the fan's electrical wires to the household wiring according to the wiring diagram in the full manual. Use the provided wire nuts. Ensure all connections are secure.
4.5 Attaching the Blades
Attach each blade to its blade holder using the blade screws. Then, attach the blade holders to the motor housing. Ensure all screws are tightened securely.

Image: Close-up view of a fan blade, illustrating its design and how it connects to the fan's central unit. This shows the smooth, curved shape of the blade, designed for efficient air movement.
4.6 Installing the Light Kit
Connect the light kit wires to the fan motor's light wires. Secure the light kit to the bottom of the fan motor assembly. Install the light bulb (if not pre-installed) and attach the diffuser.
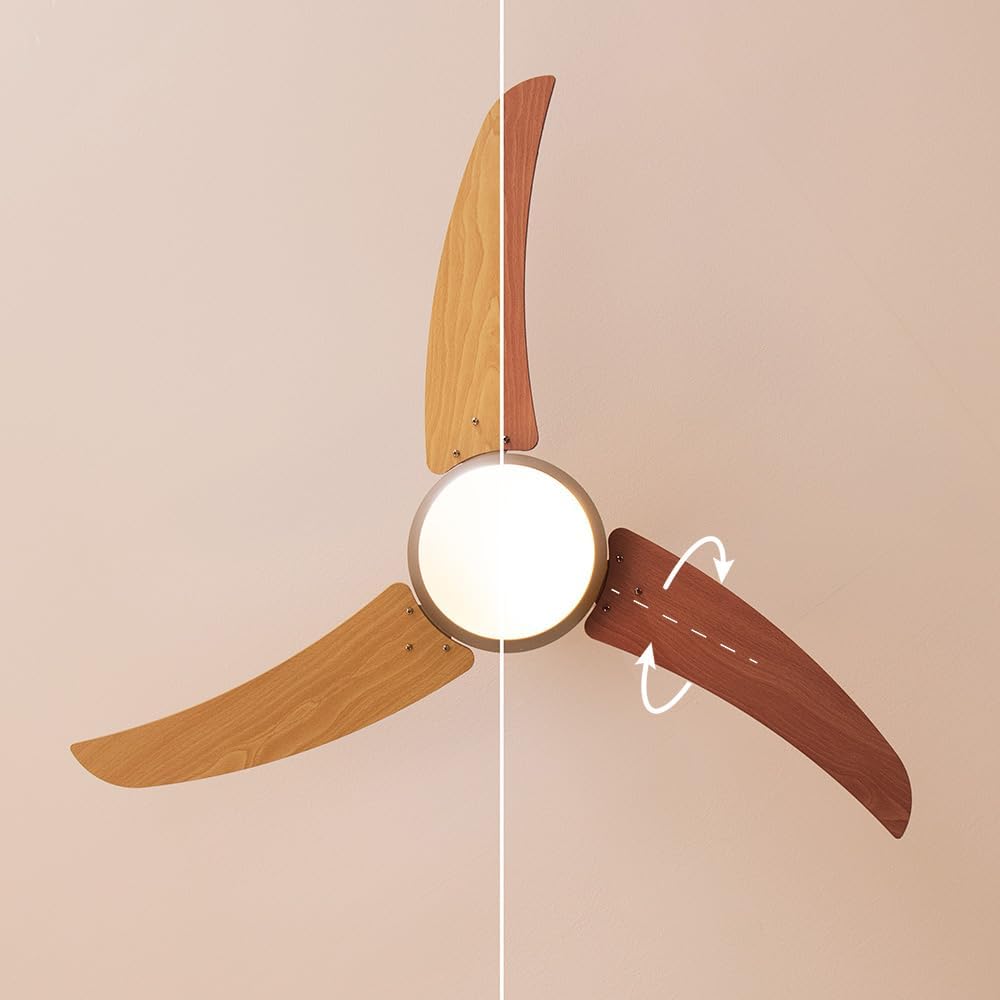
Image: A detailed view of the fan's central body, showcasing the integrated light fixture. The light globe is clearly visible, indicating the fan's dual functionality as both an air circulator and a light source.
4.7 Securing the Canopy
Slide the canopy up against the ceiling and secure it to the mounting bracket with the provided screws. Ensure all wires are tucked neatly inside the canopy.

Image: The Cecotec EnergySilence Aero 480 ceiling fan elegantly installed in a modern bedroom. The fan is mounted centrally on the ceiling, providing both air circulation and ambient lighting to the room.
5. Operating Instructions
Your Cecotec EnergySilence Aero 480 ceiling fan is operated using the included remote control.
5.1 Remote Control Functions

Image: A detailed view of the remote control for the Cecotec EnergySilence Aero 480 ceiling fan. The buttons for power, speed, mode, timer, and oscillation are clearly visible, indicating intuitive control over the fan's functions.
- ON/OFF Button: Turns the fan on or off.
- SPEED Button: Cycles through fan speeds: Low, Medium, High.
- MODE Button: Toggles between different operational modes (e.g., normal, sleep).
- TIMER Buttons (1H, 3H, 6H): Sets the fan to automatically turn off after 1, 3, or 6 hours.
- LIGHT Button: Turns the integrated light on or off.
- OSC/REVERSE Button: Activates oscillation (if applicable) or reverses blade direction.
5.2 Reversible Blade Function (Summer/Winter Mode)
The fan features reversible blades to optimize air circulation for different seasons. A switch on the fan motor housing (or a button on the remote, if available) controls this function.
- Summer Mode (Counter-clockwise rotation): Creates a downward airflow, producing a cooling effect.
- Winter Mode (Clockwise rotation): Creates an upward airflow, circulating warm air trapped near the ceiling.
Always ensure the fan is completely stopped before changing the blade direction.

Image: A clear diagram demonstrating the two operational modes of the ceiling fan: summer mode (left) and winter mode (right). The arrows indicate the direction of airflow for cooling in summer and circulating warm air in winter, highlighting the reversible blade function.
6. Maintenance
Regular maintenance ensures the longevity and optimal performance of your fan.
- Cleaning: Dust the fan blades and motor housing regularly with a soft, damp cloth. Do not use abrasive cleaners or solvents.
- Blade Care: Check blades for any cracks or damage. Ensure all blade screws are tight.
- General Checks: Periodically check all connections and mounting hardware for tightness.
- Light Bulb Replacement: Ensure power is off before replacing the light bulb. Use the specified bulb type and wattage.
Always disconnect power before performing any cleaning or maintenance.
7. Troubleshooting
If you encounter issues with your fan, refer to the following common problems and solutions:
| Problem | Possible Cause | Solution |
|---|---|---|
| Fan does not start | No power; Loose wiring; Remote control battery dead. | Check circuit breaker; Verify wiring connections; Replace remote battery. |
| Fan wobbles | Loose blades/screws; Unbalanced blades; Loose mounting bracket. | Tighten all screws; Use balancing kit (not included); Secure mounting bracket. |
| Light does not work | Bulb faulty; Loose wiring; Light switch off. | Replace bulb; Check light kit wiring; Ensure light is turned on via remote. |
| Noisy operation | Loose parts; Motor issue; Blades hitting obstruction. | Check all connections; Contact customer service if motor noise persists; Ensure clear path for blades. |
If the problem persists after trying these solutions, please contact Cecotec customer support.
8. Specifications
- Brand: Cecotec
- Model Number: 05944
- Color: Wood | Metallic
- Product Dimensions (L x W x H): 21 x 26.1 x 53.5 cm
- Weight: 4.6 Kilograms
- Power: 65 Watts
- Voltage: 220 Volts (AC)
- Material: Plastic
- Number of Speeds: 3
- Special Feature: Remote Control
- Fan Design: Ceiling Fan
- Power Source: Corded Electric
- Recommended Uses: Cooling, Air Circulation
- Mounting Type: Ceiling Mount
- ASIN: B0913KJB6N
9. Warranty and Support
Cecotec products come with a standard manufacturer's warranty. For detailed warranty information, please refer to the warranty card included with your product or visit the official Cecotec website.
For technical support, troubleshooting assistance, or to inquire about spare parts, please contact Cecotec customer service through their official channels. Spare parts availability is listed as 10 years.
No official product videos are available for this model at this time.


