
1. Product Overview
The Cinwiny Wall-Mounted Waterfall Bathtub Faucet with Handheld Shower is designed to provide a luxurious and functional bathing experience. This faucet features a wide waterfall spout for rapid tub filling, a single handle for precise control of water temperature and flow, and a versatile handheld shower for targeted rinsing. Constructed from high-quality brass with a matte black finish, it ensures durability and a modern aesthetic for your bathroom.
Key Features:
- Premium Material: Made from high-quality metal and solid brass for enhanced durability and reliability.
- Waterfall Bathtub Spout: A wide, square spout delivers a smooth, large volume of water, filling your tub quickly and creating a serene waterfall effect.
- Adjustable Handheld Sprayer: Features a straight handheld shower with a 150 cm hose, offering flexibility and a 360° rotatable holder for optimal showering angles.
- Dual-Function Brass Valve: A single handle controls both water temperature and flow, while a diverter knob easily switches water between the waterfall spout and the handheld shower.
- Matte Black Finish: A sleek, modern matte black finish complements contemporary bathroom designs.
2. Safety Information
Please read all instructions carefully before installation and use. Failure to follow these instructions may result in personal injury or property damage.
- Professional Installation Recommended: If you are unsure about plumbing installations, it is recommended to consult a qualified plumber.
- Water Supply: Ensure the main water supply is turned off before beginning any installation work to prevent water damage.
- Hot Water Safety: Exercise caution when adjusting hot water temperatures to avoid scalding.
- Component Handling: Handle all components with care to avoid scratches or damage to the finish.
- Leak Checks: After installation, thoroughly check all connections for leaks before fully restoring water pressure.
3. Package Contents
Verify that all components are present and undamaged before proceeding with installation.

Figure 3.1: Package contents including the wall-mounted bathtub filler, handheld sprayer, hand shower holder, 150 cm water hose, decorative cover, handle and knob, valve and diverter, and all necessary hardware.
- Wall-Mounted Bathtub Filler (Waterfall Spout)
- Handheld Sprayer
- Hand Shower Holder
- 150 cm Water Hose
- Decorative Cover Plate
- Single Handle and Diverter Knob
- Brass Rough-in Valve and Diverter
- Mounting Hardware
4. Setup and Installation
This section provides general guidelines for installing your Cinwiny wall-mounted bathtub faucet. Specific installation details may vary based on your plumbing setup.
4.1 Tools Required (Not Included):
- Adjustable Wrench
- Pipe Thread Sealant Tape (Teflon Tape)
- Screwdriver (Phillips/Flathead)
- Measuring Tape
- Level
- Drill (if required for mounting)
4.2 Installation Steps:
- Prepare the Installation Area: Turn off the main water supply. Clear the area around the bathtub where the faucet will be installed. Ensure the wall is structurally sound to support the faucet.
- Install the Rough-in Valve:Mount the brass rough-in valve securely within the wall, ensuring it is level and at the desired height. Connect the hot and cold water supply lines to the corresponding NPT 1/2" connectors on the valve. Connect the lines for the handheld shower head and the bathtub spout to their respective NPT 1/2" connectors. Use pipe thread sealant tape on all threaded connections to prevent leaks. The valve thickness is approximately 2.8 inches.
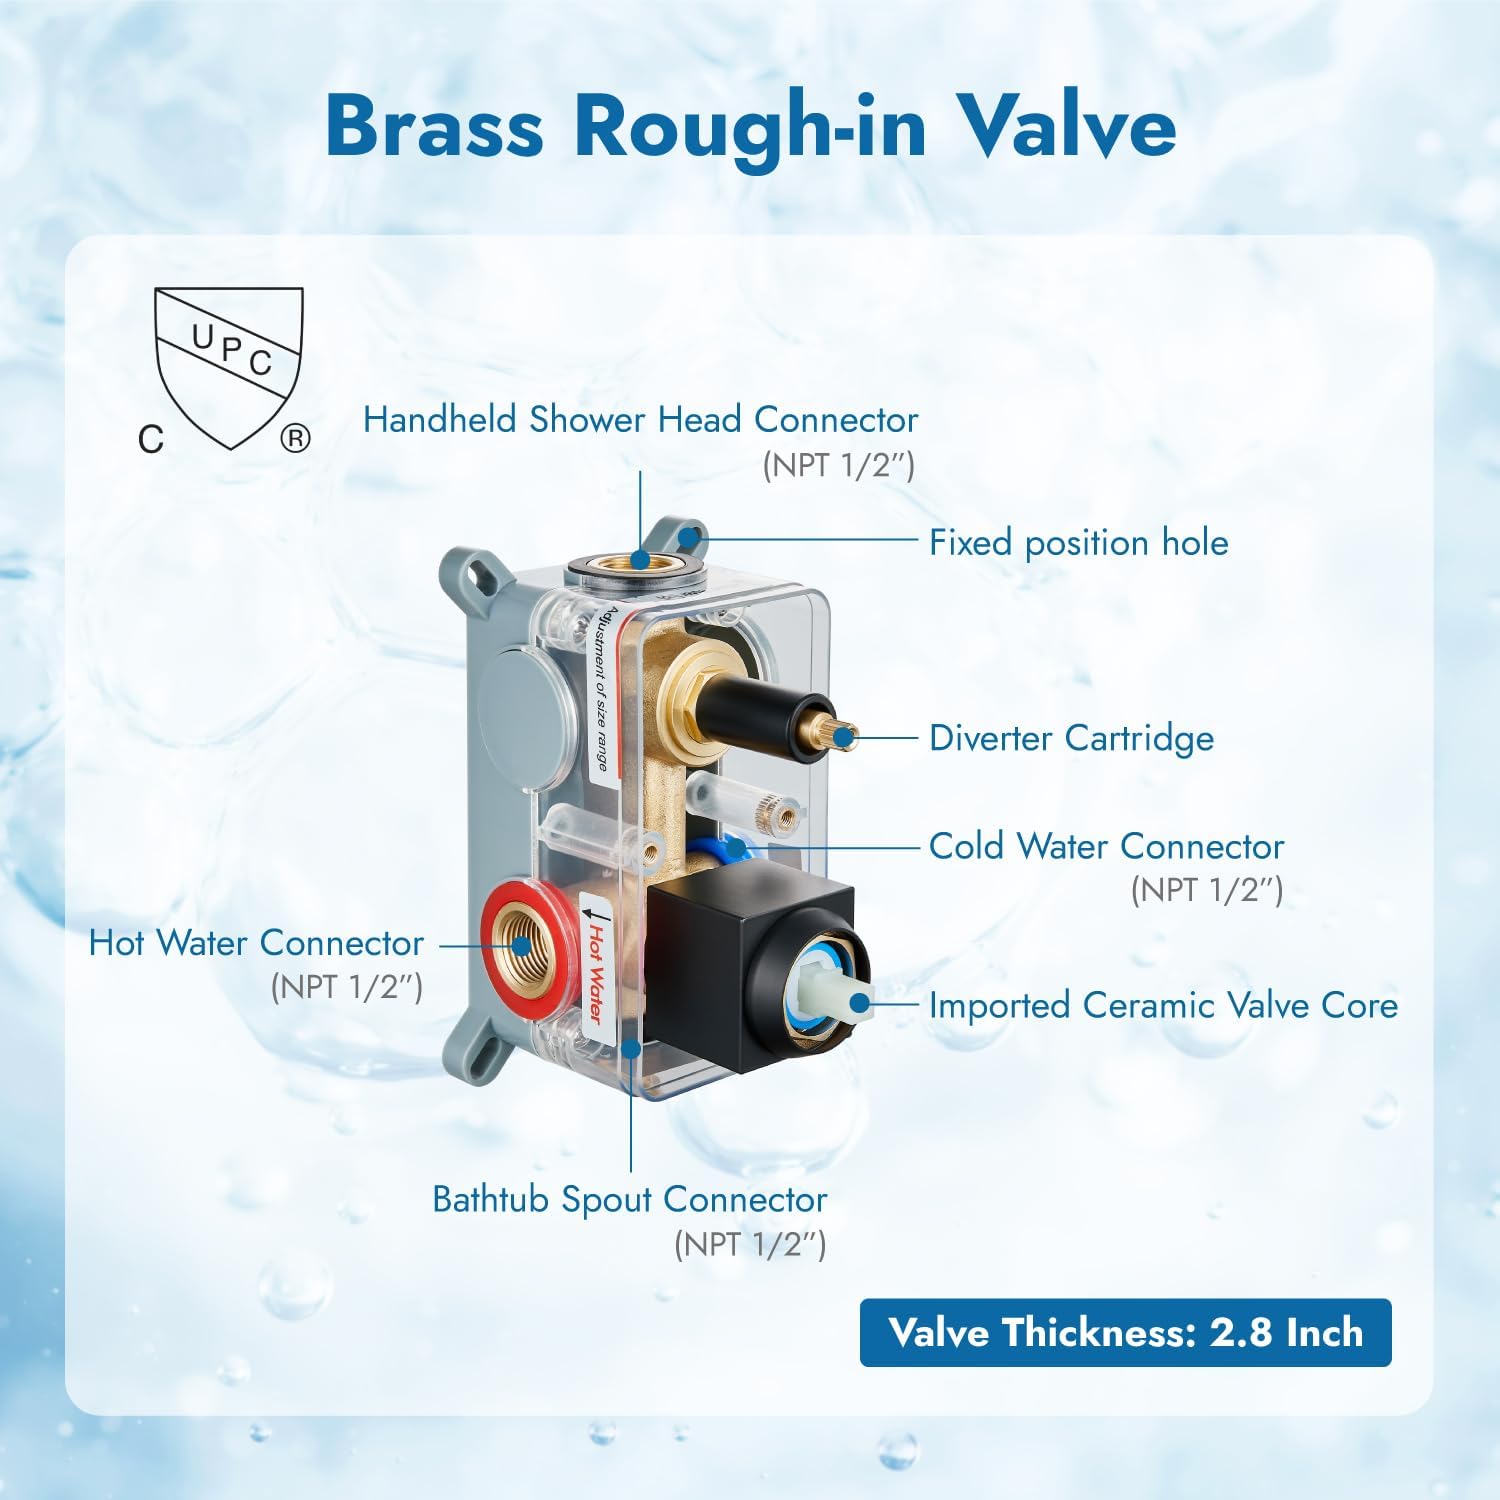
Figure 4.1: Brass Rough-in Valve Components. Note the NPT 1/2" connectors for hot water, cold water, handheld shower, and bathtub spout.
- Install the Bathtub Spout:Attach the waterfall bathtub spout to its connection point from the rough-in valve. Ensure the spout is securely fastened and positioned correctly, maintaining a distance of approximately 3.8 inches (97mm) from the wall for optimal waterfall effect.

Figure 4.2: Waterfall Bathtub Spout. Ensure a distance of 3.8 inches (97mm) from the wall for proper installation and water flow.
- Install the Handheld Shower and Holder:Mount the hand shower holder to the wall at a convenient height. Connect the 150 cm water hose to the handheld sprayer and then to the corresponding outlet from the rough-in valve. Place the handheld sprayer into its holder.

Figure 4.3: Handheld Shower Spray. The spray features TRP soft rubber nozzles for a comfortable shower experience and easy cleaning.
- Install the Decorative Cover Plate and Handle:Secure the decorative cover plate over the rough-in valve opening. Install the single handle and diverter knob onto their respective stems, ensuring they operate smoothly.
- Test for Leaks: Slowly turn on the main water supply. Check all connections for any signs of leaks. If leaks are detected, turn off the water supply, tighten the connections, and re-test.
5. Operating Instructions
Your Cinwiny faucet is designed for ease of use with a single handle and a diverter knob.

Figure 5.1: Single Handle Control. Push the handle up to turn on water, move left for hot, right for cold.
- Turning Water On/Off and Adjusting Temperature:
- To turn on the water, lift the single handle upwards.
- To increase water flow, lift the handle further.
- To adjust temperature, move the handle to the left for hotter water and to the right for colder water.
- To turn off the water, push the handle downwards.
- Switching Between Waterfall Spout and Handheld Shower:Your faucet features a diverter knob, typically located below the main handle or on the cover plate.

Figure 5.2: Two Modes of Water Outlet. Use the diverter knob to switch between the handheld shower and the waterfall spout.
- To direct water to the waterfall bathtub spout, turn the diverter knob to the corresponding position (usually indicated by an icon).
- To direct water to the handheld shower, turn the diverter knob to the other position.
- Using the Handheld Shower:
- Remove the handheld shower from its holder.
- Adjust the angle of the shower holder as needed (360° rotation).
- The TRP soft rubber nozzles provide a comfortable spray and are designed for easy cleaning to prevent blockages.
6. Maintenance and Care
Proper care and maintenance will ensure the longevity and appearance of your Cinwiny faucet.
- Regular Cleaning: Clean the faucet regularly with a soft, damp cloth and mild soap. Avoid abrasive cleaners, harsh chemicals, or scouring pads, as these can damage the matte black finish.
- Spot Cleaning: For water spots or fingerprints, use a non-abrasive cleaner specifically designed for matte finishes or a mixture of white vinegar and water (diluted). Always rinse thoroughly with clean water and dry with a soft cloth.
- Handheld Shower Nozzles: The TRP soft rubber nozzles on the handheld shower are designed for easy cleaning. Gently rub the nozzles to dislodge any mineral buildup.
- Avoid Damage: Do not use tools or excessive force when cleaning or operating the faucet, as this can cause damage.
- Check for Leaks: Periodically inspect all connections for any signs of leaks and address them promptly.
7. Troubleshooting
If you encounter any issues with your faucet, refer to the following common troubleshooting steps.
| Problem | Possible Cause | Solution |
|---|---|---|
| Low Water Flow |
|
|
| Leaks from Connections |
|
|
| Water Temperature Issues |
|
|
| Diverter Not Switching Properly |
|
|
8. Specifications

Figure 8.1: Product Dimensions. Key measurements for the control plate, spout, and handheld shower.
| Feature | Detail |
|---|---|
| Brand | Cinwiny |
| Model Number | B0912BSZBB |
| Material | Brass (Valve), Stainless Steel/Metal (Faucet Body) |
| Finish Type | Matte Black |
| Number of Handles | 1 (Single Handle) |
| Installation Type | Wall-Mounted |
| Product Dimensions (L x W x H) | 44.2 x 34.8 x 17.02 cm (Overall package dimensions) |
| Item Weight | 3.99 Kilograms |
| Handheld Hose Length | 150 cm (64 inches) |
| Valve Type | Solid Brass Rough-in Valve with Ceramic Cartridge |
9. Warranty and Support
For warranty information and customer support, please refer to the documentation included with your purchase or contact Cinwiny customer service directly. Keep your purchase receipt as proof of purchase for any warranty claims.
If you require further assistance or have questions not covered in this manual, please reach out to the manufacturer's support team.