1. Introduction
The Waveshare SIM7600G-H 4G HAT Module is designed to provide LTE Cat-4 4G, 3G, and 2G communication capabilities, along with GNSS positioning, for Raspberry Pi boards and PCs. This module is based on the SIM7600G-H chip, offering global band support for versatile connectivity. It integrates a USB HUB feature, allowing for extended USB connectivity.
Key features include:
- Global band 4G/3G/2G network compatibility.
- Integrated USB HUB with two USB-A connectors and one USB solder pad.
- Supports GPS, BeiDou, Glonass, and LBS base station positioning.
- Capable of telephoto calls and SMS via AT commands, with an onboard audio jack.
- Dedicated pogo pins for Raspberry Pi Zero/Zero W and a MicroUSB connector for other Raspberry Pi boards or PCs.
- Two LED indicators for monitoring operational status.

Figure 1: SIM7600G-H 4G HAT Module and included components.
2. Package Contents
Verify that all items listed below are included in your package:
- SIM7600G-H 4G HAT (B) x1
- LTE Antenna x1
- GPS Antenna x1
- USB-A to micro-B cable x1
- Screws pack x1
Note: Raspberry Pi boards and expansion modules are not included and must be acquired separately.
3. Setup and Installation
The SIM7600G-H 4G HAT Module offers flexible connection options for various host devices.
3.1 Connecting to Raspberry Pi Zero/Zero W
For Raspberry Pi Zero and Zero W models, the module can be directly connected using its dedicated pogo pins. This method eliminates the need for an additional USB cable for data communication. Ensure proper alignment of the pogo pins with the Raspberry Pi's GPIO header.
- Align the module's pogo pins with the corresponding pins on the Raspberry Pi Zero/Zero W.
- Gently press the module onto the Raspberry Pi until the pogo pins make secure contact.
- Secure the module using the provided screws and standoffs if necessary.
- Ensure the 5V pogo pin connects to the 5V pin of the Zero/Zero W, and the GND pogo pin connects to the GND pin. This provides power to the module.
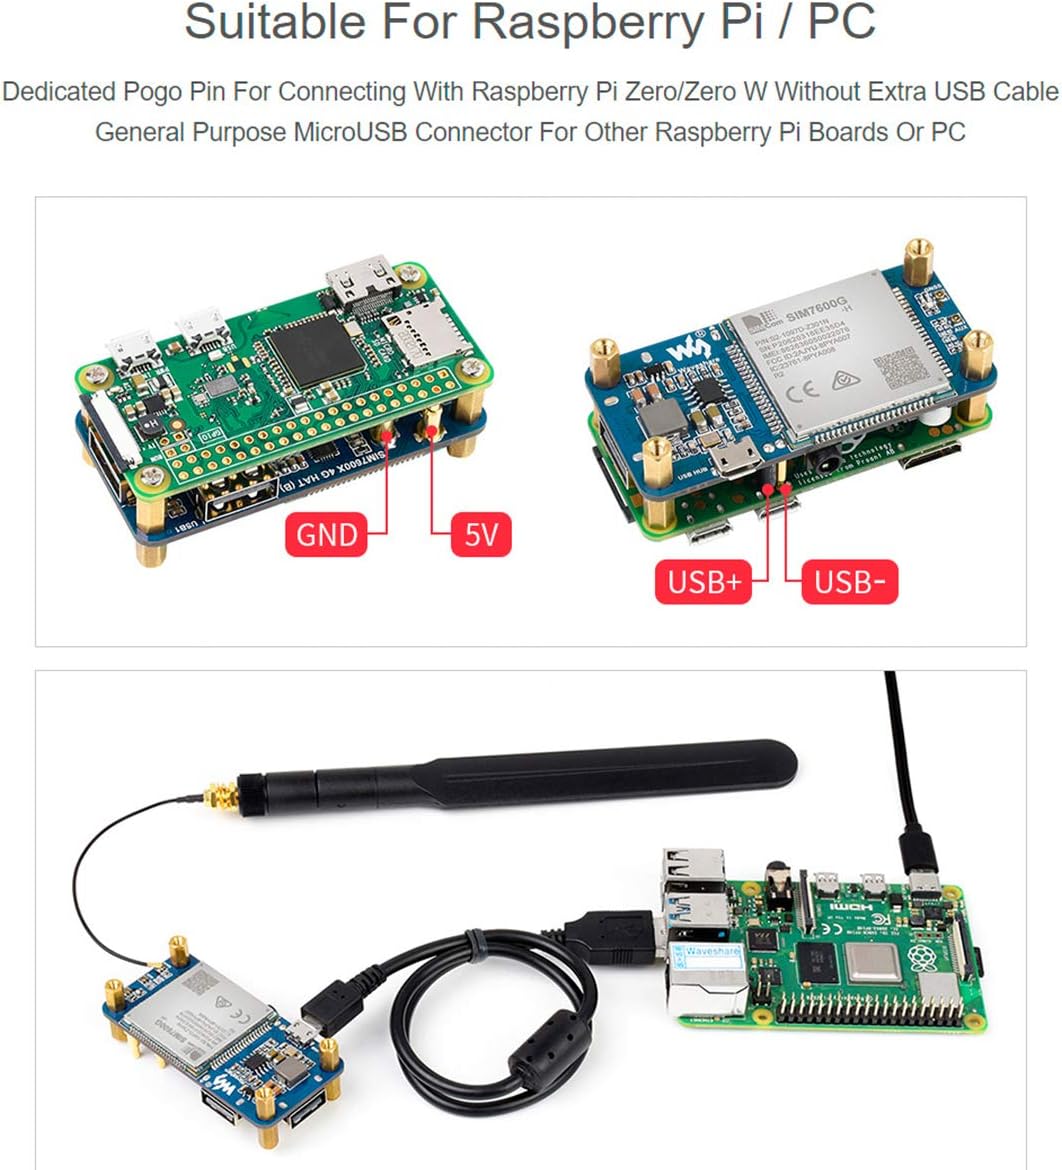
Figure 2: Connection of the SIM7600G-H module to a Raspberry Pi Zero using pogo pins.
3.2 Connecting to Other Raspberry Pi Boards or PC
For other Raspberry Pi models (e.g., Raspberry Pi 3B/4B) or a PC, use the provided MicroUSB cable to connect the module.
- Connect one end of the USB-A to micro-B cable to the MicroUSB port on the SIM7600G-H module.
- Connect the other end (USB-A) to an available USB port on your Raspberry Pi or PC.
- Ensure the host device provides sufficient power to the module.

Figure 3: Connection of the SIM7600G-H module to a Raspberry Pi via USB.
3.3 Antenna Installation
Proper antenna connection is crucial for optimal performance.
- Connect the LTE Antenna to the MAIN antenna connector on the module.
- Connect the GPS Antenna to the GNSS antenna connector on the module.
- Ensure the antenna connectors are securely fastened. Loose connections can lead to poor signal reception.
Important: The small antenna connectors require careful handling. Ensure they are firmly attached to prevent disconnections. If experiencing issues, consider securing them with a non-conductive adhesive after connection.
3.4 SIM Card Insertion
Insert a 1.8V or 3V SIM card into the designated SIM card slot on the module. Ensure the SIM card is correctly oriented as indicated on the module.
4. Operating Instructions
The SIM7600G-H module is primarily controlled via AT commands. Detailed documentation and examples for Raspberry Pi are typically provided by the manufacturer.
4.1 Initializing Communication
- After connecting the module to your Raspberry Pi or PC, the operating system should detect the device.
- On Linux systems (like Raspberry Pi OS), the module typically enumerates as a serial port (e.g.,
/dev/ttyUSB0,/dev/ttyUSB1, etc.). - Use a serial terminal program (e.g., Minicom, CuteCom) to send AT commands to the module.
- Ensure hardware flow control is disabled on your controller board if you encounter communication issues.
4.2 Network Connectivity (4G/3G/2G)
The module supports LTE Cat-4 4G, 3G, and 2G networks globally, with uplink speeds up to 50Mbps and downlink speeds up to 150Mbps on 4G.
- Use AT commands to configure network settings, connect to the cellular network, and establish data connections (e.g., dial-up, TCP, UDP, HTTP, FTP).
- Refer to the SIM7600G-H AT Command Manual for specific commands related to network registration and data services.
Figure 4: Example of network performance and USB HUB functionality.
4.3 GNSS Positioning
The module supports multiple Global Navigation Satellite Systems (GNSS), including GPS, BeiDou, Glonass, as well as LBS (Location Based Service) base station positioning.
- Ensure the GPS antenna is connected and placed in an area with a clear view of the sky for optimal signal reception.
- Use specific AT commands to enable GNSS, query position data, and configure GNSS settings.

Figure 5: GNSS positioning in action, displaying location data on a map.
4.4 Telephoto Call and SMS
The module allows for making telephoto calls and sending/receiving SMS messages using AT commands. It features an onboard audio jack for connecting a headset.
- Connect a headset to the 3.5mm audio jack for audio input/output during calls.
- Refer to the AT Command Manual for commands related to call initiation, answering, termination, and SMS sending/receiving.
Figure 6: Illustration of telephoto call and SMS functionality via AT commands.
4.5 USB HUB Feature
The integrated USB HUB chip (FE1.1S) provides additional USB 2.0/1.1 compliant ports.
- Two USB-A connectors are available for connecting external USB devices.
- An additional USB solder pad is provided for custom integrations.
5. Application Example: 4G/3G Wireless Router
The SIM7600G-H module can be combined with a Raspberry Pi running operating systems like Raspbian or OpenWrt to create a 4G/3G wireless router. This setup allows the Raspberry Pi to act as a Wi-Fi hotspot, enabling other devices to access the mobile cellular network.
- Install the necessary software and drivers on your Raspberry Pi.
- Configure the Raspberry Pi to share the cellular internet connection via its Wi-Fi interface.
- Detailed configuration steps are typically available in the manufacturer's development resources.

Figure 7: The SIM7600G-H module configured as a 4G/3G wireless router.
6. Product Overview
6.1 Outline Dimensions
The physical dimensions of the SIM7600G-H 4G HAT Module are provided below (all units in millimeters).

Figure 8: Outline dimensions of the SIM7600G-H 4G HAT Module.
6.2 What's On Board
This section details the main components and interfaces present on the SIM7600G-H 4G HAT Module.

Figure 9: Component layout and identification on the SIM7600G-H 4G HAT Module.
- SIM7600G-H module
- FE1.1S USB HUB chip
- NAU8810 audio decoder
- MP1482 power chip
- RT9193-33 voltage translator
- USB HUB input (D+/D- pogo pin for Raspberry Pi Zero/Zero W; MicroUSB connector for other Raspberry Pi boards or PC)
- Pogo pin power supply (5V: connects to 5V pin of Zero/Zero W, up to 2A current; GND: connects to GND pin of Zero/Zero W)
- USB extended ports (USB1-USB2: USB-A connectors; USB3: solder pad)
- SIM card slot (supports 1.8V/3V SIM card)
- 3.5mm earphone/mic jack
- MAIN antenna connector
- AUX auxiliary antenna connector
- GNSS antenna connector
- Power indicator
- Network status indicator
7. Specifications
Detailed technical specifications for the SIM7600G-H 4G HAT Module are provided in the table below.
| Feature | Detail |
|---|---|
| Model Name | SIM7600G-H |
| Connectivity Technology | USB |
| Network Support | LTE Cat-4 (4G), 3G, 2G (Global Band) |
| Uplink Speed (4G) | Up to 50Mbps |
| Downlink Speed (4G) | Up to 150Mbps |
| GNSS Support | GPS, BeiDou, Glonass, LBS base station positioning |
| SIM Card Slot | Supports 1.8V/3V SIM card |
| Audio Features | Onboard audio jack, audio decoder for calls |
| Control Interface | AT commands (3GPP TS 27.007, 27.005, V.25TER) |
| USB HUB Chip | FE1.1S (USB2.0/1.1 compliant) |
| USB Ports | 2x USB-A, 1x USB solder pad |
| LED Indicators | 2 (Power, Network Status) |
| Dimensions | 65.00 x 31.00 mm (approx. 2.56 x 1.22 inches) |
| Operating Temperature | -30°C to 80°C |
| Storage Temperature | -45°C to 90°C |
| Power Supply | 5V |
8. Troubleshooting
This section provides solutions to common issues encountered during the use of the SIM7600G-H 4G HAT Module.
- Module not detected by Raspberry Pi/PC:
- Ensure the module is properly powered. Check the power indicator LED.
- If using pogo pins, verify secure contact and correct 5V/GND connections.
- If using USB, try a different USB port or cable.
- On Raspberry Pi, ensure the necessary drivers are installed and the kernel recognizes USB serial devices.
- No network connection:
- Verify that the SIM card is correctly inserted and active with a valid data plan.
- Ensure the LTE antenna is securely connected to the MAIN port.
- Check the network status indicator LED for activity.
- Confirm that the correct APN settings are configured via AT commands.
- Test the module in an area with good cellular coverage.
- GNSS positioning not working:
- Ensure the GPS antenna is securely connected to the GNSS port.
- Place the GPS antenna in an open area with a clear view of the sky.
- Verify GNSS is enabled and configured correctly via AT commands.
- Communication issues with AT commands (e.g., no response, garbled text):
- Check the serial port settings (baud rate, data bits, parity, stop bits) in your terminal program.
- Crucially, ensure hardware flow control is disabled on your host controller board or in your serial communication software. This is a common cause of issues.
- Verify the correct serial port device is selected (e.g.,
/dev/ttyUSBn).
- Antenna connectors frequently detach:
- These are small connectors and can be delicate. Ensure they are fully seated.
- For permanent installations, a small amount of non-conductive adhesive (e.g., hot glue) can be used to secure the connectors after they are properly attached.
9. Support and Warranty
For technical support, additional development resources, or warranty inquiries, please contact Waveshare directly through their official website or the platform where the product was purchased. Development resources and manuals with examples for Raspberry Pi are typically provided by the manufacturer.
Manufacturer: Waveshare
Website: www.waveshare.com