
1. Introduction
This manual provides detailed instructions for the installation, operation, and maintenance of your Raidon GR3680-BA31 2-Bay SATA III HDD/SSD RAID Enclosure. This device is designed to house two 2.5-inch or 3.5-inch SATA III hard disk drives (HDDs) or solid-state drives (SSDs), offering flexible storage solutions with hardware RAID 0 and RAID 1 capabilities.
The GR3680-BA31 features a robust aluminum construction for durability and efficient heat dissipation, along with a helpful display for monitoring system status.
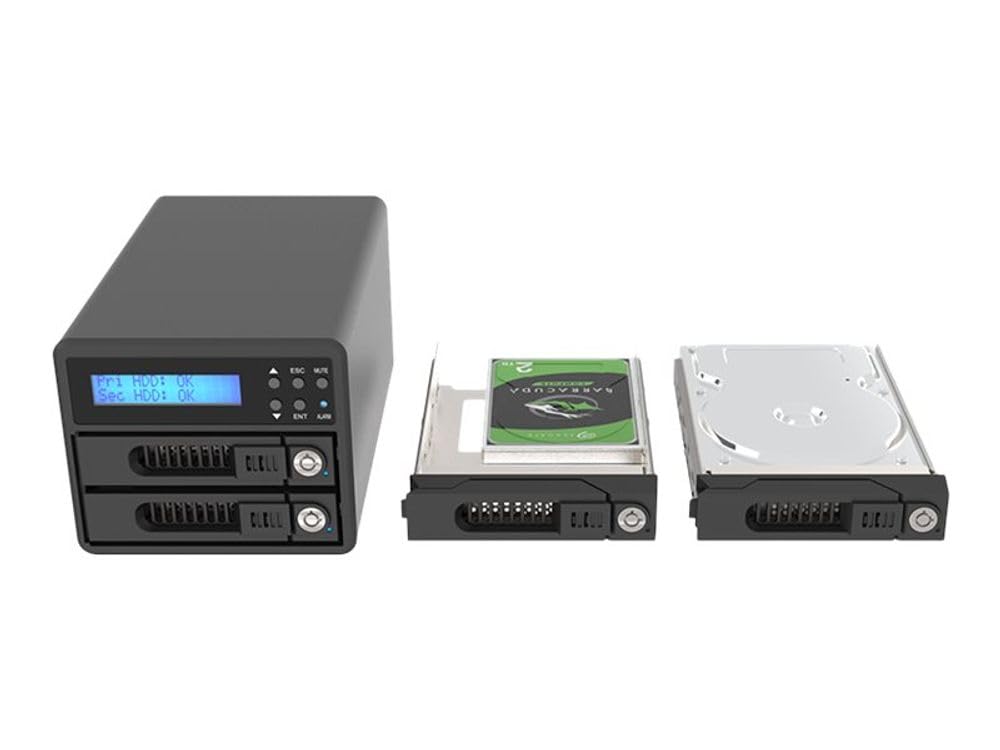
Figure 1: Front view of the Raidon GR3680-BA31 2-Bay RAID Enclosure, showing the drive bays and display panel.
2. Setup
2.1 Package Contents
- Raidon GR3680-BA31 Enclosure
- Power Adapter
- USB Data Cable
- Accessory Kit (screws for drive installation)
- User Manual (this document)
2.2 Drive Installation
- Ensure the enclosure is powered off and disconnected from the host computer.
- Locate and open the drive bay access mechanism. This typically involves releasing a latch or removing screws on the rear or front panel.
- Slide your 2.5-inch or 3.5-inch SATA III HDD/SSD into the available drive bays. Ensure the drive's SATA connector aligns correctly with the enclosure's backplane connector.
- Secure the drives using the provided screws from the accessory kit. This prevents movement and ensures proper connection.
- Close the drive bay access mechanism, ensuring it is securely latched or screwed back into place.
2.3 RAID Configuration
The GR3680-BA31 supports hardware RAID 0 (striping) and RAID 1 (mirroring). The RAID mode is typically set using DIP switches located on the rear or bottom of the enclosure. Refer to the labels near the DIP switches for specific settings.
- RAID 0 (Striping): Combines drives for increased performance and total capacity. Data is split across both drives. No data redundancy.
- RAID 1 (Mirroring): Duplicates data across both drives for redundancy. If one drive fails, data is preserved on the other. Capacity is limited to the smallest drive.
- With the enclosure powered off, set the DIP switches to your desired RAID mode (e.g., RAID 0 or RAID 1). Consult the enclosure's labeling for the correct switch positions.
- Connect the power adapter to the enclosure and an electrical outlet.
- Connect the USB data cable from the enclosure to your host computer.
- Power on the enclosure. The enclosure will detect the drives and initiate the RAID configuration. This process may take a few moments.
- Once configured, the RAID volume will appear as a single drive to your operating system. You may need to initialize and format the new volume through your operating system's disk management utility before use.
Important: Changing the RAID mode after drives have been used will erase all data on the drives. Always back up your data before changing RAID configurations.
3. Operating Instructions
3.1 Power On/Off
- Power On: Connect the power adapter and USB cable, then press the power button on the enclosure.
- Power Off: Safely eject or unmount the RAID volume from your operating system before pressing the power button to turn off the enclosure. This prevents data corruption.
3.2 LED Indicators and Display
The GR3680-BA31 features a display panel and LED indicators to provide real-time status information:
- Power LED: Indicates the power status of the enclosure.
- Drive Activity LEDs: Flash to indicate read/write activity for each installed drive.
- RAID Status LED: Indicates the health of the RAID volume (e.g., normal, degraded, rebuilding).
- LCD Display: Provides detailed information such as RAID mode, drive temperatures, fan status, and potential error messages. Consult the display for specific operational feedback.
3.3 Data Transfer
Once the RAID volume is recognized and formatted by your operating system, it functions like any other external storage device. You can drag and drop files, or use backup software to transfer data to and from the enclosure.
4. Maintenance
4.1 Cleaning
To maintain optimal performance and longevity, periodically clean the exterior of the enclosure with a soft, dry cloth. Ensure the enclosure is powered off and disconnected before cleaning. Do not use liquid cleaners or solvents.
4.2 Drive Health Monitoring
Regularly check the health of your installed drives using your operating system's disk utility tools or third-party software. Pay attention to the enclosure's display for any warnings regarding drive status or temperature. For RAID 1 configurations, promptly replace any failed drives to maintain data redundancy.
5. Troubleshooting
If you encounter issues with your GR3680-BA31 enclosure, refer to the following common troubleshooting steps:
- Enclosure Not Detected:
- Ensure the power adapter is securely connected and the enclosure is powered on.
- Verify the USB data cable is firmly connected to both the enclosure and the host computer. Try a different USB port or cable.
- Check your computer's Device Manager (Windows) or System Information (macOS) to see if the device is listed.
- Drives Not Recognized / RAID Volume Not Appearing:
- Ensure drives are correctly installed and seated firmly in their bays.
- Verify the RAID mode DIP switches are set correctly for your desired configuration.
- If this is a new setup, ensure the RAID volume has been initialized and formatted via your operating system's disk management utility.
- Check the enclosure's display for any error messages related to drive status.
- RAID 1 Degraded / Drive Failure:
- The enclosure's display or RAID status LED will indicate a degraded state.
- Identify the failed drive (often indicated by a specific drive LED or display message).
- Power off the enclosure, replace the failed drive with a new, identical or larger capacity drive.
- Power on the enclosure. The RAID system should automatically begin rebuilding the array. Monitor the display for rebuild progress.
- Performance Issues:
- Ensure you are using a USB 3.0 (or higher) port on your computer for optimal transfer speeds.
- Check the health of your drives; failing drives can significantly impact performance.
- Ensure the enclosure's ventilation is not obstructed to prevent overheating, which can lead to performance throttling.
6. Specifications
| Model Number | GR3680-BA31 |
| Drive Compatibility | 2 x 2.5"/3.5" SATA III HDD/SSD |
| RAID Modes | RAID 0, RAID 1 |
| Host Interface | USB (SATA 6.0 Gb/s internal) |
| Data Transfer Speed | Up to 6 Gigabits per second (USB 3.0/3.1 Gen 1) |
| Dimensions (L x W x H) | 25.4 x 5.08 x 6.86 cm |
| Weight | 2.14 kg |
| Compatible Devices | Laptop, Desktop Computers |
| Manufacturer | RAIDSONIC |
7. Warranty and Support
For warranty information and technical support, please refer to the documentation provided with your purchase or contact your reseller. You may also visit the official Raidon website for further assistance and updated support resources.