1. Important Safety Information
Please read all instructions carefully before assembly and use. Keep this manual for future reference.
- Ensure all parts are present and undamaged before assembly.
- Do not use power tools for assembly as this may overtighten screws and damage components.
- Periodically check all bolts and screws to ensure they remain tight.
- Do not stand on the chair.
- Use the chair only for its intended purpose.
2. Package Contents
Verify that all components are included in the package:
- Chair Seat
- Chair Back
- Base
- Wheels (Casters)
- Curved Lumbar Support
- Headrest
- Armrests (2)
- Gas Lift Cylinder
- Assembly Hardware (screws, washers, Allen wrench/screwdriver)

Image: All components of the Furmax Ergonomic Office Chair.
3. Assembly Instructions
Assembly is generally straightforward. An Allen wrench and screwdriver are typically included for convenience.
- Attach Casters to Base: Insert the five casters into the holes at the end of each leg of the chair base. Push firmly until they click into place.
- Insert Gas Lift: Place the gas lift cylinder into the center hole of the chair base.
- Attach Armrests to Seat: Secure the armrests to the underside of the chair seat using the provided screws. Ensure they are oriented correctly (left and right).
- Attach Backrest to Seat: Align the backrest with the seat mechanism and secure it with screws.
- Attach Headrest: Slide the headrest into the designated slots at the top of the backrest. You may need to apply firm pressure.
- Place Assembled Top onto Gas Lift: Carefully place the assembled seat and backrest onto the gas lift cylinder, ensuring it is centered.
Note: Some bolts, particularly those connecting the wheel/gas lift assembly to the upper part, may require careful tightening. Avoid overtightening.

Image: The Furmax Ergonomic Office Chair fully assembled in an office environment.
4. Operating Instructions
The Furmax Ergonomic Office Chair offers several adjustable features to customize your seating experience.
4.1 Chair Height Adjustment
To adjust the chair height, locate the lever on the right side, beneath the seat. Pull the lever up while seated to lower the chair, or pull the lever up while standing to raise the chair. Release the lever at your desired height.
4.2 Backrest Tilt and Lock
This chair features a reclining mechanism with three lockable angles: 90, 110, and 115 degrees. Use the lever on the left side, beneath the seat, to adjust the tilt. Push the lever in to lock the backrest at a desired angle, and pull it out to allow tilting.
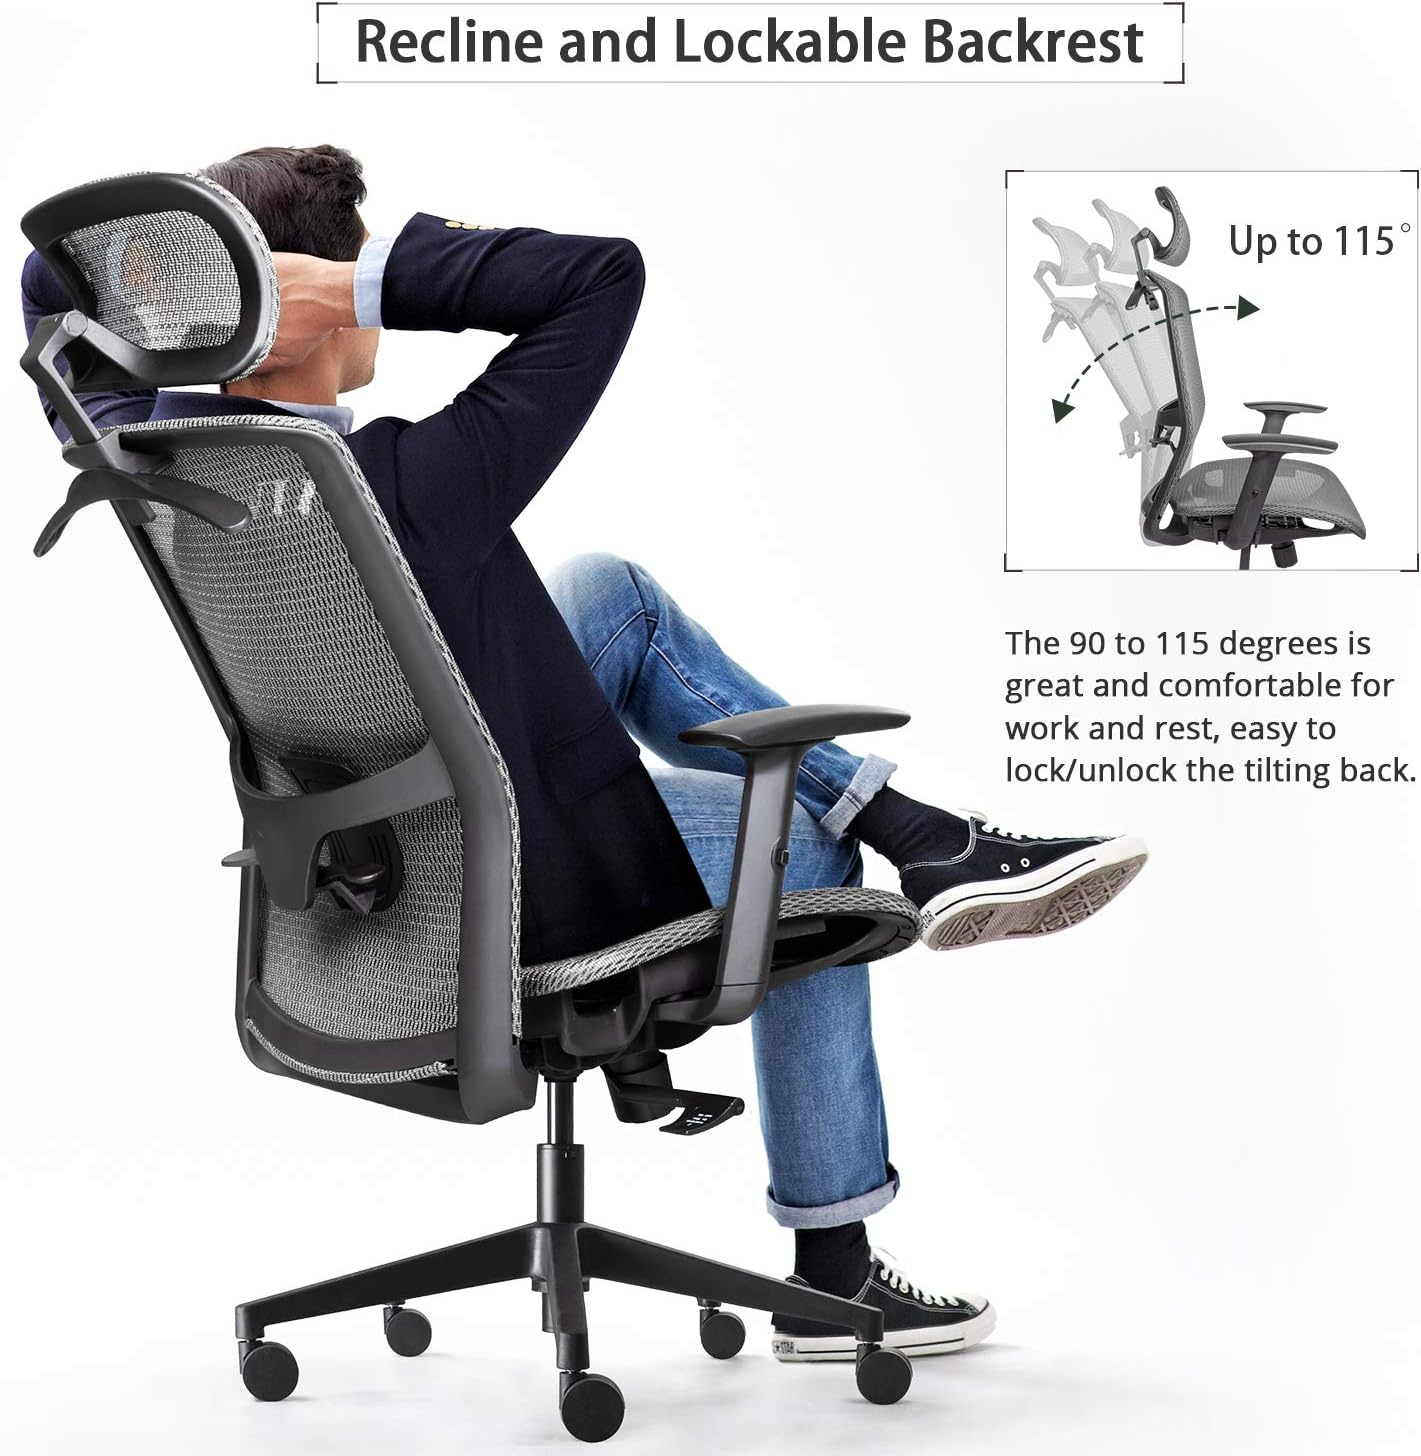
Image: Illustration of the chair's recline function, showing angles up to 115 degrees and the lock/unlock mechanism.
4.3 Lumbar Support Adjustment
The lumbar support is height-adjustable to conform to different body types. Gently push or pull the lumbar support mechanism on the backrest up or down to find your optimal position.
4.4 Armrest Adjustment
The armrests can be adjusted up and down. Locate the button or lever on the side of each armrest. Press it to unlock, adjust the armrest to your preferred height, and release to lock it in place.
4.5 Headrest Adjustment
The headrest is both turnable and height-adjustable. To adjust the height, gently pull the headrest up or push it down. To adjust the angle, pivot the headrest forward or backward.

Image: Detailed view of the chair's ergonomic features, including adjustable lumbar support, dynamic armrests, and the breathable mesh seat.
4.6 Clothes Hanger
A convenient clothes hanger is integrated into the back of the headrest for temporary storage of jackets or coats.

Image: Close-up of the headrest, illustrating its angle and height adjustment capabilities, along with the clothes hanger feature.
5. Maintenance and Care
Proper care ensures the longevity and performance of your Furmax office chair.
- Cleaning: The manufacturer recommends dry cleaning for the mesh material. For general cleaning, gently wipe mesh surfaces with a damp cloth and mild soap, then dry thoroughly. Avoid harsh chemicals or abrasive cleaners.
- Inspection: Periodically inspect all screws, bolts, and moving parts. Tighten any loose fasteners.
- Casters: Keep casters clean from hair and debris to ensure smooth rolling.
- Avoid Overloading: Do not exceed the chair's weight capacity (not specified, but general good practice).
6. Troubleshooting
If you encounter issues with your chair, refer to the following common problems and solutions:
- Headrest is too loose or slides down: Ensure the headrest is fully inserted and secured. If it continues to slide, check for any locking mechanisms or contact customer support.
- Chair back reclines too far or does not lock: Verify that the tilt lock lever (left side, under seat) is engaged correctly. If the issue persists, inspect the tilt mechanism for damage.
- Bolts spinning or not tightening: If assembly bolts do not tighten properly, do not force them. This may indicate stripped threads. Contact customer support for replacement parts or guidance.
- Mesh fabric tearing: While the mesh is designed for durability, excessive wear or damage can occur. For significant tearing, contact customer support regarding potential warranty claims.
- Lumbar support feels too high/low: Re-adjust the lumbar support to its full range of motion. If it still does not meet your ergonomic needs, consider additional lumbar cushions.
For issues not covered here, please contact Furmax customer support.
7. Specifications
| Feature | Detail |
|---|---|
| Brand | Furmax |
| Model Name | Furmax Ergonomic Office Chair Executive Chair with Mesh Seat High Back Computer Desk Chair |
| Model Number | 202T4 |
| Color | Grey |
| Material | Mesh |
| Product Dimensions (D x W x H) | 25.39"D x 25.39"W x 47.44"H |
| Item Weight | 37.7 pounds |
| Special Features | Adjustable Headrest, Adjustable Lumbar Support, Adjustable Armrests, Reclining Backrest (90-115 degrees), Clothes Hanger, Breathable Mesh Seat and Back |
| Included Components | Chair Seat, Chair Back, Base, Wheels, Curved Lumbar Support |

Image: Detailed dimensional drawing of the Furmax Ergonomic Office Chair, illustrating height, width, and depth measurements.
8. Warranty and Support
For warranty information, please refer to the documentation included with your purchase or contact Furmax directly. The standard return policy is 30 days from the date of purchase.
For technical support, missing parts, or any other inquiries, please contact Furmax customer service through their official website or the retailer where the product was purchased.
Manufacturer: Furmax
Website: Visit the Furmax Store on Amazon


