Download PDFFree PDF. The Save button below keeps a bookmark and private notes in your account.
JANOME EASY JEANS HEAVY DUTY 523 Sewing Machine User Manual
Model: JANOME EASY JEANS HD 523
1. Introduction
Thank you for choosing the JANOME EASY JEANS HEAVY DUTY 523 Sewing Machine. This manual provides essential information for the safe and efficient operation, maintenance, and troubleshooting of your new sewing machine. Please read this manual thoroughly before using the machine to ensure proper setup and to maximize its performance and longevity. This model is designed for durability and ease of use, particularly with heavier fabrics like denim.
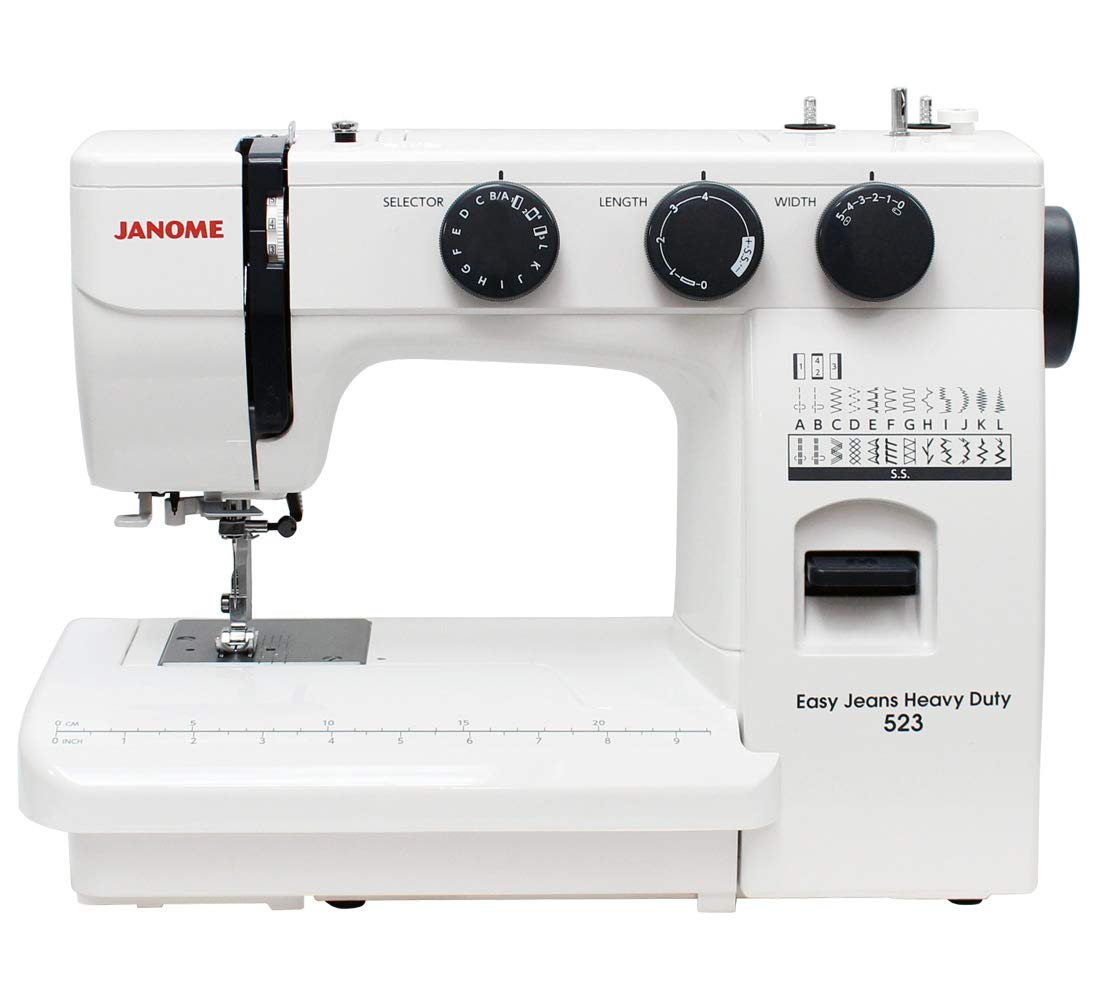
Figure 1: The JANOME EASY JEANS HEAVY DUTY 523 Sewing Machine. This image displays the overall design of the sewing machine, including its main body, needle area, and control dials.
2. Important Safety Instructions
When using an electrical appliance, basic safety precautions should always be followed, including the following:
Read all instructions before using this sewing machine.
Keep fingers away from all moving parts. Special care is required around the sewing machine needle.
Always use the proper needle plate. The wrong plate can cause the needle to break.
Do not use bent needles.
Turn the sewing machine off when making any adjustments in the needle area, such as threading the needle, changing the needle, threading the bobbin, or changing the presser foot.
Always unplug the sewing machine from the electrical outlet when removing covers, lubricating, or when making any other user servicing adjustments mentioned in the instruction manual.
Never drop or insert any object into any opening.
Do not use outdoors.
Do not operate where aerosol (spray) products are being used or where oxygen is being administered.
To disconnect, turn all controls to the off position, then remove the plug from the outlet.
Do not unplug by pulling on the cord. To unplug, grasp the plug, not the cord.
3. Setup
3.1 Unpacking
Carefully remove the sewing machine from its packaging. Retain all packaging materials for future storage or transport. Ensure all accessories listed in the packing list are present.
3.2 Power Connection
Place the machine on a stable, flat surface.
Insert the machine plug into the machine's power socket.
Insert the power supply plug into a suitable electrical outlet.
Ensure the power switch is in the "OFF" position before connecting.
3.3 Needle Installation
To install a new needle:
Turn off the power switch.
Raise the needle to its highest position by turning the handwheel towards you.
Loosen the needle clamp screw.
Insert a new needle with the flat side facing the back of the machine. Push it up as far as it will go.
Tighten the needle clamp screw securely.
(An illustrative diagram showing the correct orientation and insertion of a sewing machine needle would typically be included here.)
3.4 Bobbin Winding
To wind a bobbin:
Place a spool of thread on the spool pin.
Guide the thread through the upper thread guide and around the bobbin winding tension disc.
Insert the thread through the hole in the bobbin from the inside out.
Place the bobbin onto the bobbin winder spindle and push it to the right.
Press the foot pedal gently to wind the bobbin. Stop when the bobbin is full.
Cut the thread and push the bobbin winder spindle to the left, then remove the bobbin.
(An illustrative diagram demonstrating the steps for winding a bobbin correctly would typically be included here.)
3.5 Threading the Machine
To thread the machine:
Raise the presser foot and the needle to its highest position.
Place a spool of thread on the spool pin.
Guide the thread through the upper thread guide.
Bring the thread down the right channel, up around the take-up lever, and down the left channel.
Pass the thread through the needle bar thread guide.
Thread the needle from front to back.
Insert the wound bobbin into the bobbin case (if top-loading) or shuttle hook (if front-loading) according to your machine's specific design. Pull the bobbin thread out.
Hold the upper thread, turn the handwheel towards you to lower and raise the needle, catching the bobbin thread. Pull both threads under the presser foot to the back.
(An illustrative diagram detailing the complete upper and lower threading path for the sewing machine would typically be included here.)
4. Operating Instructions
4.1 Basic Stitch Selection
Your JANOME EASY JEANS HD 523 offers a variety of stitches. Use the stitch selector dial to choose the desired stitch pattern. Common stitches include straight stitch, zigzag stitch, and buttonhole stitch. Refer to the stitch chart on your machine for visual guidance.
4.2 Foot Pedal Usage
The foot pedal controls the sewing speed. Press gently for slower speeds and apply more pressure for faster sewing. Always start slowly to maintain control, especially when beginning a seam or working on intricate details.
4.3 Sewing Straight Seams
Place the fabric under the presser foot, aligning the edge with a seam guide line on the needle plate.
Lower the presser foot.
Turn the handwheel towards you to lower the needle into the fabric at the starting point.
Press the foot pedal to begin sewing. Guide the fabric gently, do not pull or push forcefully.
At the end of the seam, press the reverse stitch lever/button to secure the stitches.
Raise the needle and presser foot, then remove the fabric. Cut the threads.
4.4 Adjusting Thread Tension
Correct thread tension is crucial for balanced stitches. The tension dial typically ranges from 0 to 9. A setting of 3-5 is common for most fabrics. Adjust as follows:
Too loose upper tension: Bobbin thread shows on the top side of the fabric. Increase the upper tension dial number.
Too tight upper tension: Upper thread shows on the underside of the fabric. Decrease the upper tension dial number.
Balanced tension: Upper and bobbin threads interlock evenly between the fabric layers.
4.5 Working with Heavy Fabrics (e.g., Denim)
The JANOME EASY JEANS HD 523 is designed for heavy-duty sewing. For best results with thick materials like denim:
Use a denim needle (size 16 or 18) or a heavy-duty needle.
Use strong, polyester thread.
Increase stitch length slightly.
Adjust tension as needed for the thicker fabric.
Use a walking foot if available, to help feed multiple layers evenly.
5. Maintenance
Regular maintenance ensures your sewing machine operates smoothly and extends its lifespan. Always unplug the machine before performing any maintenance.
5.1 Cleaning
To clean your machine:
Needle Plate Area: Remove the needle and presser foot. Unscrew the needle plate. Use a small brush to remove lint and dust from the feed dogs and bobbin area.
Bobbin Case Area: Remove the bobbin case and clean any lint or thread scraps.
General Cleaning: Wipe the exterior of the machine with a soft, dry cloth. Do not use harsh chemicals.
(An illustrative image showing how to access and clean the bobbin case and feed dog area would typically be included here.)
5.2 Oiling (Consult your machine's specific guide)
Some sewing machines require periodic oiling. Refer to your machine's specific manual for oiling points and frequency. Use only high-quality sewing machine oil. If your specific model manual does not indicate oiling, do not oil the machine.
5.3 Needle Replacement
Replace your needle regularly (after every 8-10 hours of sewing or when starting a new project) and whenever it becomes bent, dull, or breaks. A fresh, sharp needle prevents skipped stitches and fabric damage. Refer to section 3.3 for installation steps.
6. Troubleshooting
This section addresses common issues you might encounter. Always turn off and unplug the machine before inspecting or attempting to fix any problem.
Problem
Possible Cause
Solution
Skipped Stitches
Incorrect needle size/type, bent needle, improper threading, incorrect tension.
Change needle to correct size/type, re-thread machine, adjust tension.
Thread Breakage (Upper)
Improper threading, too much upper tension, damaged needle, poor quality thread.
Re-thread machine, reduce upper tension, replace needle, use quality thread.
Thread Breakage (Bobbin)
Improperly wound bobbin, bobbin inserted incorrectly, lint in bobbin case, too much bobbin tension.
Thread tangled in bobbin area, needle hitting bobbin case.
Turn off, unplug, remove needle plate and bobbin case, clear tangled thread. Check needle for bends.
7. Specifications
Model Number
JANOME EASY JEANS HD 523
Brand
JANOME
Weight
2.72 Kilograms
Dimensions (L x W x H)
10 x 5 x 1.27 cm
Material
Stainless Steel, Plastic
Power Source
Electric Cable
Manufacturer
JANOME
8. Warranty and Support
For information regarding warranty coverage, terms, and conditions, please refer to the warranty card included with your product or visit the official JANOME website. For technical support, spare parts, or service inquiries, please contact your authorized JANOME dealer or the JANOME customer service department. Keep your purchase receipt as proof of purchase for warranty claims.
Online Resources: For additional tips, tutorials, and FAQs, visit the official JANOME support page: www.janome.com (This is a placeholder URL, please refer to your region's specific Janome website).
Ask a question about this manual
Ask about setup, troubleshooting, compatibility, parts, safety, or missing instructions. Manuals+ will review the question and use this page’s manual context to help answer it.