
1. Introduction
This manual provides detailed instructions for the safe and efficient installation, operation, and maintenance of your Garwarm LED Dimmable Flower Shape Ceiling Light. Please read this manual thoroughly before installation and retain it for future reference.
The Garwarm LED Dimmable Flower Shape Ceiling Light features a modern two-layer petal design, offering adjustable brightness and three color temperatures (3000K-6500K) via remote control. It is designed for indoor use in various rooms such as living rooms, bedrooms, dining rooms, and kitchens.

Image: The Garwarm LED Dimmable Flower Shape Ceiling Light with its unique flower petal design, illuminating a modern living space.
2. Safety Information
- Electrical Safety: Always turn off the main power supply at the circuit breaker before beginning any electrical work. Installation should be performed by a qualified electrician or a person with sufficient electrical knowledge.
- Voltage: Ensure the power supply voltage matches the fixture's requirements (110V AC).
- Handling: Handle the light fixture components with care to prevent damage.
- Compatibility: This fixture is NOT COMPATIBLE with external dimmer switches. Use only the provided remote control for dimming and color temperature adjustments.
- Environment: For indoor use only. Do not expose to water or high humidity.
- Cleaning: Disconnect power before cleaning. Use a soft, dry cloth. Avoid abrasive cleaners.
3. Package Contents
Verify that all components are present and undamaged before proceeding with installation.
- LED Ceiling Light Fixture (with integrated LED Chips)
- Remote Control
- Mounting Hardware (screws, anchors, wire nuts)
- Installation Manual
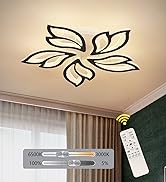
Image: All parts of the ceiling light, including the base, petal-shaped diffusers, wiring, and mounting hardware, are shown before assembly.
4. Specifications
| Feature | Specification |
|---|---|
| Brand | Garwarm |
| Model Number | 8370-14-W-WJ |
| Color | White |
| Material | Acrylic, Metal |
| Style | Modern, Flower Shape |
| Light Source | LED (Integrated Chips) |
| Number of Light Sources | 14 |
| Wattage | 98 Watts |
| Voltage | 110 Volts (AC) |
| Brightness | 4900 Lumens |
| Light Color | Warm white to cool white (3000K-6500K) |
| Control Method | Remote Control |
| Dimmable | Yes (via remote control only) |
| Installation Type | Flush Mount |
| Item Dimensions (L x W x H) | 39.3"L x 39.3"W x 3.93"H (92cm x 92cm x 11cm) |
| Light Fixture Base Diameter | 21.7 inches (55cm) |
| Item Weight | 6.58 Kilograms |
| Recommended Area | 20-35 square meters |

Image: Detailed dimensions of the ceiling light, including overall length, width, height, and base diameter.
5. Installation
Installation requires careful attention to electrical connections and secure mounting. It is recommended to have two people for installation due to the size and weight of the fixture. Always ensure the power is OFF at the circuit breaker before starting.
5.1. Pre-Installation Steps
- Unpack: Carefully remove all components from the packaging. Inspect for any damage.
- Identify Parts: Familiarize yourself with the light fixture base, petal-shaped diffusers, wiring, remote control, and mounting hardware.
- Power Off: Turn off the electricity at the main circuit breaker.
5.2. Assembly of the Light Fixture
The petal-shaped diffusers need to be attached to the main light base. Follow the sequence shown in the video for proper assembly.
Video: Detailed assembly instructions for the Garwarm Flower Shape Ceiling Light. This video demonstrates how to connect the individual petal components to the main fixture base and complete the internal wiring.
- Attach each petal-shaped diffuser to the main circular base using the provided screws and nuts. Ensure each connection is secure.
- Connect the wiring from each petal to the central wiring hub on the main base. Match colors (e.g., black to black, white to white) and ensure connections are firm.
- Once all petals are attached and wired, the fixture is ready for mounting.
5.3. Mounting to the Ceiling
- Install Hanging Plate: Secure the metal hanging plate to your ceiling junction box using appropriate screws and anchors. Ensure it is firmly attached to a structural element.
- Connect Electrical Wires: Carefully connect the household electrical wires to the fixture's wires. Typically, black to black (live), white to white (neutral), and bare copper or green to ground. Use electrical caps to secure connections.
- Mount Fixture: With assistance, lift the assembled light fixture and align it with the hanging plate. Secure the fixture to the hanging plate using the provided screws. Ensure the fixture is flush against the ceiling and all screws are tightened.

Image: The ceiling light beautifully installed in a kitchen setting, demonstrating its flush mount design.
Note: The installation process can be challenging. If you are unsure, consult a professional electrician.
6. Operating Instructions
Your Garwarm LED Dimmable Flower Shape Ceiling Light is operated using the included remote control. It is not compatible with standard wall dimmer switches.
6.1. Remote Control Functions

Image: The remote control for the ceiling light, illustrating buttons for power, brightness adjustment, and color temperature selection.
- Power ON/OFF: Press the ON or OFF buttons to turn the light on or off.
- Brightness Adjustment: Use the + and - buttons (often depicted as sun icons) to increase or decrease brightness from 5% to 100%.
- Color Temperature Adjustment: Use the K+ and K- buttons (or similar icons) to cycle through color temperatures (Warm White 3000K, Neutral White 4000K, Cool White 6500K).
- Night Light Mode: Activate a low-brightness, warm light setting for nighttime use. (Refer to remote for specific button, often a moon icon).
- Memory Function: The light typically remembers the last brightness and color temperature setting when turned off and on via the remote.
Video: Demonstration of the Garwarm 14 Petals Modern Ceiling Lighting in White, showcasing its dimming and color temperature adjustment features using the remote control.
7. Maintenance
- Cleaning: To clean the fixture, ensure the power is off. Use a soft, dry, or slightly damp cloth. Do not use harsh chemicals, abrasive cleaners, or polishes as they may damage the finish or acrylic components.
- Bulb Replacement: The LED chips are integrated and not user-replaceable. The fixture has a long service life of over 30,000 hours.
- Inspection: Periodically check all connections and mounting hardware to ensure they remain secure.
8. Troubleshooting
| Problem | Possible Cause | Solution |
|---|---|---|
| Light does not turn on | No power supply; Loose wiring; Faulty remote control battery. | Check circuit breaker. Ensure all electrical connections are secure. Replace remote control batteries. |
| Light flickers or dims unexpectedly | Incompatible dimmer switch; Loose wiring; Power fluctuations. | Ensure no external dimmer switch is used. Check wiring connections. Consult an electrician for power issues. |
| Remote control not working | Dead batteries; Remote not paired; Obstruction between remote and fixture. | Replace batteries. Ensure direct line of sight. Refer to remote pairing instructions (if applicable, not detailed in provided data). |
| Light color or brightness cannot be adjusted | Remote control issue; Internal wiring issue. | Check remote batteries and functionality. Verify internal wiring connections. |
If you encounter issues not listed here or if the suggested solutions do not resolve the problem, please contact Garwarm customer support.
9. Warranty and Support
Garwarm is committed to providing high-quality products. If the package you received is damaged or missing parts, we can replace or send the part to you for free. For any questions or concerns regarding your Garwarm LED Dimmable Flower Shape Ceiling Light, please contact Garwarm customer service for assistance.
You can visit the Garwarm Store on Amazon for more information or to contact support.