Introduction
This manual provides instructions for the Sharp 14-inch Oversized LED Digital Wall Clock. This clock features a large, easy-to-read display for time, date, day of week, and both indoor and outdoor temperatures. It is designed for versatile placement, offering both wall-mounting and tabletop options.
Package Contents
- Sharp 14-inch Oversized LED Digital Wall Clock
- Wireless Outdoor Temperature Sensor
- Electric Adapter
- Instruction Manual
Note: 2 AAA batteries for the outdoor sensor and 2 AAA batteries for clock battery backup are not included.
Key Features
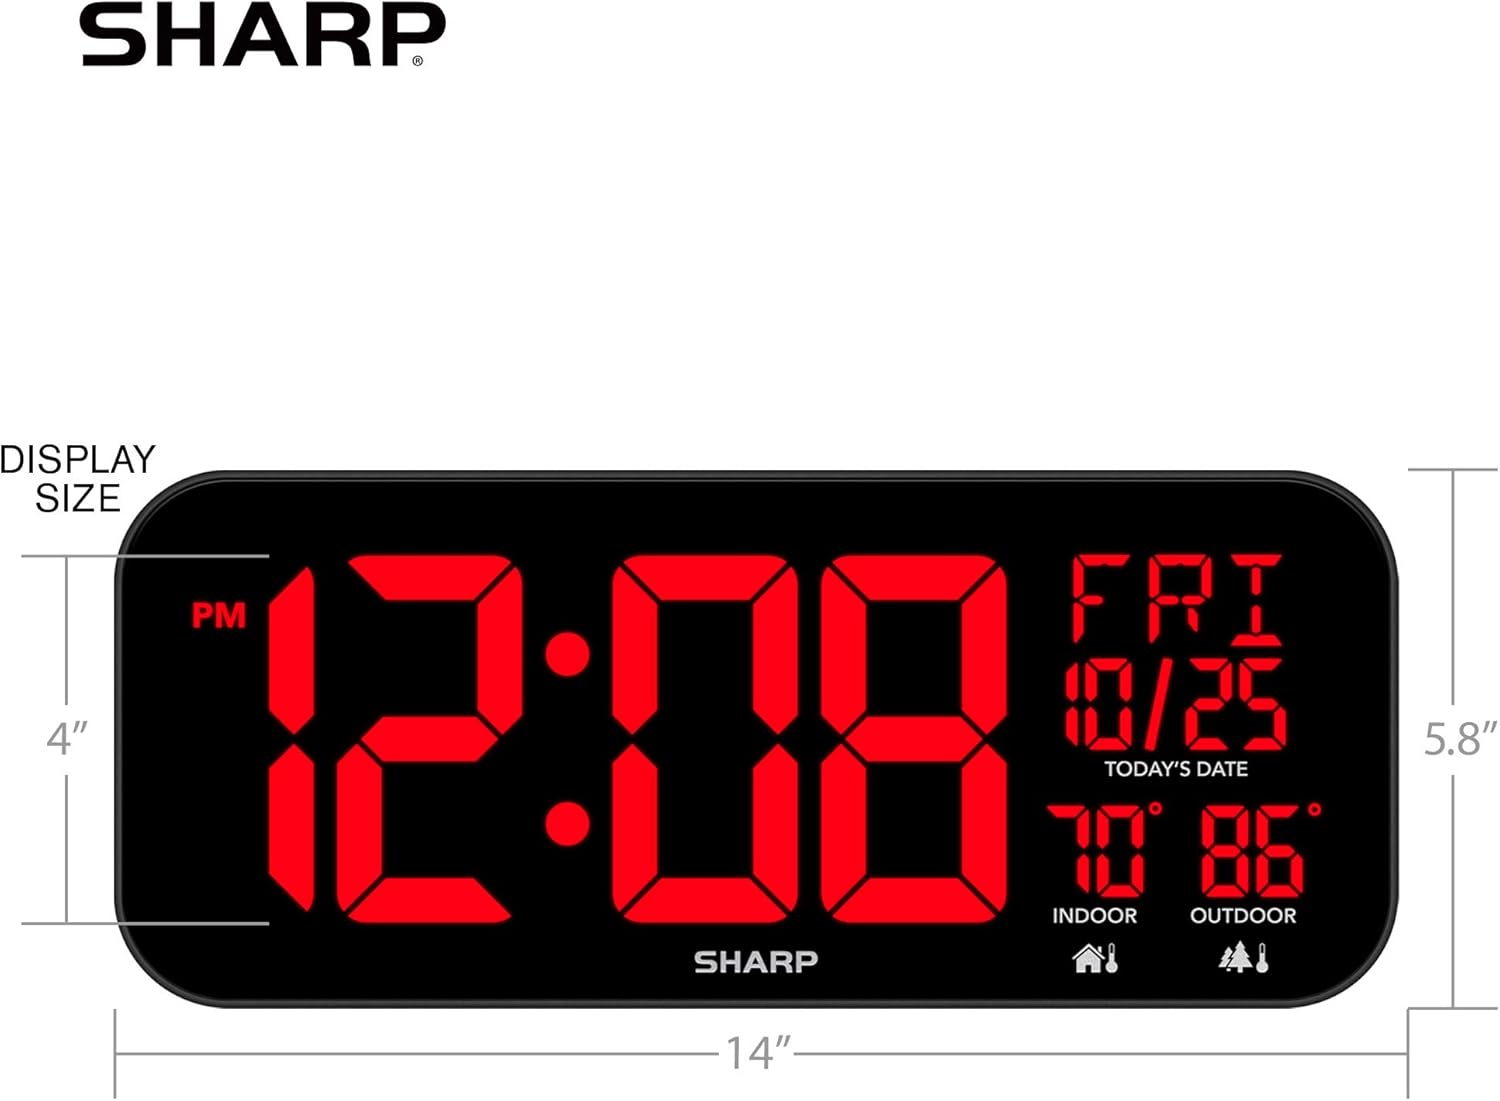
- Giant Display: Measures 5.8 inches tall, 14 inches wide, and 1.5 inches deep.
- Large 4-inch Time Digits: Ensures easy readability from a distance.
- Indoor and Outdoor Temperature Display: Features a wireless outdoor sensor (included) that transmits temperature up to 100ft.
- Date and Day of Week Display: Includes a 1-inch tall calendar and day of week display.
- 3-Step Dimmer Control: Adjust display brightness for comfort.
- Versatile Placement: Keyholes for wall mounting and a fold-out backstand for tabletop use.
- Cord Wrap Function: Keeps excess power cord tidy.
- Battery Backup: Retains time settings during power outages (requires 2 AAA batteries, not included).


Setup Instructions
1. Powering the Clock
- Plug the provided electric adapter into the DC input port on the back of the clock.
- Plug the adapter into a standard electrical outlet. The clock display will illuminate.
- For battery backup, open the battery compartment on the back of the clock and insert 2 new AAA alkaline batteries (not included). This will retain time settings during a power outage.
2. Setting Up the Wireless Outdoor Sensor
- Open the battery compartment on the back of the wireless outdoor sensor.
- Insert 2 new AAA alkaline batteries (not included), observing correct polarity.
- Place the sensor outdoors in a shaded, dry location, within 100 feet of the main clock unit. Ensure there are no major obstructions that could interfere with the wireless signal.
- The outdoor temperature should appear on the clock display within a few minutes. If not, try repositioning the sensor or the clock.

3. Setting Time and Date
- Locate the "SET" button on the back of the clock. Press and hold it to enter time setting mode.
- Use the "UP" (▲) and "DOWN" (▼) buttons to adjust the flashing digit (e.g., hour, minute).
- Press "SET" again to confirm the current setting and move to the next adjustable item (e.g., hour, minute, year, month, day).
- Continue this process until all time and date settings are correct. The clock will automatically exit setting mode if no buttons are pressed for a few seconds.
- Adjust the 3-step dimmer control using the dedicated button on the back to set your preferred display brightness.

Operating the Clock
Reading the Display
The large LED display shows the current time (with AM/PM indicator), day of the week, month, date, indoor temperature, and outdoor temperature. The 4-inch digits for the time ensure visibility across a room.
Adjusting Brightness
Use the "DIMMER" button on the back of the clock to cycle through the three brightness levels (High, Medium, Low) to suit your environment and preference.
Placement Options
- Wall Mount: Utilize the keyholes on the back of the clock to securely hang it on a wall.
- Tabletop: Extend the fold-out backstand for stable placement on a desk, shelf, or table.
Daylight Saving Time (DST)
If applicable, use the "DST +/-1 HR SWITCH" on the back of the clock to manually adjust the time for Daylight Saving Time. Refer to local regulations for exact dates.
Video Demonstration
Care and Maintenance
- Cleaning: Wipe the clock and sensor with a soft, dry cloth. Do not use abrasive cleaners or solvents.
- Battery Replacement: Replace batteries in the outdoor sensor and for the clock's backup function annually, or when the display indicates low power or inconsistent readings.
- Storage: If storing the clock for an extended period, remove all batteries to prevent leakage.
Troubleshooting
- Clock display is blank:
- Ensure the electric adapter is securely plugged into both the clock and a working electrical outlet. Check if the outlet has power. If using battery backup, ensure batteries are fresh and correctly inserted.
- Outdoor temperature is not displayed or is inaccurate:
- Check if the outdoor sensor batteries are fresh and correctly inserted.
- Ensure the outdoor sensor is within 100 feet of the main clock unit and free from major obstructions (e.g., thick walls, large metal objects).
- Try repositioning both the clock and the sensor to improve signal reception.
- Allow a few minutes for the sensor to transmit data after battery replacement or repositioning.
- Note that direct sunlight or proximity to heat sources can affect sensor accuracy. Place the sensor in a shaded area.
- Time is incorrect:
- Re-enter the time and date settings as described in the "Setting Time and Date" section. Ensure the AM/PM indicator is correct. If the clock is losing time, replace the battery backup batteries.
- Display is too bright or too dim:
- Use the "DIMMER" button on the back of the clock to adjust the brightness to one of the three available levels.
Specifications
| Brand | Sharp |
| Model Number | Flechazo-0401-1416-11 |
| Display Type | Digital LED |
| Color | Black |
| Product Dimensions | 14"W x 5.8"H x 1.5"D |
| Item Weight | 1.96 Pounds |
| Power Source | Corded Electric with Battery Backup |
| Battery Requirements | 2 AAA for clock backup (not included), 2 AAA for outdoor sensor (not included) |
| Mounting Type | Tabletop, Wall Mount |
| Special Feature | Temperature Display (Indoor/Outdoor), Date, Day of Week, Dimmer |
Warranty and Support
For warranty information or technical support, please refer to the contact details provided on the product packaging or visit the official Sharp website. Keep your purchase receipt for warranty claims.