1. Introduction
This instruction manual provides comprehensive guidance for the safe and efficient use of your Renogy 100 Watt 12 Volt Monocrystalline Solar Panel. This panel is designed for various off-grid applications, including RVs, marine systems, rooftops, and remote power needs. Please read this manual thoroughly before installation and operation to ensure optimal performance and longevity of your solar panel.
2. Safety Information
- Always wear appropriate personal protective equipment (PPE), including safety glasses and insulated gloves, during installation and maintenance.
- Do not attempt to disassemble or modify the solar panel. This can void the warranty and pose safety risks.
- Ensure all electrical connections are secure and properly insulated to prevent short circuits and electrical shock.
- Avoid touching the panel's surface when it is wet or during lightning storms.
- Keep the solar panel away from flammable materials and sources of ignition.
- Handle the panel with care to prevent damage to the glass or frame.
- Consult a qualified electrician for complex installations or if you are unsure about any wiring procedures.
3. Product Features
The Renogy 100 Watt 12 Volt Monocrystalline Solar Panel offers robust performance and durability:
- Reliable Power Output: Capable of providing an average of 500 Watt-hours of electricity per day under optimal sun availability.
- Efficient Performance: Features bypass diodes to protect solar cells from overheating and maintain functionality during partial shading.
- Industry-Leading Technology: Constructed with high-purity silicon cells and advanced encapsulation materials for enhanced cell performance and long-lasting durability.
- Built to Last: Equipped with a corrosion-resistant aluminum frame for extended outdoor use and an IP65 rated junction box to withstand dirt, dust, debris, and low-pressure water jets.
- Fast and Easy Installation: Pre-drilled holes on the back allow for quick mounting and securing, compatible with various Renogy mounting solutions.

Figure 3.1: Front and back view of the Renogy 100 Watt Monocrystalline Solar Panel, showcasing its robust design and integrated wiring.
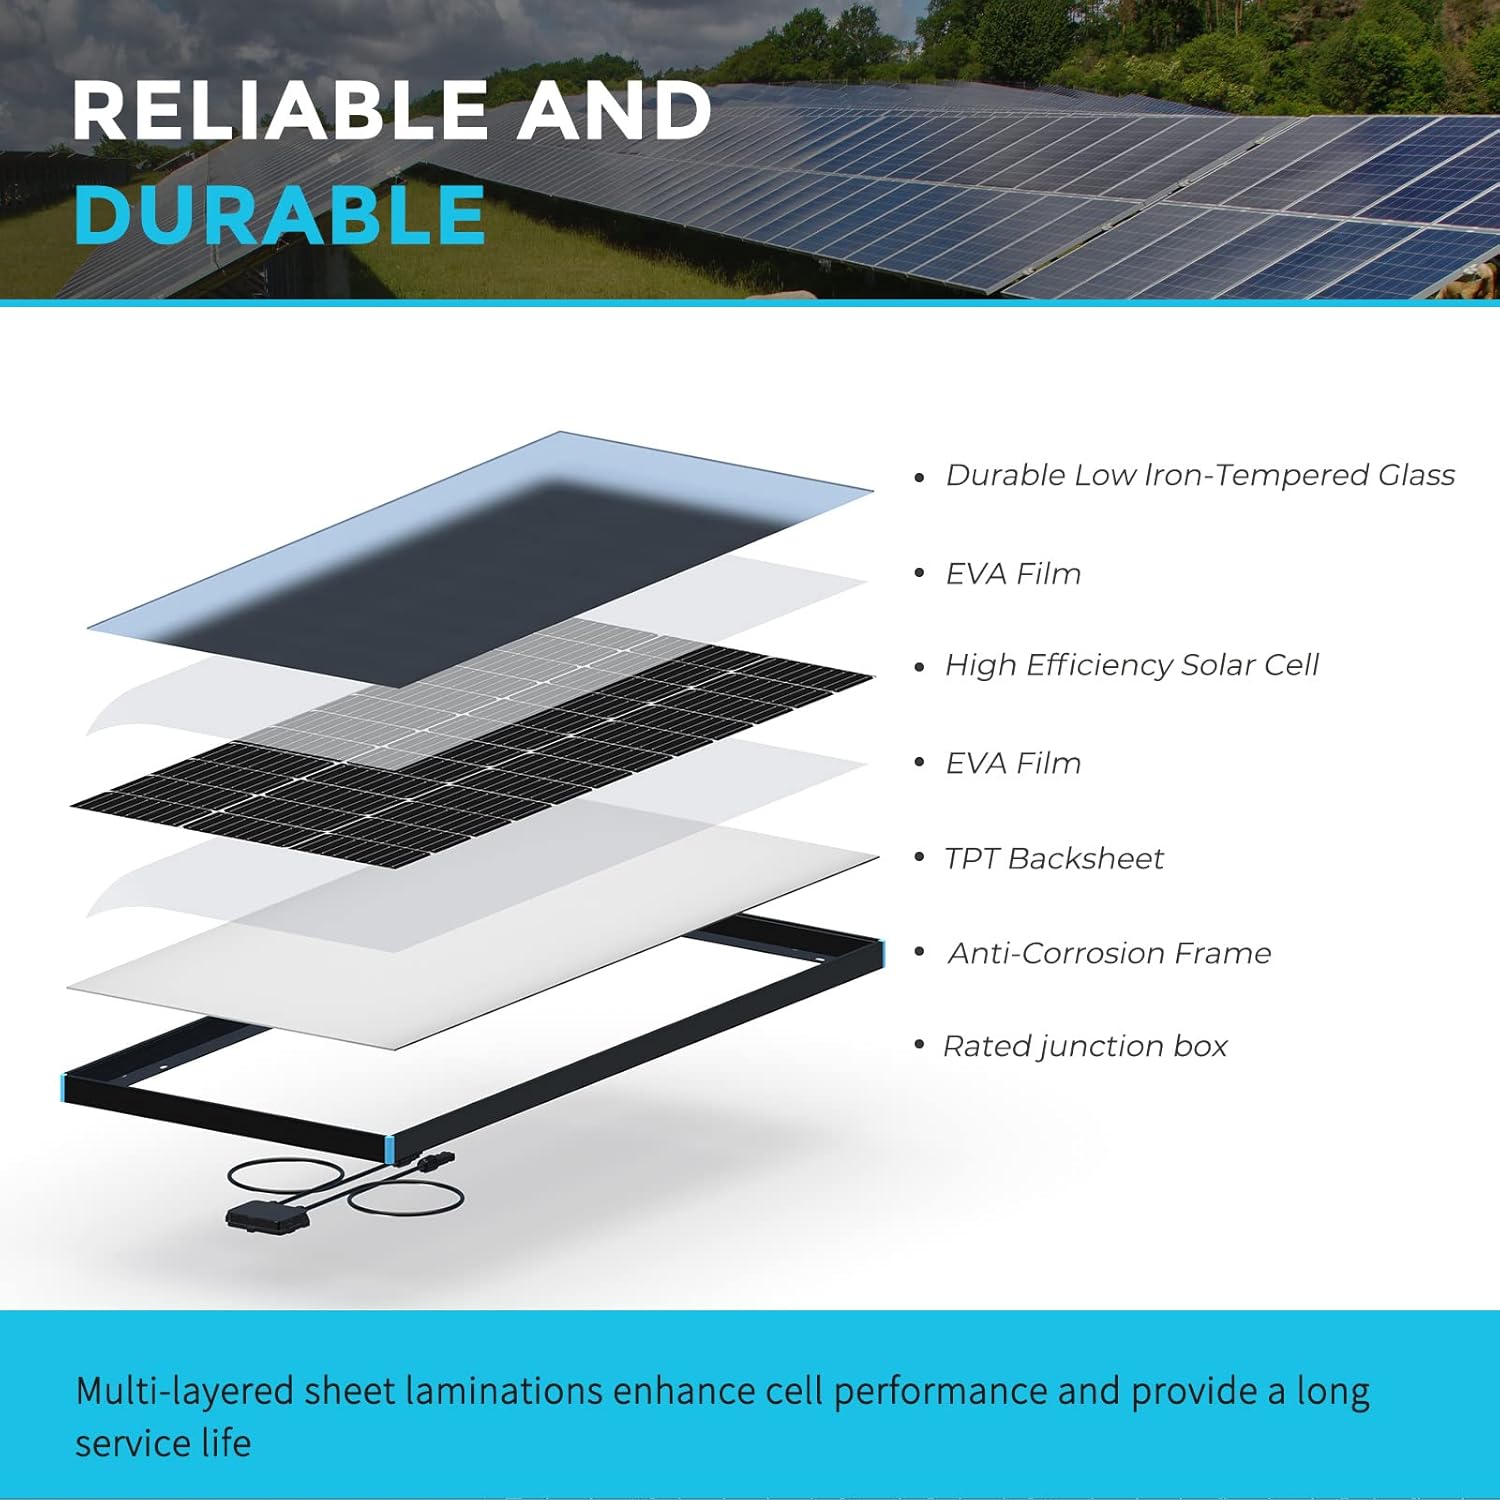
Figure 3.2: Exploded view illustrating the multi-layered construction of the solar panel, including low iron-tempered glass, EVA film, high-efficiency solar cells, TPT backsheet, and anti-corrosion frame.
4. Setup and Installation
Proper installation is crucial for the performance and safety of your solar panel system. Follow these steps for a successful setup:
4.1 Site Selection
Choose a location that receives maximum direct sunlight throughout the day, free from obstructions like trees or buildings that could cause shading. Ensure the mounting surface is structurally sound to support the panel's weight and withstand wind loads.
4.2 Mounting
The panel features pre-drilled holes for easy mounting. It is compatible with various Renogy mounting hardware such as ground mounts, Z Brackets, Corner Brackets, Pole Mounts, and Tilt Mounts. Secure the panel firmly using appropriate fasteners.
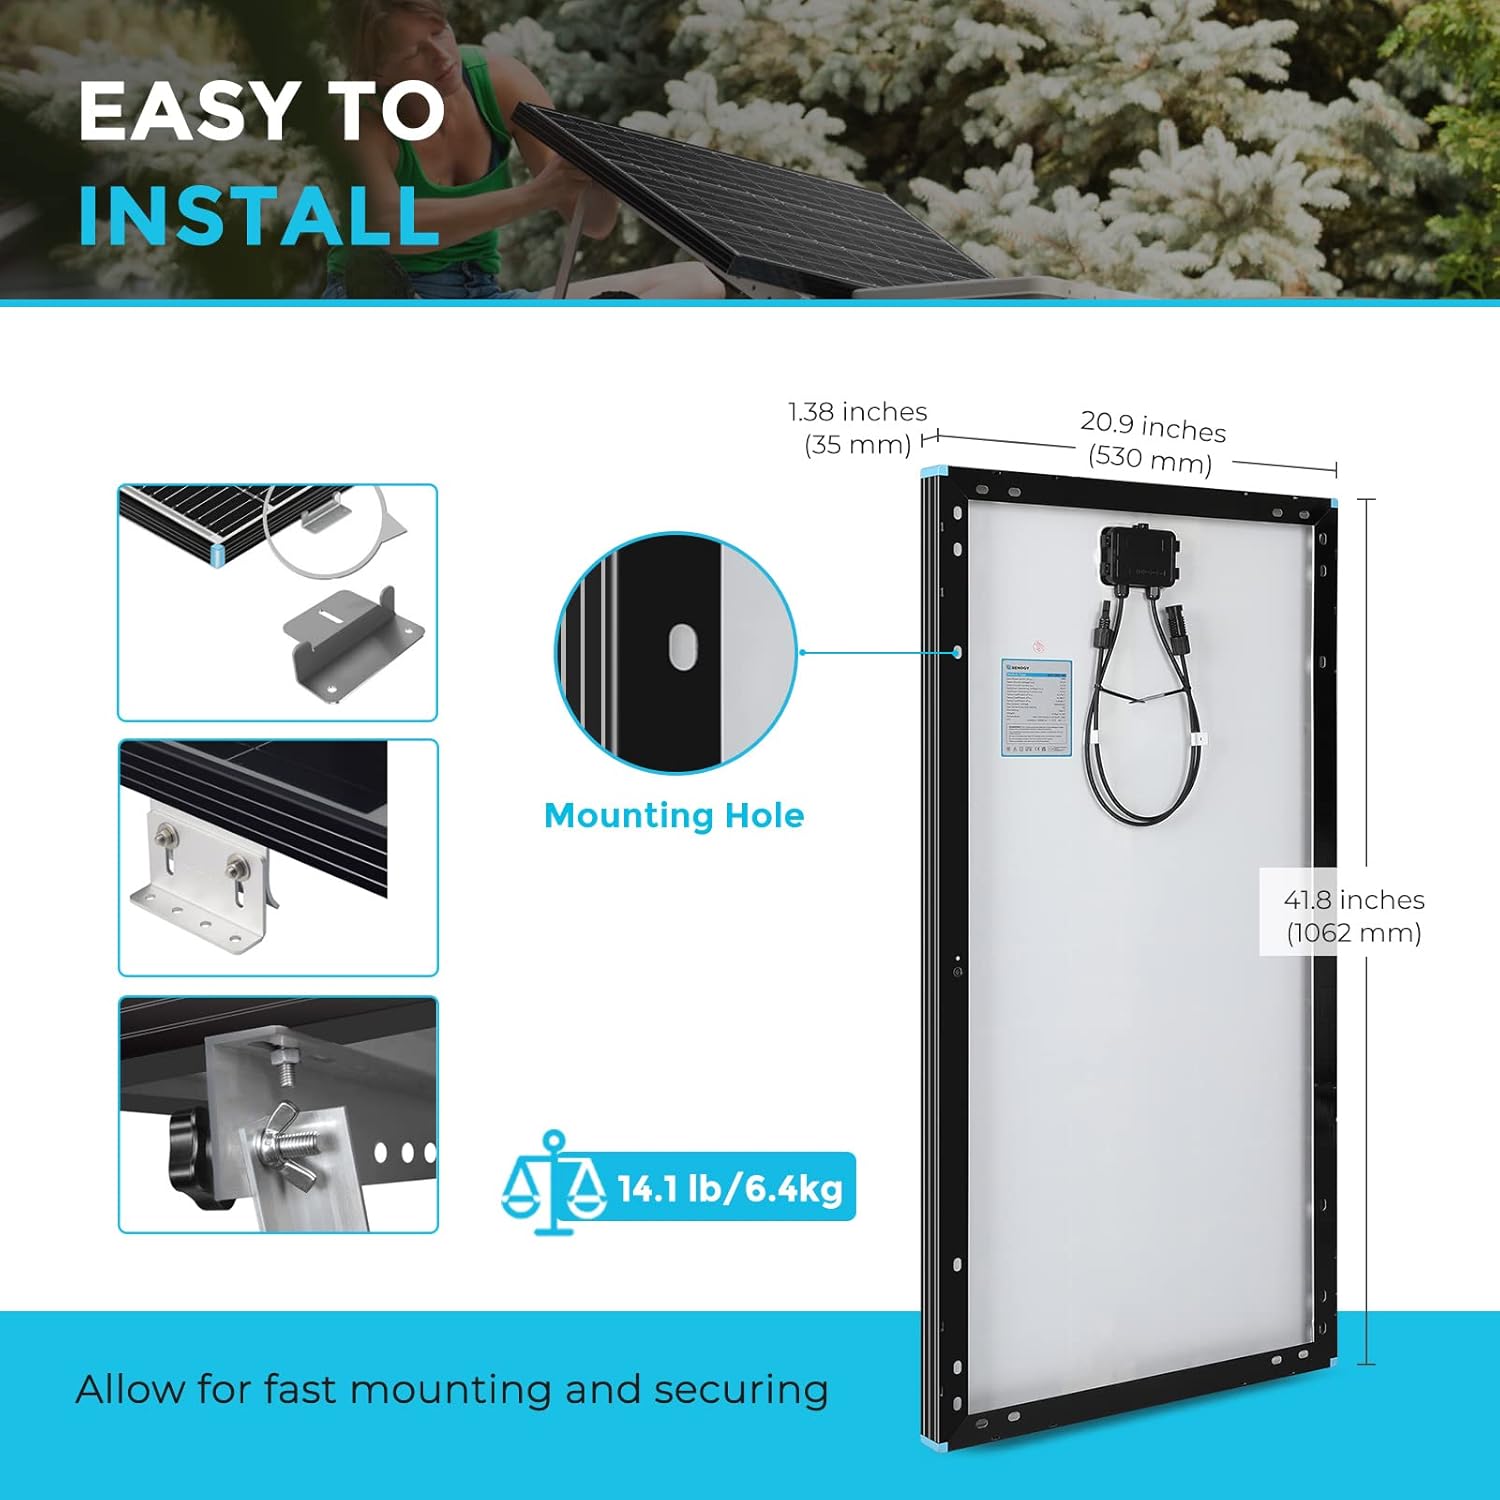
Figure 4.1: Detailed dimensions of the solar panel (41.8"L x 20.9"W x 1.38"H) and the location of pre-drilled mounting holes for easy installation.
4.3 Wiring Connections
The solar panel comes with MC4 connectors for easy and secure wiring. Ensure correct polarity (+ to + and - to -) when connecting panels in series or parallel. Connect the solar panel to a compatible charge controller, which then connects to your battery bank and inverter (if applicable).

Figure 4.2: Schematic diagram illustrating the connection of solar panels to a charge controller, battery, and inverter in an off-grid system.

Figure 4.3: The IP65 rated junction box, designed to protect electrical connections from environmental elements like dust and water.

Figure 4.4: IP67 rated MC4 connectors, ensuring a waterproof and reliable connection for solar wiring.
5. Operating Instructions
Once installed, the Renogy solar panel operates automatically by converting sunlight into electricity. For optimal performance:
- Maximize Sunlight Exposure: Ensure the panel is positioned to receive direct sunlight for the longest possible duration each day. Adjust tilt angles seasonally if possible.
- Monitor Performance: Regularly check your charge controller's display or system monitoring app to ensure the panel is producing the expected power output.
- Shading Management: While bypass diodes help mitigate the impact of partial shading, aim to keep the panel completely unshaded for maximum efficiency. Even small shadows can significantly reduce output.
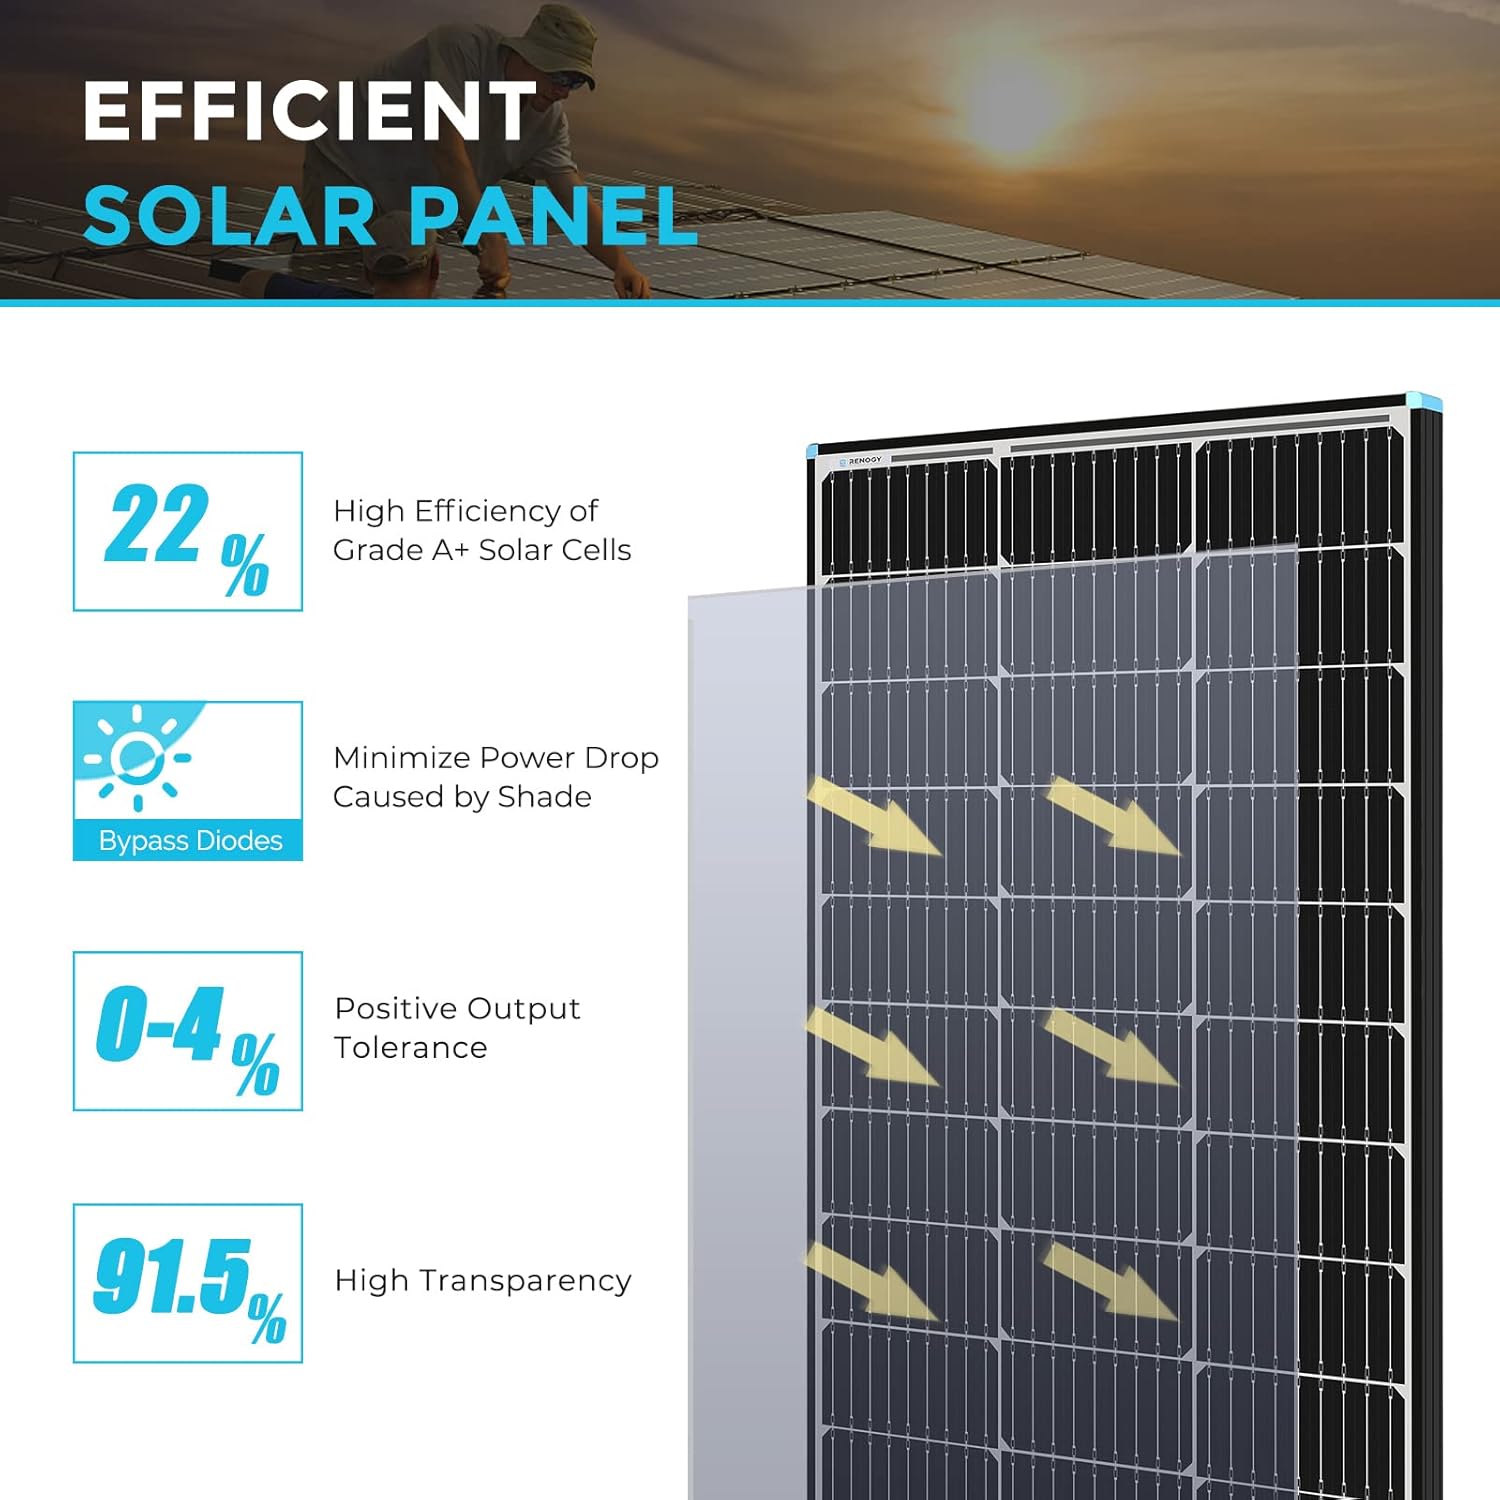
Figure 5.1: Visual representation of the solar panel's efficiency, highlighting the function of bypass diodes in minimizing power loss due to shading.
6. Maintenance
Regular maintenance ensures the long-term efficiency and lifespan of your solar panel:
- Cleaning: Clean the surface of the solar panel periodically with a soft cloth and water to remove dust, dirt, bird droppings, or other debris that can reduce efficiency. Do not use abrasive materials or harsh chemicals.
- Inspection: Annually inspect the panel for any physical damage, such as cracks in the glass, bent frames, or loose connections. Check wiring for signs of wear, corrosion, or rodent damage.
- Connection Check: Ensure all MC4 connectors and other wiring connections remain tight and secure. Loose connections can lead to power loss or overheating.
- Shading Check: Periodically check for new sources of shading, such as growing trees or new structures, and address them if possible.
7. Troubleshooting
If you experience issues with your solar panel, refer to the following common problems and solutions:
| Problem | Possible Cause | Solution |
|---|---|---|
| Low or No Power Output | Shading on the panel surface | Remove any obstructions causing shade. |
| Low or No Power Output | Dirty panel surface | Clean the panel surface with water and a soft cloth. |
| Low or No Power Output | Loose or faulty wiring connections | Check all MC4 connections and system wiring for tightness and proper contact. |
| Low or No Power Output | Charge controller issue | Refer to your charge controller's manual for troubleshooting. |
| Panel Overheating | Insufficient airflow behind the panel | Ensure adequate spacing between the panel and mounting surface for ventilation. |
If the problem persists after attempting these solutions, please contact Renogy customer support for further assistance.
8. Specifications
Detailed technical specifications for the Renogy 100 Watt 12 Volt Monocrystalline Solar Panel:
| Specification | Value |
|---|---|
| Brand | Renogy |
| Material | Aluminum, Glass |
| Product Dimensions (L x W x H) | 41.8" x 20.9" x 1.38" |
| Item Weight | 14.5 Pounds |
| Efficiency | High Efficiency |
| Connector Type | MC4 |
| Maximum Voltage | 12 Volts |
| Maximum Power | 100 Watts |
| Upper Temperature Rating | 180 Degrees Fahrenheit |
| Warranty | 10 years |
9. Warranty Information
The Renogy 100 Watt 12 Volt Monocrystalline Solar Panel comes with a 10-year warranty. This warranty covers defects in materials and workmanship under normal use and service conditions. Please retain your proof of purchase for warranty claims. For detailed warranty terms and conditions, refer to the official Renogy website or contact customer support.
10. Customer Support
For technical assistance, troubleshooting not covered in this manual, or warranty inquiries, please contact Renogy customer support:
- Online Support: Visit the official Renogy website for FAQs, support articles, and contact forms.
- Brand Store: You can also find more information and products at the Renogy Amazon Store.


