1. Introduction and Overview
This manual provides essential information for the proper installation, operation, and maintenance of your Memphis Audio SRXE212VP Dual 12-inch Subwoofer Enclosure and Amplifier Package. Please read this manual thoroughly before attempting installation or operation to ensure optimal performance and safety.

Figure 1.1: Memphis Audio SRXE212VP Dual 12-inch Subwoofer Enclosure and SRX500.1 Amplifier Package.
This image displays the complete Memphis Audio SRXE212VP package, featuring the dual 12-inch subwoofer enclosure alongside the compact SRX500.1 amplifier, ready for installation.
Key Features:
- Dual 12-inch subwoofers for powerful bass reproduction.
- Vented enclosure design with a side slot port for enhanced bass response.
- Includes a dedicated Memphis SRX500.1 amplifier, optimized for the subwoofers.
- Subwoofers feature woven tinsel leads and a 2-inch diameter heat-treated aluminum voice coil.
- Amplifier includes a bass boost circuit and remote level control for convenient adjustments.
2. What's in the Box
Upon unpacking your Memphis Audio SRXE212VP package, please verify that all components listed below are present and in good condition:
- Dual 12-inch subwoofers (pre-installed in vented enclosure)
- Vented subwoofer enclosure
- Memphis SRX500.1 dedicated subwoofer amplifier
- Remote level control (bass knob)
- Wiring harness for remote level control
- Mounting hardware (screws, etc.)
- Instruction Manual / Warranty Information

Figure 2.1: Included accessories and documentation.
This image illustrates the various components typically included with the SRXE212VP package, such as the amplifier, remote gain control, wiring, and documentation.
3. Safety Information
Always observe the following safety precautions during installation and operation to prevent injury or damage to the equipment:
- Disconnect the vehicle's negative battery terminal before starting any electrical work.
- Ensure proper grounding for all components to prevent electrical shorts and noise.
- Use appropriate wire gauges for power, ground, and speaker connections as specified by the amplifier's requirements.
- Install fuses at the battery and near the amplifier as close as possible to protect against overcurrent.
- Mount the amplifier and enclosure securely to prevent movement during vehicle operation.
- Avoid routing power cables near signal cables to minimize interference.
- Do not expose the equipment to excessive moisture or extreme temperatures.
- Seek professional installation if you are unsure about any steps.
4. Installation and Setup
Proper installation is crucial for the performance and longevity of your subwoofer system. Follow these general guidelines. Specific vehicle wiring diagrams are not included and may vary.
4.1 Mounting the Amplifier and Enclosure
- Choose a secure, well-ventilated location for the amplifier, away from direct sunlight or heat sources.
- Ensure the mounting surface is solid and can support the weight of the amplifier.
- Mount the subwoofer enclosure securely in the trunk or cargo area to prevent it from shifting during driving.
4.2 Wiring Connections
Refer to the diagrams below for amplifier connections. Always ensure the vehicle's battery is disconnected before making any electrical connections.

Figure 4.1: Amplifier rear panel showing input and control connections.
This image details the various input and control terminals on the amplifier, including High Input, RCA Input/Output, Gain, LPF, Sub Sonic, and Remote connections.

Figure 4.2: Amplifier power and speaker output terminals.
This image shows the power input (+12V, REM, GND) and speaker output terminals, along with the fuse slots for the SRX500.1 amplifier.
- Power Connection (+12V): Run a heavy gauge power cable (e.g., 4 AWG or 8 AWG, depending on total power draw) directly from the vehicle's positive battery terminal to the amplifier's +12V terminal. Install an inline fuse holder within 18 inches (45 cm) of the battery.
- Ground Connection (GND): Connect a heavy gauge ground cable of the same length as the power cable from the amplifier's GND terminal to a clean, unpainted metal surface on the vehicle chassis. Ensure a solid, low-resistance connection.
- Remote Turn-On (REM): Connect a smaller gauge wire (e.g., 18 AWG) from the amplifier's REM terminal to the remote turn-on output of your head unit. This signal turns the amplifier on and off with your stereo.
- Signal Input:
- RCA Input: If your head unit has RCA pre-outs, connect RCA cables from the head unit's subwoofer output to the amplifier's RCA Input terminals.
- High-Level Input: If your head unit does not have RCA outputs, use the high-level input. Connect the speaker wires from your head unit's rear speaker outputs to the amplifier's High Input terminal using the provided connector.
- Speaker Output: The dual 12-inch subwoofers are pre-wired within the enclosure. Connect the speaker wires from the subwoofer enclosure's terminals to the amplifier's Speaker Output terminals. Ensure correct polarity (+ to + and - to -).
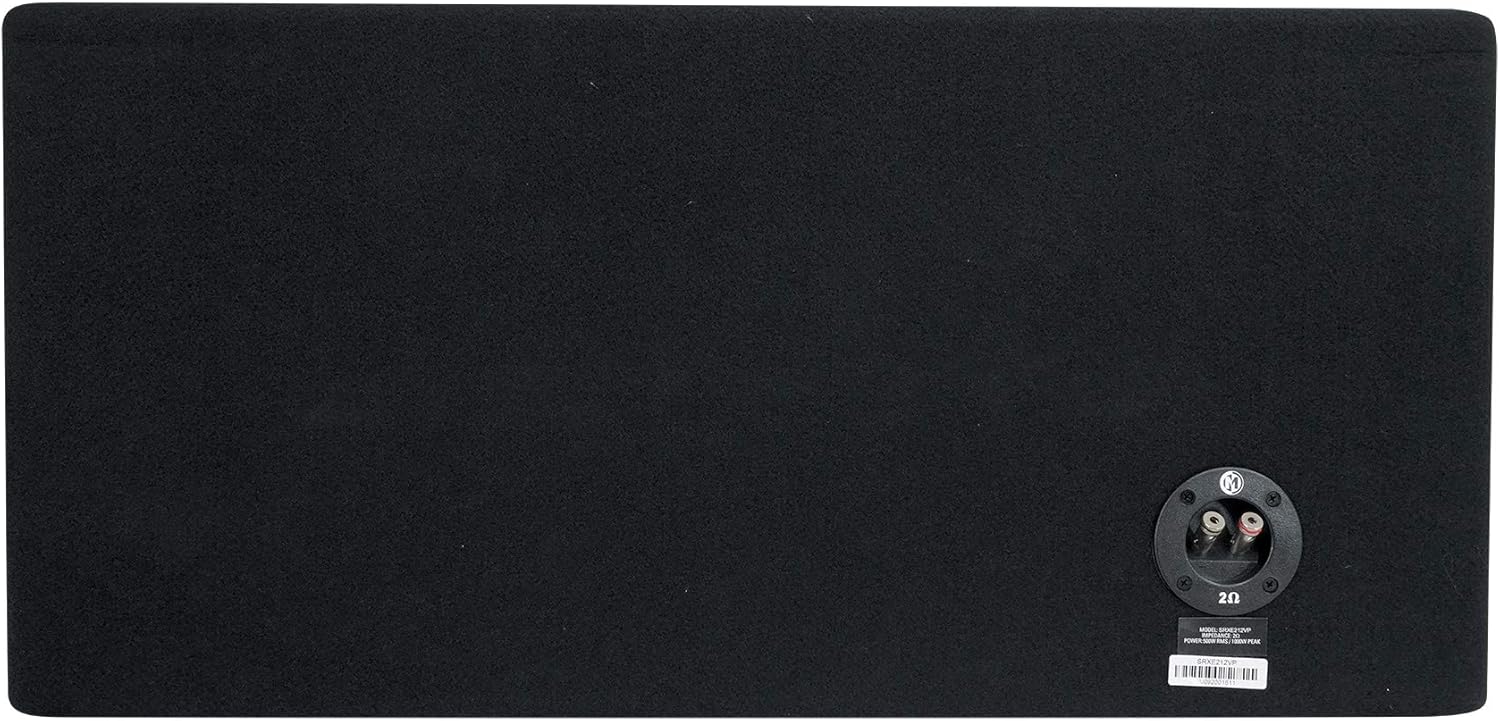
Figure 4.3: Rear view of the subwoofer enclosure showing speaker terminals.
This image displays the speaker wire input terminals located on the rear panel of the subwoofer enclosure, where the amplifier's speaker output connects.
5. Operating Instructions
Once installed, you can adjust the amplifier settings to optimize the subwoofer's performance for your vehicle and listening preferences.
5.1 Amplifier Controls (Refer to Figure 4.1)
- GAIN: This control matches the amplifier's input sensitivity to the output level of your head unit. Start with the gain at minimum, then slowly increase it until you hear distortion, then back off slightly. Do not use the gain control as a volume knob.
- LPF (Low Pass Filter): This filter allows only frequencies below the set point to pass through to the subwoofer. Adjust this to blend the subwoofer's output seamlessly with your main speakers. A common starting point is 80-100 Hz.
- SUB SONIC: This filter removes extremely low frequencies that are below the audible range or harmful to the subwoofer. Setting it slightly below your LPF setting (e.g., 20-30 Hz) can improve sound quality and protect the subwoofers.
- REMOTE: This port connects to the included remote level control.
5.2 Remote Level Control
The remote level control allows you to adjust the subwoofer's output level conveniently from the driver's seat without accessing the amplifier directly.

Figure 5.1: Front view of the remote gain control.
This image shows the compact remote gain control unit, featuring a rotary knob for adjusting the subwoofer's output level and an indicator light.
- Connect the remote control to the "REMOTE" port on the amplifier using the provided cable.
- Mount the remote control in an easily accessible location within the vehicle.
- Turn the knob to increase or decrease the subwoofer's volume relative to the main system volume.
6. Maintenance
To ensure the longevity and optimal performance of your Memphis Audio subwoofer system, follow these simple maintenance guidelines:
- Cleaning: Use a soft, dry cloth to wipe down the amplifier and enclosure surfaces. Avoid using harsh chemicals or abrasive cleaners.
- Ventilation: Ensure the amplifier's cooling fins are free from dust and debris to maintain proper airflow and prevent overheating.
- Connections: Periodically check all wiring connections (power, ground, signal, speaker) to ensure they are secure and free from corrosion. Loose connections can lead to poor performance or damage.
- Environment: Protect the system from extreme temperatures, direct sunlight, and moisture.
7. Troubleshooting
If you experience issues with your subwoofer system, consult the following table for common problems and their solutions before contacting customer support.
| Problem | Possible Cause | Solution |
|---|---|---|
| No Power / Amplifier Not Turning On |
|
|
| No Sound from Subwoofers |
|
|
| Distorted Sound |
|
|
8. Product Specifications
Below are the technical specifications for the Memphis Audio SRXE212VP package:
| Specification | Detail |
|---|---|
| Model Name | SRXE212VP |
| Speaker Type | Subwoofer |
| Subwoofer Diameter | 12 Inches (x2) |
| Speaker Maximum Output Power | 1000 Watts |
| Impedance | 2 Ohms |
| Frequency Response | 500 Hz (Amplifier LPF adjustable) |
| Connectivity Technology | RCA, High-Level Input |
| Subwoofer Connectivity Technology | Wired |
| Audio Output Mode | Mono (from amplifier) |
| Special Feature | Bass Boost, Remote Level Control |
| Recommended Uses For Product | Vehicle |
| Amplifier Product Dimensions (approx.) | 7.44"D x 15.75"W x 2.1"H |
| Item Weight (total package) | 84.8 pounds |
| Manufacturer | Memphis Audio |
| UPC | 613816406807 |
Note: Specifications are subject to change without notice.
9. Warranty Information
Memphis Audio products are designed and manufactured to the highest quality standards. This product comes with a limited or full warranty. Please refer to the warranty document included in your package (see Figure 2.1) for specific terms, conditions, and duration of coverage.
Typically, warranty coverage addresses defects in materials and workmanship under normal use. Damage resulting from improper installation, abuse, accident, neglect, or unauthorized modification is generally not covered. Retain your proof of purchase for warranty claims.
10. Customer Support
If you have questions or require assistance beyond the scope of this manual, please contact Memphis Audio customer support. For the most up-to-date contact information, visit the official Memphis Audio website or refer to the documentation included with your product.
When contacting support, please have your product model number (SRXE212VP) and proof of purchase readily available.


