1. Introduction
Thank you for choosing the IKEA NOLLATTA Digital Alarm Clock. This manual provides essential information for the safe and efficient use of your new alarm clock. Please read it thoroughly before use and keep it for future reference.
The IKEA NOLLATTA is a modern digital alarm clock featuring a clear LED display, adjustable brightness, and a compact design suitable for various spaces. It operates via a USB power cable and includes a battery backup for time memory.
2. Safety Information
- Ensure the product is connected to a compatible USB power source (5V/1A adapter, not included).
- Do not expose the clock to water or excessive humidity.
- Keep the clock away from direct sunlight and heat sources.
- Only use the specified CR2032 3V lithium battery for time memory. Incorrect battery type may cause damage.
- Do not attempt to disassemble or repair the clock yourself. Contact qualified service personnel for assistance.
- Keep batteries out of reach of children. Swallowing batteries can be fatal.
3. Package Contents
Verify that all items are present in the package:
- IKEA NOLLATTA Digital Alarm Clock (Main Unit)
- USB Power Cable (1.5m)
- Desktop Stand
- User Manual
Note: A CR2032 3V lithium battery is required for time memory backup but is sold separately and not included in the package. A 5V/1A USB power adapter is also required and sold separately.
4. Product Overview
The IKEA NOLLATTA features a minimalist design with a clear LED display. The main unit includes control buttons on the back for setting time and alarms, and a light sensor for automatic brightness adjustment.
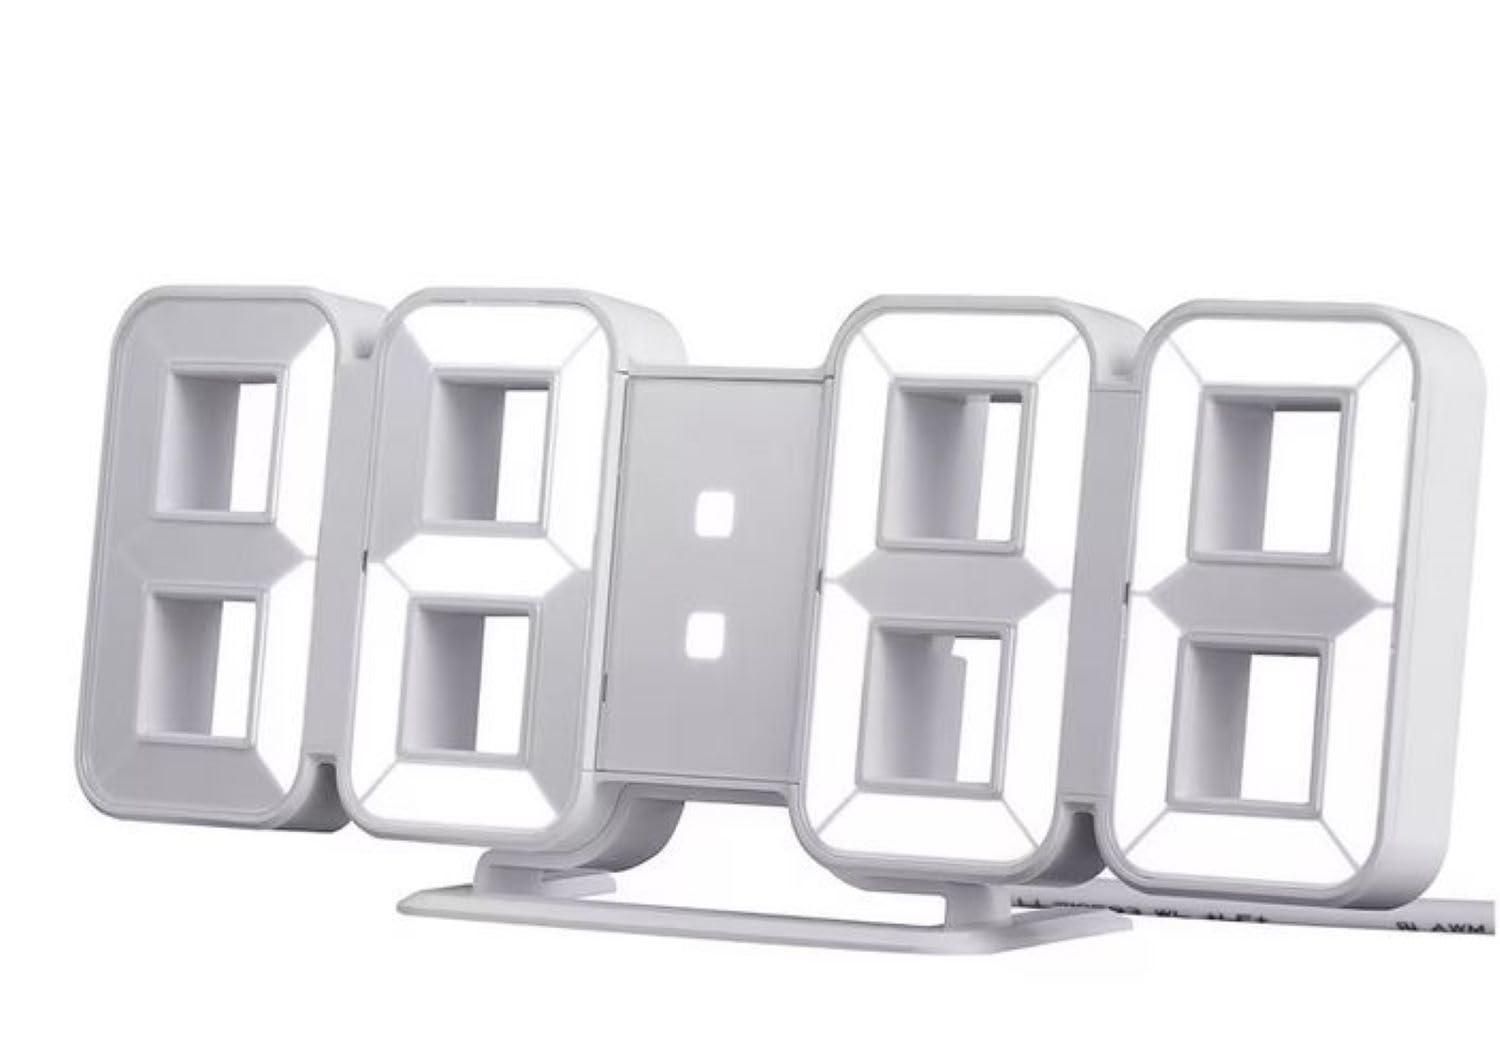
Figure 1: IKEA NOLLATTA Digital Alarm Clock in a bedroom setting.

Figure 2: Rear view of the clock, highlighting the control buttons, USB port, and battery compartment.
Control Buttons (Rear of Clock):
- MODE Button: Used to switch between time, date, and temperature display modes, and to enter setting modes.
- UP Button: Used to increase values during setting, or to adjust brightness.
- DOWN Button: Used to decrease values during setting, or to adjust brightness.
Other Features:
- Light Sensor: Automatically adjusts display brightness based on ambient light.
- USB Power Port: Connects the clock to a power source using the included USB cable.
- Battery Compartment: Holds a CR2032 3V lithium battery for time memory backup.
5. Setup
5.1. Power Connection
- Insert the small end of the included USB power cable into the USB power port on the back of the clock.
- Connect the other end of the USB cable to a 5V/1A USB power adapter (not included) and plug it into a wall outlet. The display will light up.
5.2. Installing Time Memory Battery (CR2032, sold separately)
The CR2032 battery provides backup power to retain time settings in case of a power outage or when the USB cable is disconnected. The display will not be active on battery power alone, but the internal clock and alarm settings will be preserved.
- Locate the battery compartment on the back of the clock.
- Open the battery compartment cover.
- Insert one CR2032 3V lithium battery, ensuring correct polarity (+/-).
- Close the battery compartment cover securely.
5.3. Placement
The IKEA NOLLATTA can be placed on a flat surface using the included desktop stand or mounted on a wall.
- Desktop Placement: Attach the desktop stand to the bottom of the clock. Place the clock on a stable, flat surface.
- Wall Mounting: The clock has keyhole slots on the back for wall mounting. Use appropriate screws and wall plugs (not included) for your wall type. Ensure the clock is securely mounted before releasing it.
6. Operating Instructions
6.1. Setting Time and Date
- Press and hold the MODE button for 3 seconds to enter time setting mode. The hour digits will start blinking.
- Use the UP and DOWN buttons to adjust the hour.
- Press MODE again to move to minute setting. Use UP and DOWN to adjust the minutes.
- Continue pressing MODE to cycle through setting the year, month, and day, adjusting each with the UP and DOWN buttons.
- After setting the day, press MODE to exit the setting mode.
6.2. 12/24-Hour Format Selection
In normal time display mode, press the UP button to toggle between 12-hour and 24-hour formats.
6.3. Alarm Setting
The alarm function works even when the display is turned off.
- Press the MODE button repeatedly until "AL" appears on the display, indicating alarm mode.
- Press and hold the MODE button for 3 seconds. The alarm hour digits will start blinking.
- Use the UP and DOWN buttons to set the desired alarm hour.
- Press MODE again to move to alarm minute setting. Use UP and DOWN to set the minutes.
- Press MODE to confirm and exit alarm setting.
- To activate/deactivate the alarm, in alarm mode ("AL" displayed), press the UP button. An alarm icon will appear/disappear on the display.
- When the alarm sounds, press any button to snooze. To turn off the alarm, press and hold the MODE button.
6.4. Brightness Adjustment
The clock offers 3 levels of brightness (High, Medium, Low) and an automatic adjustment mode, as well as an OFF setting for the display.
- In normal time display mode, press the DOWN button repeatedly to cycle through brightness levels: High → Medium → Low → OFF.
- The clock also features an automatic brightness adjustment function via its built-in light sensor.
6.5. Display Rotation Mode
The clock can cycle through displaying time, date, and temperature.
- In normal time display mode, press the MODE button briefly to switch between Time, Date, and Temperature displays.
- To activate automatic cycling through Time, Date, and Temperature, press and hold the MODE button until the display starts rotating.
- To stop automatic cycling and return to a static display, press the MODE button briefly again.
7. Maintenance
7.1. Cleaning
Wipe the clock surface with a soft, dry cloth. Do not use abrasive cleaners or solvents, as they may damage the finish.
7.2. Battery Replacement
If the time memory function is no longer working during power disconnection, replace the CR2032 3V lithium battery in the battery compartment (refer to section 5.2).
8. Troubleshooting
| Problem | Possible Cause | Solution |
|---|---|---|
| Display is off, but alarm still works. | USB power cable disconnected, or power outage. | This is normal behavior if a CR2032 battery is installed for time memory. Reconnect the USB cable to restore the display. |
| Clock does not turn on. | No power supply. | Ensure the USB cable is securely connected to both the clock and a working 5V/1A USB power adapter. Check the power outlet. |
| Time/Date settings are lost after power disconnection. | CR2032 battery is dead or not installed. | Install a new CR2032 3V lithium battery (sold separately) in the battery compartment. |
| Display is too bright/dim. | Brightness setting needs adjustment. | Press the DOWN button to cycle through brightness levels (High, Medium, Low, OFF). The clock also has an automatic brightness feature. |
9. Specifications
- Model: NOLLATTA (704.993.50)
- Color: White
- Dimensions (approx.): Length: 21.5 cm, Height: 8.5 cm, Depth: 4 cm
- Materials: Clock face: Polystyrene plastic; Back cover/feet: ABS plastic
- Power Source: USB (5V/1A adapter required, not included)
- Battery Backup: 1 x CR2032 3V Lithium Battery (sold separately) for time memory
- Cable Length: 1.5m USB cable included
- Display Type: LED Digital
- Features: 3-level dimming, 12/24-hour format, alarm function, automatic brightness adjustment
10. Warranty and Support
For information regarding warranty, returns, or technical support, please refer to the purchase documentation or contact your IKEA retailer directly. Keep your proof of purchase for any warranty claims.


