1. Introduction
This manual provides detailed instructions for the proper installation, operation, and maintenance of your Belva BXD3K Monoblock Amplifier. To ensure optimal performance and safety, please read this manual thoroughly before using the product and retain it for future reference.

Figure 1: Belva BXD3K Monoblock Amplifier with included remote bass knob.
2. Safety Information
WARNING: This product contains chemicals known to the State of California to cause cancer and birth defects or other reproductive harm. For more information, visit www.P65Warnings.ca.gov.
- Always disconnect the vehicle's battery before installing or servicing the amplifier.
- Ensure proper grounding to the vehicle chassis. A poor ground connection can cause malfunctions or damage.
- Protect all wiring from sharp edges and heat sources. Use appropriate gauge wiring for power and speaker connections.
- Do not expose the amplifier to moisture or extreme temperatures.
- Professional installation is recommended to ensure correct wiring and optimal performance.
- Mount the amplifier securely in a well-ventilated area to prevent overheating.
3. Product Overview
3.1 Key Features
- Max Power Rating: 3000 watts
- Power Rating:
- 4 ohms: 750 watts x 1
- 2 ohms: 1500 watts x 1
- 1 ohm: 3000 watts x 1
- Extreme Efficiency: Class D amplifier design with MOSFET transistors for lower power consumption and reduced heat dissipation (up to 90% efficiency).
- User Control: Features a variable Bass EQ (0-18dB) for precise bass and gain tuning.
- Versatile Inputs: Equipped with both high-level (speaker level) and low-level (RCA) inputs for broad compatibility with various source units.
- Protection Circuitry: Includes 3-way protection circuitry for enhanced durability.
3.2 Component Identification

Figure 2: Rear view of the BXD3K amplifier highlighting key connections and controls.
- Power Input Terminals: +12V, REM (Remote Turn-On), GND (Ground).
- Fuses: Multiple fuses for circuit protection.
- Speaker Output Terminals: For connecting to subwoofers.
- RCA Input: For low-level signal input.
- HI INPUT: For high-level (speaker level) signal input.
- Gain Control: Adjusts input sensitivity.
- Bass Boost: Variable control for bass equalization (0-18dB).
- Phase Control: Adjusts phase from 0 to 180 degrees.
- LPF (Low Pass Filter): Adjustable frequency control (50Hz-250Hz).
- REMOTE: Port for connecting the remote subwoofer level control.

Figure 3: Remote Subwoofer Level Control.
4. Setup and Installation
Proper installation is crucial for the performance and longevity of your amplifier. It is highly recommended to have the amplifier installed by a qualified professional.
4.1 Mounting the Amplifier
- Choose a mounting location that is dry, well-ventilated, and away from direct sunlight or heat sources.
- Ensure sufficient airflow around the amplifier's heatsink.
- Securely mount the amplifier using appropriate hardware to prevent movement during vehicle operation.
4.2 Wiring Connections
Refer to Figure 2 for terminal locations.
- Power Connection (+12V): Connect a fused power cable (minimum 4 AWG recommended) directly from the positive terminal of the vehicle's battery to the +12V terminal on the amplifier. Ensure the fuse is located within 18 inches of the battery.
- Ground Connection (GND): Connect a ground cable (minimum 4 AWG recommended) from the GND terminal on the amplifier to a clean, unpainted metal surface on the vehicle's chassis. Ensure a solid electrical connection.
- Remote Turn-On (REM): Connect a remote turn-on wire from your head unit's remote output to the REM terminal on the amplifier. This wire signals the amplifier to turn on when the head unit is active.
- Speaker Output: Connect your subwoofer(s) to the SPEAKER OUTPUT terminals. Ensure correct polarity (+ to + and - to -). The BXD3K is 1-Ohm stable.
- Signal Input (RCA or HI INPUT):
- Low-Level Input (RCA): Connect RCA cables from your head unit's pre-amp outputs to the RCA INPUT on the amplifier.
- High-Level Input (HI INPUT): If your head unit does not have RCA outputs, connect the speaker wires from your head unit to the HI INPUT terminal using the provided connector.
- Remote Bass Knob: Connect the remote bass knob to the REMOTE port on the amplifier. Mount the knob in an accessible location for easy adjustment.
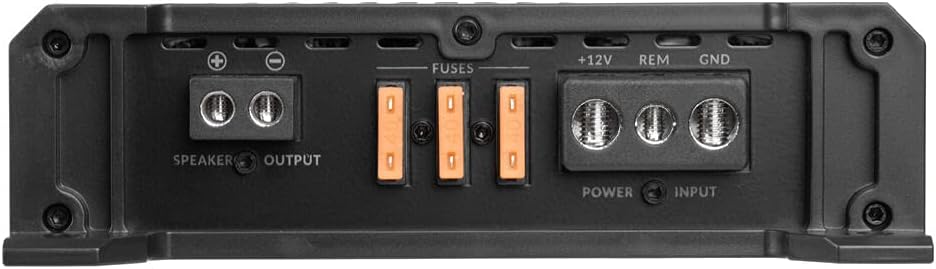
Figure 4: Power and Speaker Output Terminals.
5. Operating Instructions
Once installed, adjust the amplifier settings for optimal sound performance.
5.1 Initial Setup and Adjustments

Figure 5: Amplifier Control Panel.
- Gain Control: Start with the gain control at minimum. Gradually increase the gain until you achieve a clear, undistorted sound at your desired volume level from the head unit. Avoid setting the gain too high, as this can lead to distortion and potential damage.
- LPF (Low Pass Filter): Adjust the LPF to filter out high frequencies from your subwoofer. A common starting point is 80Hz-100Hz, but this can be adjusted based on your subwoofer and personal preference.
- Bass Boost: Use the variable Bass EQ to fine-tune the bass output. Start at 0dB and increase gradually if more bass is desired. Excessive bass boost can cause distortion.
- Phase Control: Adjust the phase (0° or 180°) to ensure the subwoofer's output is in phase with the rest of your audio system. This helps prevent cancellation and improves bass impact. Listen to music and switch between 0° and 180° to find the setting that provides the most impactful bass.
- Remote Subwoofer Level Control: Use the remote knob to conveniently adjust the subwoofer's output level from the driver's seat.
5.2 Video Overview of BX-Series Amplifiers
For a visual guide on the features and settings of the Belva BX-Series amplifiers, including the BXD3K, watch the official product video below.
Video 1: Belva BX-Series Car Audio Amplifier Overview. This video provides a detailed look at the features and controls of the Belva BX-Series amplifiers, including the BXD3K monoblock, and explains how to adjust settings like gain, bass boost, phase, and low-pass filter.
6. Maintenance
Regular maintenance ensures the longevity and performance of your amplifier.
- Keep the amplifier clean and free from dust and debris. Use a soft, dry cloth for cleaning.
- Ensure the heatsink fins are not obstructed to allow for proper heat dissipation.
- Periodically check all wiring connections for tightness and corrosion. Loose connections can lead to poor performance or damage.
7. Troubleshooting
If you experience issues with your amplifier, refer to the following common problems and solutions:
| Problem | Possible Cause | Solution |
|---|---|---|
| No Power / Amplifier Not Turning On | Blown fuse, loose power/ground/remote wire, no remote signal. | Check and replace fuses. Verify all power, ground, and remote connections are secure. Ensure head unit is sending a remote turn-on signal. |
| No Sound Output | Loose RCA/speaker wires, incorrect gain setting, amplifier in protection mode. | Check all audio input and speaker output connections. Adjust gain. Check protection light (red LED) and resolve underlying issue (e.g., short circuit, overheating). |
| Distorted Sound | Gain set too high, improper LPF setting, poor ground connection, speaker impedance mismatch. | Reduce gain. Adjust LPF. Verify ground connection. Ensure speaker impedance matches amplifier's stable load. |
| Amplifier Overheating (Protection Mode) | Insufficient ventilation, low impedance load, prolonged high volume use. | Ensure proper airflow around the amplifier. Check speaker impedance. Reduce volume or allow amplifier to cool down. |
If the problem persists after attempting these solutions, contact customer support or a qualified car audio technician.
8. Specifications
| Feature | Specification |
|---|---|
| Brand | BELVA |
| Model Number | BXD3K |
| Number of Channels | 1 (Monoblock) |
| Output Power (Peak) | 3000 Watts |
| RMS Power (1 Ohm) | 3000 Watts x 1 |
| RMS Power (2 Ohms) | 1500 Watts x 1 |
| RMS Power (4 Ohms) | 750 Watts x 1 |
| Minimum Supply Voltage | 12 Volts |
| Maximum Supply Voltage | 100 Volts |
| Mounting Type | Surface Mount |
| Material | Semiconductor (Silicon) |
| Item Weight | 6.36 pounds |
| UPC | 810021843377 |
9. Warranty and Support
For warranty information and customer support, please contact the seller, NVX® Direct, or refer to the warranty card included with your product. Additional protection plans may be available for purchase separately.
For further assistance, visit the official BELVA store on Amazon: BELVA Store.


