1. Introduction
Welcome to the user manual for your LIVLOV V9 Heart Rate Monitor Armband. This device is designed to provide accurate heart rate monitoring during various physical activities, utilizing advanced optical sensor technology. It features dual Bluetooth and ANT+ connectivity, allowing seamless integration with a wide range of fitness equipment and applications. Please read this manual thoroughly to ensure proper use, optimal performance, and longevity of your device.

Figure 1: LIVLOV V9 Heart Rate Monitor Armband
The LIVLOV V9 is built for durability and comfort, featuring an IP67 waterproof rating and a long-lasting rechargeable battery. This manual covers everything from initial setup and operation to maintenance and troubleshooting.
2. Product Overview
2.1 Components
- LIVLOV V9 Heart Rate Monitor Sensor
- Adjustable Armband
- Magnetic Charging Cable
- User Manual
2.2 Key Features
- Optical Heart Rate Sensor: Provides precise heart rate data.
- Bluetooth & ANT+ Dual Modes: Connects to various devices and apps simultaneously.
- IP67 Waterproof: Resistant to sweat and splashes, suitable for indoor and outdoor activities (not recommended for swimming).
- Long Battery Life: Up to 20+ hours of continuous operation on a single charge.
- Comfortable Armband: Made from nylon, adjustable for a secure fit.
- LED Indicator: Displays device status and connection.

Figure 2: LIVLOV V9 Heart Rate Sensor and Adjustable Armband
3. Setup
3.1 Initial Charging
Before first use, fully charge the LIVLOV V9. The device comes with a magnetic charging cable.
- Connect the magnetic end of the charging cable to the charging terminals on the back of the V9 sensor. Ensure a secure connection.
- Plug the USB end of the cable into a standard USB power adapter (not included) or a computer USB port.
- The LED indicator on the device will show charging status. Typically, it blinks red and green during charging and turns solid green when fully charged.
- A full charge takes approximately 1.5 hours and provides over 20 hours of usage.

Figure 3: Magnetic Charging for LIVLOV V9
3.2 Wearing the Armband
For accurate heart rate readings, proper placement of the armband is essential.
- Attach the sensor to the armband.
- Wear the armband on your forearm or upper arm. Ensure the optical sensor is in direct contact with your skin.
- Adjust the strap to be snug but comfortable. It should not be too tight to restrict circulation, nor too loose to move around during activity.
- The sensor should be positioned on the fleshy part of your arm, away from bones or joints.
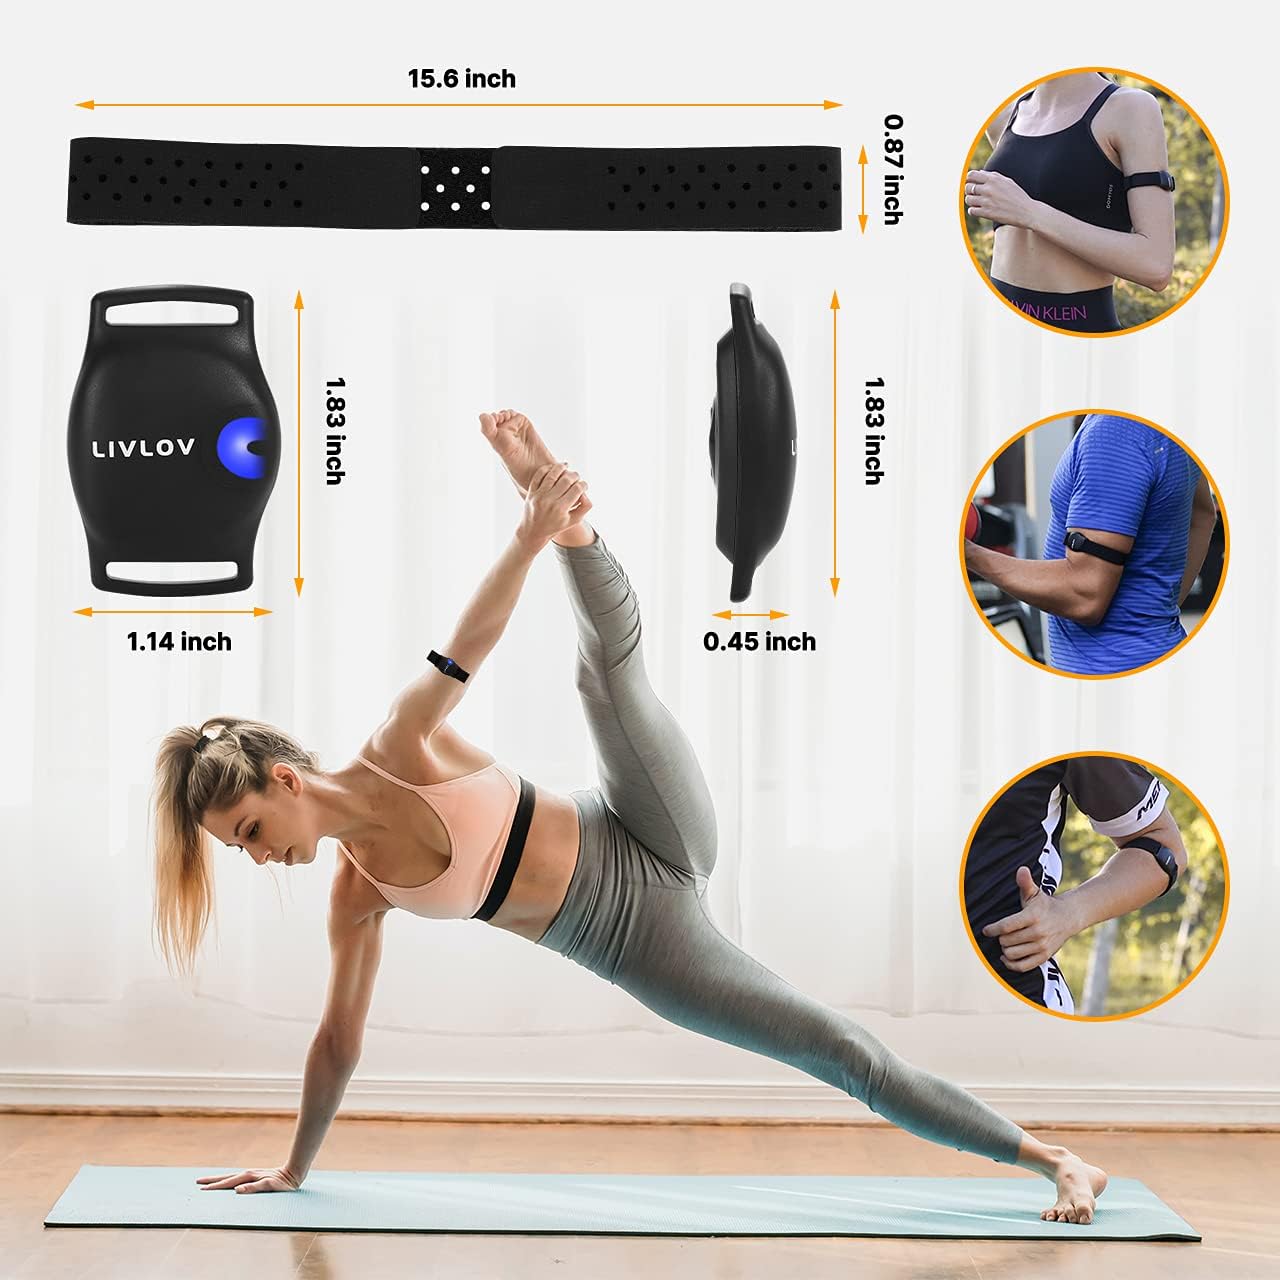
Figure 4: Recommended Armband Wearing Positions
4. Operating Instructions
4.1 Power On/Off
- To Power On: Press and hold the single button on the front of the sensor for a few seconds until the LED indicator lights up and you feel a slight vibration.
- To Power Off: Press and hold the button again for a few seconds until the LED turns off and you feel a vibration.
4.2 Pairing with Devices
The LIVLOV V9 supports both Bluetooth and ANT+ connectivity.
- Activate the V9: Ensure the device is powered on and worn correctly.
- Enable Bluetooth/ANT+ on your receiving device: This could be a smartphone, tablet, GPS watch, or bike computer.
- Search for the device: In your device's settings or fitness application, search for new sensors or heart rate monitors. The LIVLOV V9 should appear as an available device.
- Connect: Select the LIVLOV V9 to pair. For some applications, it is recommended to pair directly within the app rather than through the phone's Bluetooth settings.

Figure 5: Bluetooth and ANT+ Connectivity

Figure 6: LIVLOV V9 pairing with a bike computer
4.3 Compatible Applications
The LIVLOV V9 is compatible with most mainstream health and fitness applications, including but not limited to:
- Wahoo Fitness
- Endomondo
- Zwift
- Polar Beat
- DDP Yoga
- Map My Run
- Peloton
For mobile devices, ensure your iOS device is iPhone 5 or later with iOS 11 or later, and Android devices have Bluetooth 5.0 and Android 5.0 or later.

Figure 7: LIVLOV V9 usage across various sports and activities
4.4 Heart Rate Monitoring
Once paired, your heart rate data will be transmitted in real-time to your connected device or application. The LED indicator may change color or pattern to reflect heart rate zones or connection status, depending on the specific model and application settings.

Figure 8: Heart Rate Exceeded Warning feature
5. Maintenance
5.1 Cleaning
Regular cleaning helps maintain the device's performance and hygiene.
- After each use, especially after intense workouts, gently wipe the sensor and armband with a damp cloth.
- For deeper cleaning, the armband can be hand-washed with mild soap and water. Ensure the sensor is detached before washing the armband.
- Do not use abrasive cleaners or harsh chemicals, as these can damage the device.
- Allow all components to air dry completely before reassembling or storing.
5.2 Storage
- Store the LIVLOV V9 in a cool, dry place away from direct sunlight and extreme temperatures.
- If storing for an extended period, ensure the battery is partially charged (around 50%) to prolong its lifespan. Recharge every few months if not in use.
6. Troubleshooting
6.1 Device Not Powering On
- Ensure the device is fully charged. Connect it to the charging cable and check the LED indicator.
- Press and hold the power button firmly for a few seconds.
6.2 Cannot Pair with Device/App
- Make sure the V9 is powered on and within range of your receiving device.
- Check that Bluetooth/ANT+ is enabled on your receiving device.
- Close and reopen the fitness application.
- Restart both the V9 and your receiving device.
- Ensure no other devices are actively connected to the V9 via Bluetooth, as it may only support one Bluetooth connection at a time.
- Verify your mobile device meets the minimum OS and Bluetooth version requirements (iOS 11+, Android 5.0+ with Bluetooth 5.0).
6.3 Inaccurate Heart Rate Readings
- Ensure the armband is worn snugly on your forearm or upper arm, with the optical sensor in direct contact with your skin.
- Avoid placing the sensor over tattoos, scars, or areas with dense hair, as this can interfere with readings.
- Clean the sensor window if it appears dirty or smudged.
- Allow a few minutes for the sensor to stabilize at the beginning of your workout.
6.4 Charging Issues
- Ensure the magnetic charging cable is securely attached to the V9's charging terminals.
- Try a different USB port or power adapter.
- Check for any debris or corrosion on the charging contacts of both the cable and the device.
7. Specifications
| Feature | Specification |
|---|---|
| Model Number | V9 |
| Brand | LIVLOV |
| Dimensions (L x W x H) | 39.62 x 3.56 x 1.14 cm |
| Weight | 60 grams |
| Material | Nylon |
| Color | Black |
| Sensor Type | Optical |
| Connectivity | Bluetooth, ANT+ |
| Waterproof Rating | IP67 |
| Battery Type | Lithium-ion |
| Battery Life | Up to 20+ hours (advertised 60 hours in some places, but 20+ hours is consistent with feature bullets) |
| Charging Time | Approx. 1.5 hours |
| Compatible Devices | Smartphone, Tablet, GPS Watch, Bike Computer |
8. Warranty and Support
8.1 Warranty Information
LIVLOV offers an unparalleled warranty, including unlimited replacement of adjustable armbands. This demonstrates our commitment to product quality and customer satisfaction.
8.2 Customer Support
Should you have any questions, concerns, or require assistance with your LIVLOV V9 Heart Rate Monitor Armband, please contact LIVLOV customer support. We are dedicated to responding to your inquiries within 24 hours to ensure a prompt resolution.
Please refer to the product packaging or the official LIVLOV website for specific contact details.


