
1. Important Safety Instructions
Read all instructions carefully before operating the tool. Failure to follow all instructions listed below may result in electric shock, fire, and/or serious injury.
- Always wear safety glasses and closed-toe shoes to protect against flying debris.
- Ensure the battery is securely installed and balanced during operation.
- When using the edger function, be aware of the cutting edges and maintain a safe distance from obstacles.
- Keep hands, face, and feet clear of the cutting line at all times.
- Do not operate the tool in wet conditions or near flammable liquids or gases.
- Keep children and bystanders at a safe distance (at least 50 feet) from the operating area.
- Remove the battery pack when not in use, before cleaning, or when changing accessories.
2. Package Contents
Verify that all items listed below are included in your package. If any parts are missing or damaged, contact customer service.
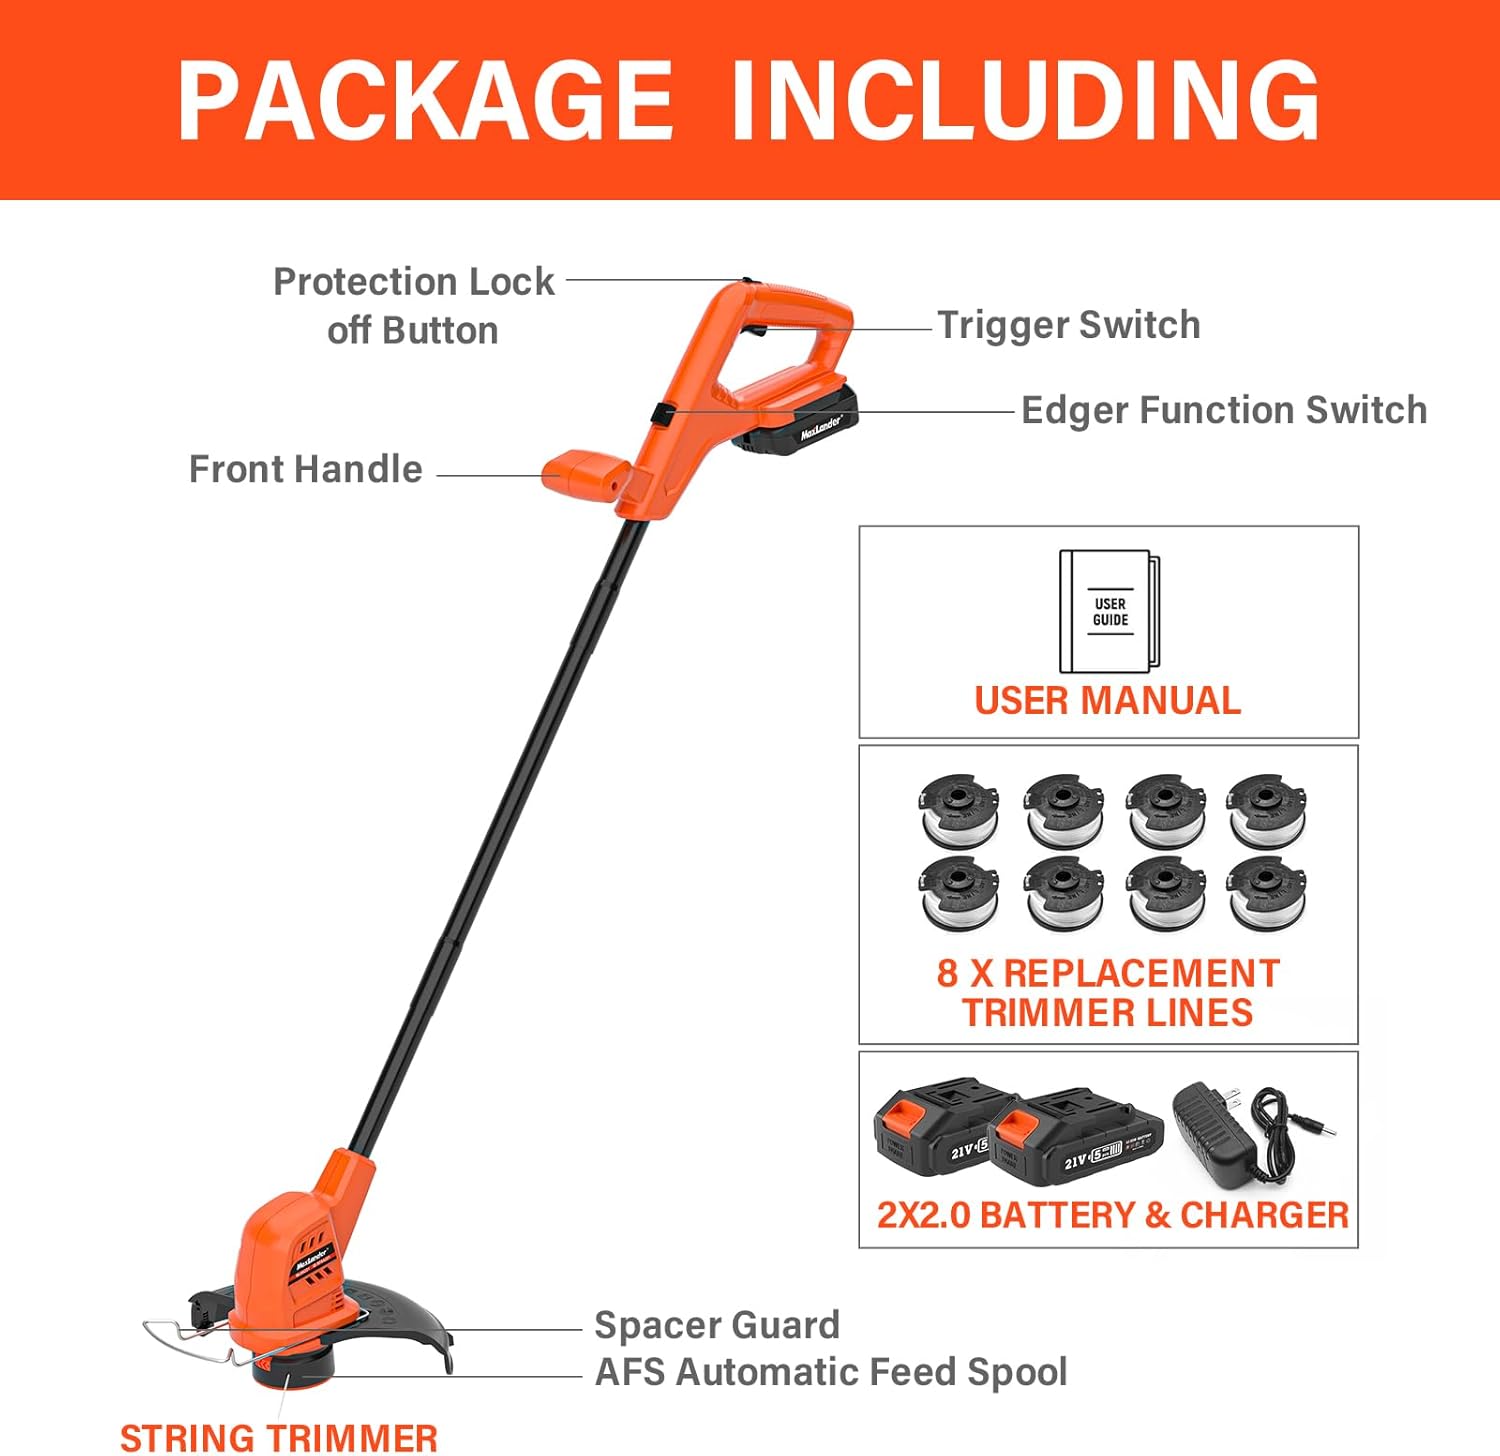
Image: MAXLANDER Cordless Weed Wacker and its accessories, including batteries, charger, and replacement spools.
- MAXLANDER Cordless Weed Wacker (SF8A220)
- 2 x 20V 2.0Ah Lithium-ion Batteries
- 1 x Quick Charger
- 8 x Replacement Spool Trimmer Lines
- User Manual
3. Assembly
Follow these steps to assemble your MAXLANDER Cordless Weed Wacker:
- Attach the Guard: Align the guard with the mounting slots on the trimmer head. Secure it with the provided screws. Ensure it is firmly in place to protect against debris.
- Install the Front Handle: Slide the front handle onto the shaft and adjust it to a comfortable working position. Tighten the handle securely.
- Insert the Battery: Slide a charged 20V battery into the battery slot on the handle until it clicks into place. Ensure it is fully seated.
4. Battery Charging and Installation
4.1 Charging the Battery
- Connect the quick charger to a standard power outlet.
- Slide the 20V battery into the charger. The indicator light on the charger will show the charging status.
- A 2.0Ah battery typically charges fully in approximately 1 hour.
- Once fully charged, remove the battery from the charger.
4.2 Installing the Battery
- Ensure the tool is turned off before installing or removing the battery.
- Slide the charged battery pack into the battery port on the tool's handle until it locks securely.
- To remove, press the battery release button and slide the battery out.
5. Operation
5.1 Starting and Stopping the Trimmer
- Ensure the battery is installed and the area is clear of bystanders and obstacles.
- Press the protection lock-off button (usually located on the side of the handle).
- While holding the lock-off button, squeeze the trigger switch to start the trimmer.
- Release the trigger switch to stop the trimmer.
5.2 Using as a String Trimmer

Image: A person using the MAXLANDER weed wacker to trim grass around a tree, demonstrating automatic line feed.
- Hold the trimmer firmly with both hands.
- Maintain a comfortable distance from your body.
- Swing the trimmer from side to side, cutting grass and weeds with the tip of the line.
- The automatic line feed system will advance the line as needed.
5.3 Converting to Edger Mode

Image: The MAXLANDER weed wacker head rotated 90 degrees for edging, highlighting its 2-in-1 design.
- Ensure the trimmer is OFF and the battery is removed.
- Locate the edger function switch (usually near the trimmer head).
- Press the switch and rotate the trimmer head 90 degrees until it locks into the edging position.
- Re-install the battery.
5.4 Using as an Edger
Video: Official MAXLANDER video demonstrating the 10-inch weed wacker in action, showcasing its edging capabilities.
- Hold the tool with the wheel on the guard resting on the paved surface (e.g., sidewalk, driveway).
- Walk slowly, guiding the trimmer along the edge.
- Allow the line to cut cleanly without forcing the tool.
6. Maintenance
6.1 Replacing Trimmer Line
- Ensure the tool is OFF and the battery is removed.
- Refer to the diagram on the spool cover for instructions on how to open the spool housing.
- Remove the empty spool and replace it with a new MAXLANDER replacement spool.
- Thread the line through the eyelet and reassemble the spool housing.
6.2 Cleaning and Storage
- After each use, clean the tool with a damp cloth. Do not use harsh chemicals.
- Remove any grass clippings or debris from the guard and trimmer head.
- Store the tool in a dry, secure location out of reach of children.
- Remove the battery pack before storing for extended periods.
7. Troubleshooting
If you encounter issues with your MAXLANDER Cordless Weed Wacker, refer to the following common problems and solutions:
| Problem | Possible Cause | Solution |
|---|---|---|
| Tool does not start | Battery not charged or improperly installed; Lock-off button not pressed. | Ensure battery is fully charged and correctly inserted. Press lock-off button before squeezing trigger. |
| Trimmer line not feeding | Line tangled or empty spool; Debris in feed mechanism. | Remove battery, inspect spool for tangles or replace spool. Clear any debris from the trimmer head. |
| Reduced cutting performance | Dull or short trimmer line; Low battery charge. | Advance or replace trimmer line. Recharge or replace battery. |
| Excessive vibration | Damaged or improperly installed spool/line. | Remove battery, inspect spool and line for damage. Ensure proper installation. |
If the problem persists, contact MAXLANDER customer support.
8. Specifications
| Feature | Detail |
|---|---|
| Brand | MAXLANDER |
| Model Number | SF8A220 |
| Power Source | Battery Powered (20V) |
| Battery Type | Lithium-ion (2 x 2.0Ah included) |
| Cutting Width | 10 inches |
| Speed | 3000 RPM |
| Item Weight | 6 Pounds |
| Color | Orange & Black |
| Assembly Required | Yes |
9. Warranty and Customer Support
MAXLANDER products are designed for durability and performance. For warranty information, technical support, or to order replacement parts, please refer to the contact details provided on the product packaging or visit the official MAXLANDER website.
Please retain your proof of purchase for warranty claims.