1. Introduction
Thank you for choosing the Telestar TroTTY Pump. This compact and versatile wireless electric air pump is designed for convenient inflation of various items, including bicycle, motorcycle, and car tires, as well as sports balls and other inflatables. Featuring a digital display, preset modes, and a built-in flashlight, the TroTTY Pump offers efficient and precise inflation on the go. Please read this manual thoroughly before using the device to ensure safe and optimal operation.

Image 1.1: The Telestar TroTTY Pump, a compact black electric air pump with a digital display showing pressure readings and mode icons.
2. Safety Instructions
To prevent injury or damage to the device, please observe the following safety precautions:
- Do not operate the pump near flammable liquids or gases.
- Keep out of reach of children. This is not a toy.
- Do not expose the pump to rain or moisture.
- Avoid prolonged operation to prevent overheating. Allow the device to cool down between uses if necessary.
- Do not disassemble or attempt to repair the pump yourself. Contact qualified service personnel.
- Ensure the correct pressure setting for the item being inflated to avoid over-inflation and potential bursting.
- Use only the provided charging cable and accessories.
- Store the pump in a cool, dry place when not in use.
3. Package Contents
Verify that all items are present in the package:
- Telestar TroTTY Pump (Main Unit)
- Air Hose with Schrader Valve Connector (Car Valve)
- Sclaverand Valve Adapter (Presta Valve / French Valve)
- Ball Needle
- Inflatable Nozzle
- USB Type-C Charging Cable
- User Manual
- Nylon Carrying Bag
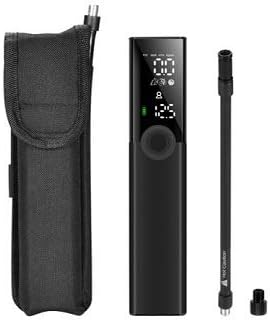
Image 3.1: The TroTTY Pump shown alongside its air hose, various adapters, and the nylon carrying bag.
4. Product Overview
Familiarize yourself with the components of your TroTTY Pump:

Image 4.1: Labeled diagram of the TroTTY Pump, indicating the digital display (showing unit, measured pressure, preset pressure, battery indicator), air intake, USB charging port, LED light, hose interface, set button, power button, and preset +/- buttons.
- Digital Display: Shows current pressure, preset pressure, battery level, and selected mode.
- Power Button: Turns the pump on/off and starts/stops inflation.
- Set Button: Cycles through inflation modes (car, motorcycle, bicycle, ball, custom).
- Preset +/- Buttons: Adjusts the target pressure value.
- Hose Interface: Connection point for the air hose.
- USB Charging Port: Type-C port for charging the internal battery.
- LED Light: Provides illumination for use in low-light conditions.
- Air Intake: Where air is drawn into the pump.
5. Setup and Charging
5.1 Initial Charging
Before first use, fully charge the TroTTY Pump. Connect the supplied USB Type-C charging cable to the pump's charging port and the other end to a 5V/2A USB power adapter (not included). The battery indicator on the display will show charging progress. A full charge takes approximately 2.5 hours.
5.2 Attaching the Air Hose and Adapters
- Screw the air hose firmly onto the hose interface at the top of the pump.
- Depending on the item you wish to inflate, attach the appropriate adapter to the other end of the air hose:
- Schrader Valve (Car Valve): Directly connect the hose to car, motorcycle, or some bicycle tires.
- Sclaverand Valve (Presta Valve): Use the Sclaverand adapter for road bike tires.
- Ball Needle: For inflating sports balls.
- Inflatable Nozzle: For inflating swimming rings, air mattresses, etc.
6. Operating Instructions
6.1 Powering On and Off
- Press and hold the Power Button for 3 seconds to turn the pump on. The display will light up.
- Press and hold the Power Button again for 3 seconds to turn the pump off.
- The pump will automatically turn off after a period of inactivity.
6.2 Selecting Units and Modes
- When the pump is on, short press the Set Button to cycle through pressure units: PSI, BAR, KPA, Kg/cm².
- Long press the Set Button to cycle through the five preset inflation modes:
- Car Mode
- Motorcycle Mode
- Bicycle Mode
- Ball Mode
- Custom Mode (Manual setting)

Image 6.1: The digital display of the TroTTY Pump illustrating various preset modes for different inflation needs, such as bicycle, car, and ball.
6.3 Setting Target Pressure
- After selecting a mode, use the Preset +/- Buttons to adjust the desired target pressure. The preset value will flash on the display.
- Refer to the recommended pressure for your item (usually printed on tires or balls).
6.4 Starting and Stopping Inflation
- Connect the air hose with the appropriate adapter firmly to the valve of the item to be inflated. The display will show the current pressure.
- Press the Power Button once to start inflation. The pump will automatically stop when the preset target pressure is reached.
- To manually stop inflation at any time, press the Power Button again.
- Carefully disconnect the hose from the valve.

Image 6.2: The TroTTY Pump connected to a bicycle tire valve, actively inflating it.
6.5 Using the LED Light
- With the pump on, short press the LED Light Button (often integrated with the power or set button, refer to diagram 4.1) to turn the flashlight on or off.
7. Maintenance and Storage
- Cleaning: Wipe the pump's exterior with a soft, damp cloth. Do not use harsh chemicals or abrasive cleaners. Ensure the device is dry before storage.
- Storage: Store the TroTTY Pump and its accessories in the provided nylon carrying bag. Keep it in a cool, dry place, away from direct sunlight and extreme temperatures.
- Battery Care: To prolong battery life, charge the pump at least once every three months if not used regularly. Avoid completely draining the battery before recharging.
8. Troubleshooting
| Problem | Possible Cause | Solution |
|---|---|---|
| Pump does not turn on. | Battery is depleted. | Charge the pump fully using the USB Type-C cable. |
| Pump does not inflate or inflates slowly. | Air hose not securely connected. Wrong adapter used. Battery low. | Ensure the air hose is tightly screwed on. Check adapter fit. Recharge the battery. |
| Pump stops prematurely. | Target pressure reached. Overheating protection activated. | Check the display for current pressure. Allow the pump to cool down for 10-15 minutes before resuming use. |
| Inaccurate pressure reading. | Hose not properly connected to valve. | Ensure a tight seal between the hose/adapter and the valve. |
9. Specifications
| Model Number | 100-001 |
| Dimensions (L x W x H) | 4 x 4 x 19 cm (1.57 x 1.57 x 7.48 inches) |
| Weight | 370 grams |
| Max Pressure | 8 bar (120 PSI) |
| Filling Capacity | 20 l/min |
| Pressure Accuracy | +/- 1 PSI |
| Battery Type | Lithium Polymer |
| Battery Capacity | 1200 mAh, 7.4 V |
| Charging Port | USB Type-C |
| Charging Time | Approx. 2.5 hours (with 5V/2A adapter) |
| Material | Metal |
| Color | Black |
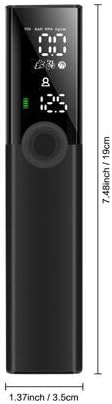
Image 9.1: Diagram illustrating the dimensions of the TroTTY Pump: approximately 3.5 cm (1.37 inches) wide and 19 cm (7.48 inches) tall.
10. Warranty and Support
For warranty information and technical support, please refer to the warranty card included in your package or contact Telestar customer service through their official website or the retailer from whom you purchased the product. Please have your model number (100-001) and purchase date ready when contacting support.


