1. Introduction
This manual provides detailed instructions for the setup, operation, and maintenance of your MEBUS 25581 Digital Radio-Controlled Alarm Clock. This device features automatic time synchronization, two independent alarm times, an indoor thermometer, date display, and a backlight for enhanced readability.
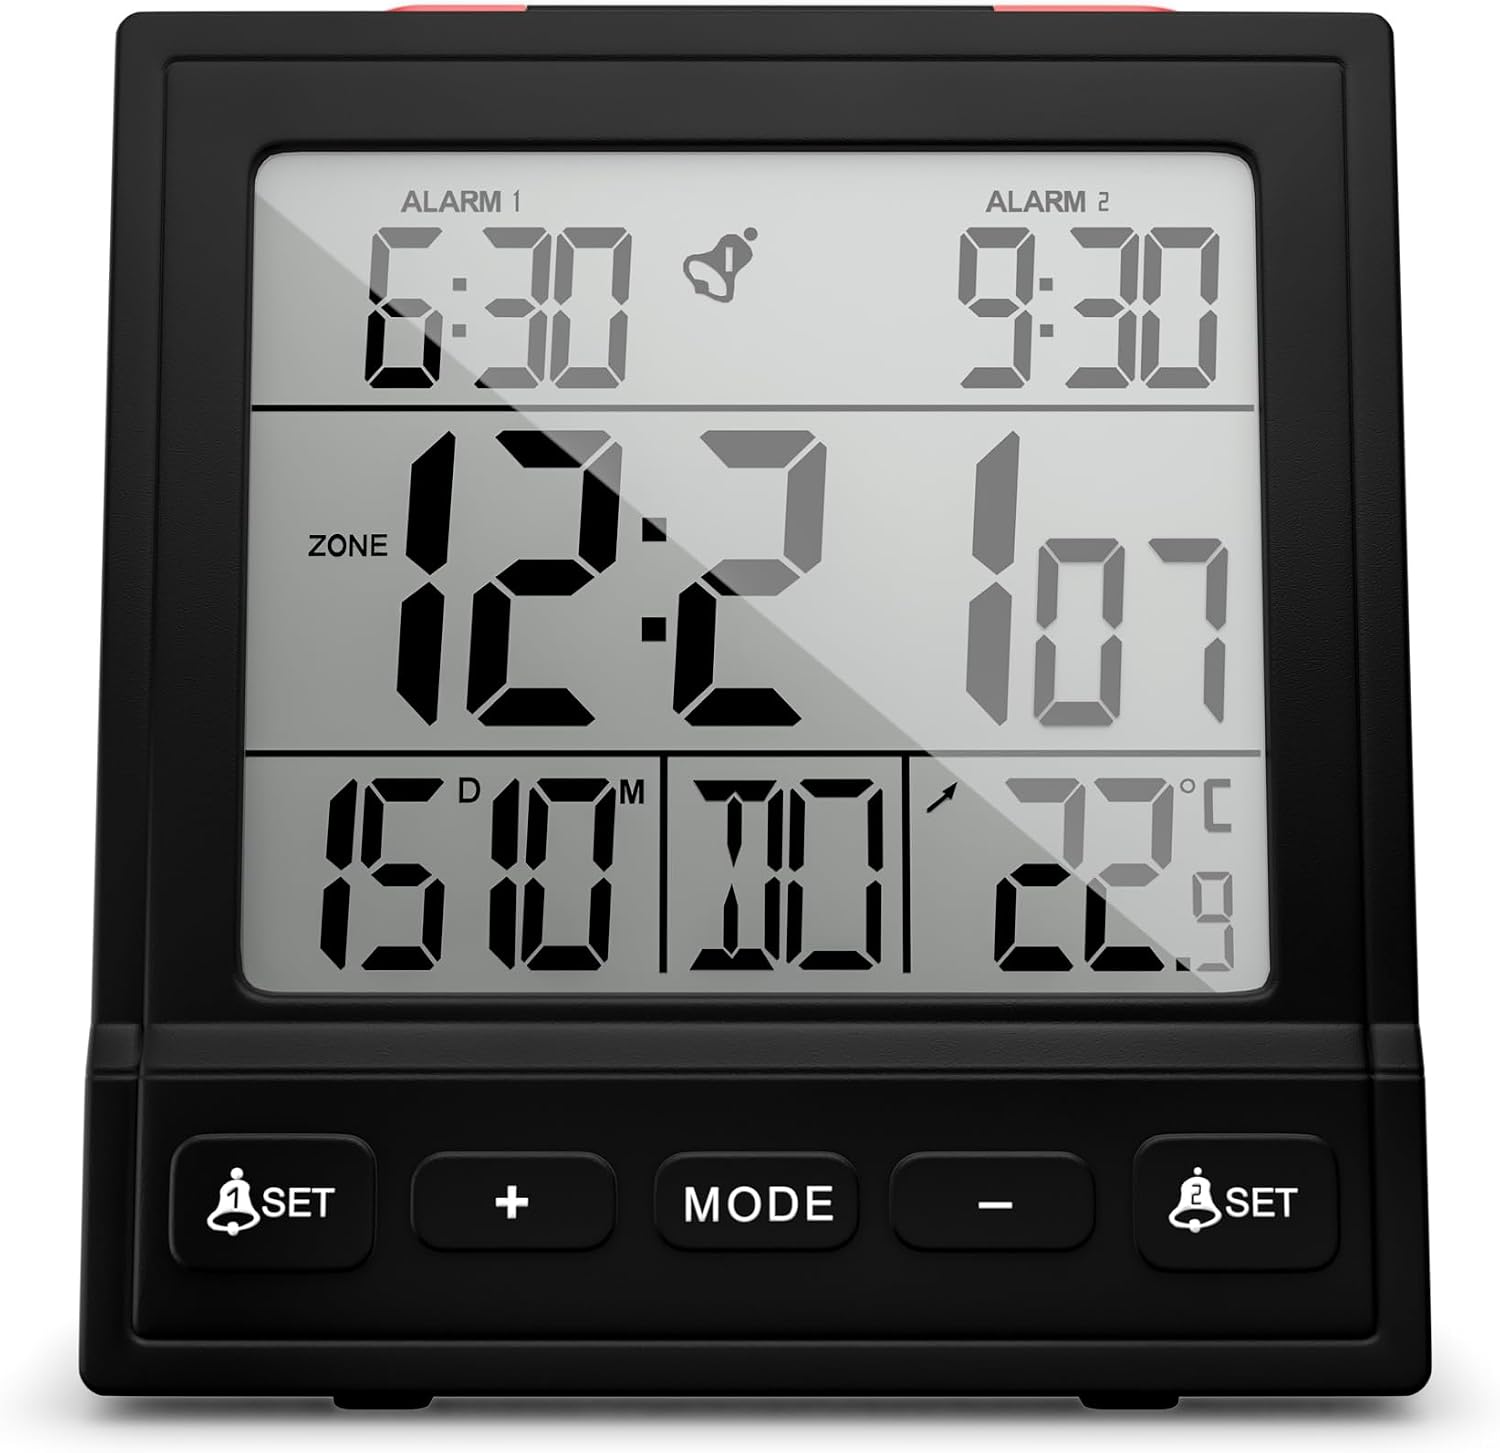
Figure 1: MEBUS 25581 Digital Radio-Controlled Alarm Clock
2. Safety Instructions
- Do not expose the device to extreme temperatures, direct sunlight, or high humidity.
- Avoid dropping the device or subjecting it to strong impacts.
- Do not attempt to disassemble or repair the device yourself. Refer to qualified personnel for service.
- Keep batteries out of reach of children. Dispose of used batteries responsibly.
3. Package Contents
Please check that all items are present:
- MEBUS 25581 Digital Radio-Controlled Alarm Clock
- User Manual (this document)
Note: 2x AAA batteries are required and are not included in the package.
4. Product Overview
4.1. Front Display Elements
- Alarm 1 Time: Displays the set time for Alarm 1.
- Alarm 2 Time: Displays the set time for Alarm 2.
- Current Time: Main time display.
- Date Display: Shows the current date (Day/Month).
- Day of Week: Abbreviated display of the current day.
- Indoor Temperature: Displays the current room temperature.
- Radio Signal Indicator: Shows the status of the DCF 77 radio signal reception.
- Low Battery Indicator: Symbol appears when batteries need replacement.
4.2. Buttons and Controls

Figure 2: Top and Front Controls
- SNOOZE/LIGHT Button (Top): Activates snooze function during alarm; illuminates display.
- ALARM 1 ON/OFF Button (Top): Toggles Alarm 1 on or off.
- ALARM 2 ON/OFF Button (Top): Toggles Alarm 2 on or off.
- ALARM SET Button (Front Left): Enters Alarm 1 setting mode.
- + Button (Front): Increases values during setting.
- MODE Button (Front): Cycles through display modes or confirms settings.
- - Button (Front): Decreases values during setting.
- ALARM SET Button (Front Right): Enters Alarm 2 setting mode.
5. Setup
5.1. Battery Installation
- Open the battery compartment cover on the back of the alarm clock.
- Insert 2 new AAA batteries, observing the correct polarity (+/-).
- Close the battery compartment cover securely.
5.2. Initial Power-On and Radio-Controlled Time Synchronization (DCF 77)
Upon battery insertion, the clock will automatically attempt to receive the DCF 77 radio signal to set the time. This process may take several minutes. During synchronization, the radio signal indicator will flash. Once successful, the indicator will become solid, and the time, date, and day of the week will be set automatically, including adjustment for summer/winter time.

Figure 3: Radio-Controlled Time Synchronization
Tips for optimal reception:
- Place the clock near a window.
- Avoid placing it near electronic devices that may cause interference.
- The best reception is usually at night.
5.3. Manual Time and Date Setting (if DCF signal is unavailable)
If the radio signal cannot be received, you can set the time and date manually:
- Press and hold the MODE button for approximately 3 seconds to enter time setting mode. The hour digits will flash.
- Use the + or - buttons to adjust the hour.
- Press MODE to confirm and move to minute setting. Adjust with + or -.
- Continue pressing MODE to cycle through and set Year, Month, Day, and 12/24-hour format. Use + or - to adjust each value.
- Press MODE again to exit setting mode.
5.4. Setting Temperature Unit (°C/°F)
In normal time display mode, press the - button to toggle between Celsius (°C) and Fahrenheit (°F) for the temperature display.
6. Operating Instructions
6.1. Setting Alarm Times (Alarm 1 and Alarm 2)
- Press the ALARM SET button (left for Alarm 1, right for Alarm 2). The alarm hour digits will flash.
- Use the + or - buttons to adjust the alarm hour.
- Press the respective ALARM SET button again to confirm the hour and move to minute setting. Adjust with + or -.
- Press the ALARM SET button once more to confirm the alarm time and exit setting mode.
6.2. Activating/Deactivating Alarms
Use the dedicated ALARM 1 ON/OFF and ALARM 2 ON/OFF buttons on the top of the clock to activate or deactivate each alarm. An alarm icon will appear on the display when an alarm is active.
6.3. Snooze Function
When an alarm sounds, press the large SNOOZE/LIGHT button on the top of the clock. The alarm will pause for approximately 5 minutes and then sound again.
6.4. Backlight Operation
Press the SNOOZE/LIGHT button on the top of the clock to activate the display backlight. The backlight will illuminate for a few seconds, allowing you to read the time in low-light conditions.

Figure 4: Illuminated Display for Day and Night Use
6.5. Date and Day Display
The alarm clock automatically displays the current date (Day/Month) and the abbreviated day of the week, synchronized via the DCF 77 signal or set manually.
6.6. Low Battery Indicator
A battery symbol will appear on the display when the battery level is low. Replace the batteries promptly to ensure continued functionality.
7. Maintenance
7.1. Cleaning
Wipe the device with a soft, dry cloth. Do not use abrasive cleaners or solvents, as these may damage the surface.
7.2. Battery Replacement
When the low battery indicator appears, replace both AAA batteries with new ones. Follow the battery installation steps in Section 5.1.
8. Troubleshooting
| Problem | Possible Cause | Solution |
|---|---|---|
| No display or faint display | Batteries are dead or inserted incorrectly. | Replace batteries, ensuring correct polarity. |
| Time is incorrect or not setting automatically | Poor DCF 77 signal reception due to location or interference. | Move the clock to a different location (e.g., near a window). Manually set the time if reception remains poor. |
| Alarm does not sound | Alarm is deactivated. | Ensure the respective ALARM ON/OFF button is in the 'ON' position. |
| Backlight not working | Batteries are low. | Replace batteries. |
9. Specifications
- Model: MEBUS 25581
- Display Type: Digital
- Time Synchronization: Radio-controlled (DCF 77) with manual setting option
- Alarm Functions: Two independent alarm times, snooze function
- Special Features: Date display, Day of week, Indoor thermometer (°C/°F), Backlight, Low battery indicator
- Power Source: 2 x AAA batteries (not included)
- Material: Plastic
- Dimensions: Approximately 8 cm (W) x 9 cm (H) x 3 cm (D)
- Weight: Approximately 145 g

Figure 5: Product Dimensions and Weight
10. Warranty and Support
Mebus products are manufactured with quality and care. For warranty information or technical support, please refer to the retailer where the product was purchased or visit the official Mebus website. Please retain your proof of purchase for warranty claims.
UPC: 4017805255814


