1. Introduction
This manual provides detailed instructions for the installation, operation, and maintenance of your MSI MAG B560M Mortar WiFi Gaming Motherboard. The MAG series is engineered for durability and user-friendliness, offering a straightforward setup process and intuitive interface.
Key Features:
- Processor Support: Compatible with 11th and 10th Generation Intel Core/Pentium/Celeron processors for the LGA 1200 Socket.
- Memory Support: Supports DDR4 Memory for high-speed performance.
- Advanced Thermal Solution: Features an Extended Heatsink Design and M.2 Shield Frozr to ensure optimal cooling for high-performance systems and extended gaming sessions.
- High-Speed Storage: Equipped with Turbo M.2, running at PCI-E Gen3 x4, to maximize performance for NVMe based SSDs.
- Convenient Installation: Includes Pre-installed I/O Shielding for enhanced EMI protection and simplified installation.

Figure 1: Top view of the MSI MAG B560M Mortar WiFi Motherboard.
2. Package Contents
Verify that all items listed below are included in your motherboard package. If any items are missing or damaged, please contact your retailer.
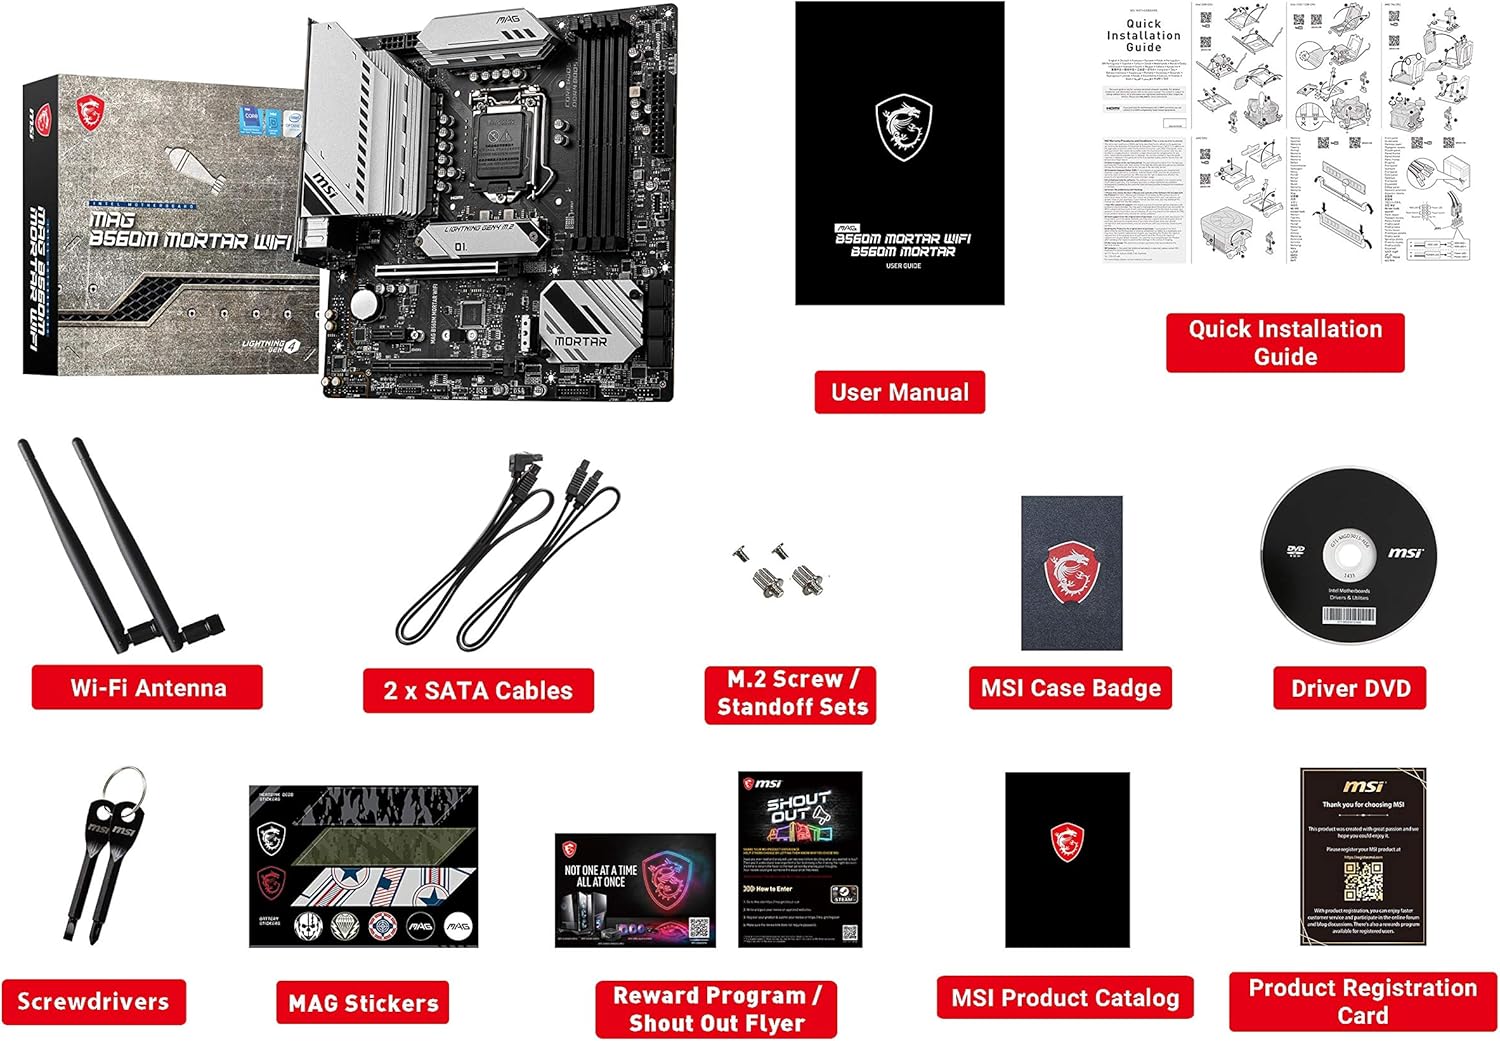
Figure 2: Included accessories with the motherboard.
- MSI MAG B560M Mortar WiFi Motherboard
- User Manual
- Quick Installation Guide
- Wi-Fi Antenna
- 2 x SATA Cables
- M.2 Screw/Standoff Sets
- MSI Case Badge
- Driver DVD
- Screwdrivers
- MAG Stickers
- Reward Program / Shout Out Flyer
- MSI Product Catalog
- Product Registration Card
3. Setup and Installation
Before beginning installation, ensure your system is powered off and unplugged from the wall outlet. Wear an anti-static wrist strap to prevent electrostatic discharge (ESD) damage to components.
3.1. CPU Installation
Carefully open the LGA 1200 socket lever. Align the triangular mark on your Intel LGA 1200 processor with the corresponding mark on the socket. Gently place the CPU into the socket without forcing it. Close the lever to secure the CPU.

Figure 3: Close-up of the LGA 1200 CPU socket.
3.2. RAM (DDR4 Memory) Installation
Locate the four DDR4 memory slots. Open the clips on both ends of the desired memory slot. Align the notch on the DDR4 memory module with the key in the slot. Press down firmly on both ends of the memory module until the clips snap into place.

Figure 4: DDR4 memory slots on the motherboard.
3.3. M.2 SSD Installation
The motherboard features Turbo M.2 slots with M.2 Shield Frozr for optimal performance and cooling. Remove the M.2 Shield Frozr heatsink. Insert your NVMe M.2 SSD into the slot at an angle, then gently push it down. Secure the SSD with the provided M.2 screw/standoff set. Reattach the M.2 Shield Frozr heatsink.

Figure 5: M.2 slot with M.2 Shield Frozr heatsink.
3.4. Graphics Card (PCIe) Installation
Locate the PCIe 4.0 x16 slot for your graphics card. Open the retention clip at the end of the slot. Align your graphics card with the slot and press down firmly until it is seated correctly and the clip locks. Secure the card to your chassis with screws.

Figure 6: Diagram illustrating PCIe slot configuration.
3.5. Connecting Peripherals and Power
Connect your power supply's 24-pin ATX power connector and 8-pin CPU power connector to the motherboard. Connect SATA drives using the provided SATA cables. Attach the Wi-Fi antennas to the rear I/O panel. The motherboard features a pre-installed I/O Shield for ease of installation and improved EMI protection.

Figure 7: Rear I/O panel with various ports and pre-installed shield.
3.6. Product Overview Video
Video 1: An overview of the MSI B550M PRO-VDH WiFi Motherboard, demonstrating key features and components. Note: This video is for a related product (B550M PRO-VDH WiFi) and provides a general overview of similar MSI motherboard features.
4. Operating Instructions
4.1. Initial Boot-up and BIOS Setup
After assembling your system, power it on. Press the 'Del' key during startup to enter the BIOS (Basic Input/Output System) setup. In the BIOS, you can configure boot order, system time, and other advanced settings. Ensure your storage drive is recognized and set as the primary boot device.
4.2. Driver Installation
Once your operating system is installed, install the necessary drivers for your motherboard components. The included Driver DVD contains most drivers. Alternatively, download the latest drivers from the official MSI website for optimal performance and compatibility.
5. Specifications
| Feature | Specification |
|---|---|
| Brand | MSI |
| Model Name | MAG B560M MORTAR WIFI |
| CPU Socket | LGA 1200 |
| Compatible Processors | 11th/10th Gen Intel Core/Pentium/Celeron |
| Chipset Type | Intel B560 |
| RAM Memory Technology | DDR4 |
| Memory Clock Speed | 2133 MHz (Supports higher via XMP) |
| PCIe Slots | PCIe 4.0 x16, PCIe 3.0 x16, PCIe 3.0 x1 |
| M.2 Slots | 2 (Turbo M.2 with M.2 Shield Frozr) |
| LAN | 2.5G LAN |
| Wireless Connectivity | Wi-Fi 6E |
| Video Output | DisplayPort, HDMI |
| USB Ports | USB 3.2 Gen 2, USB 2.0 |
| Form Factor | mATX |
| Dimensions (LxWxH) | 9.6 x 9.6 x 2.5 inches |
| Item Weight | 3.39 pounds |
6. Maintenance
6.1. Keeping Your Motherboard Clean
Regularly clean your motherboard and PC case to prevent dust buildup, which can lead to overheating and reduced performance. Use compressed air to remove dust from fans, heatsinks, and other components. Ensure the system is powered off and unplugged before cleaning.
6.2. BIOS Updates
Periodically check the MSI website for BIOS updates. BIOS updates can improve system stability, add support for new hardware, and enhance performance. Follow the instructions provided by MSI carefully when updating the BIOS to avoid potential issues.
6.3. Driver Updates
Keep your device drivers updated to ensure optimal performance and compatibility with new software and hardware. Visit the MSI support page for the latest drivers for your motherboard.
7. Troubleshooting
7.1. No Display Output
- Ensure your monitor is connected to the graphics card (if installed) or the motherboard's integrated graphics ports.
- Check that the graphics card is properly seated in its PCIe slot and that all necessary power cables are connected.
- Verify that RAM modules are correctly installed in their slots. Try reseating them or testing with one module at a time.
7.2. System Instability or Crashes
- Check CPU and GPU temperatures using monitoring software. Overheating can cause instability.
- Ensure all power connections to the motherboard and components are secure.
- Run memory diagnostic tools to check for faulty RAM.
- Update your BIOS and all device drivers to the latest versions.
7.3. Wi-Fi Connectivity Issues
- Ensure the Wi-Fi antennas are securely attached to the rear I/O panel.
- Install the latest Wi-Fi drivers from the MSI website.
- Check your router settings and ensure the Wi-Fi network is broadcasting.
8. Warranty and Support
MSI products are built with a focus on quality and durability. For specific warranty terms and conditions, please refer to the warranty card included in your package or visit the official MSI support website. The website also provides access to FAQs, driver downloads, and technical support contact information.
For further assistance, please visit the MSI Support Page.


