1. Introduction
This manual provides comprehensive instructions for the installation, operation, and maintenance of your MSI H510M PRO ProSeries Motherboard. Designed for efficiency and productivity, this motherboard offers stable functionality and high-quality assembly, ensuring optimized professional workflows and long-term reliability.

Figure 1.1: The MSI H510M PRO motherboard alongside its retail packaging.
2. Setup
2.1 Package Contents
Before beginning installation, please verify that all components listed below are present in your package:
- MSI H510M PRO Motherboard
- Quick Installation Guide
- Driver DVD
- 2 x SATA Cables
- M.2 Screw / Standoff Sets
- MSI Case Badge
- I/O Shielding
- Product Registration Card

Figure 2.1: All items included in the MSI H510M PRO motherboard package.
2.2 Installation Steps
Follow these steps to properly install your motherboard into a compatible PC case:
- Prepare the Case: Ensure your PC case is ready for motherboard installation. Install the I/O shield into the case's rear opening.
- Install CPU: Carefully open the CPU socket lever, align the CPU with the triangle marker on the socket, and gently place it into the socket. Close the lever to secure the CPU.
- Install CPU Cooler: Mount the CPU cooler according to its manufacturer's instructions. Ensure proper thermal paste application and secure mounting.
- Install RAM: Open the clips on the DDR4 memory slots. Align the RAM modules with the notch in the slot and press firmly until the clips snap into place. This motherboard supports DDR4 Memory, up to 3200(Max) MHz.
- Install M.2 SSD (Optional): If using an M.2 SSD, insert it into the Turbo M.2 slot and secure it with the provided screw/standoff set. This slot maximizes performance for NVMe based SSDs.
- Mount Motherboard: Carefully place the motherboard into the PC case, aligning the screw holes with the standoffs. Secure the motherboard with screws.
- Connect Power: Connect the 24-pin ATX power connector and the 8-pin CPU power connector from your power supply to the motherboard.
- Connect Peripherals: Connect front panel headers (power, reset, USB, audio), SATA drives, and any other necessary cables.
- Install Expansion Cards (Optional): Insert graphics cards or other PCIe expansion cards into the appropriate PCIe slots. This motherboard features PCIe 4.0 support.
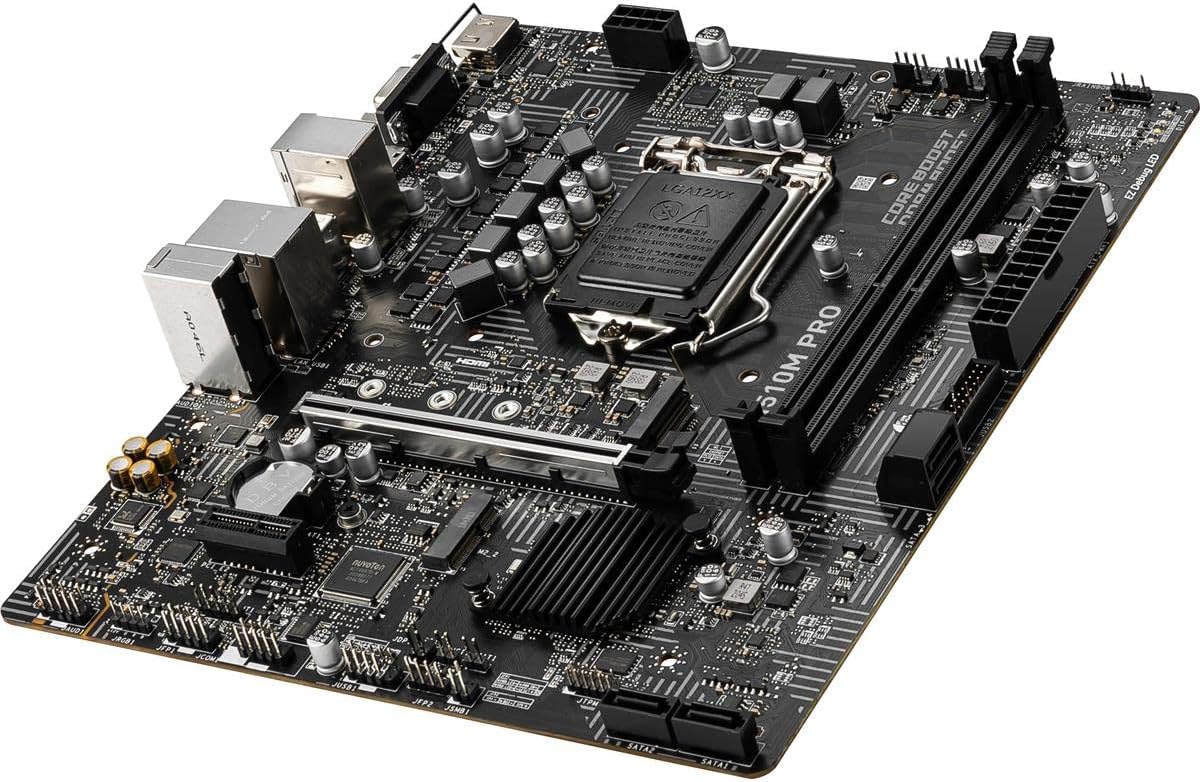
Figure 2.2: An angled view of the MSI H510M PRO motherboard, highlighting various components and connectors.

Figure 2.3: A top-down view of the MSI H510M PRO motherboard, showing the layout of the CPU socket, RAM slots, and PCIe slots.

Figure 2.4: Diagram illustrating the various input/output ports available on the MSI H510M PRO motherboard, including video outputs, USB ports, and audio jacks.
3. Operating Instructions
3.1 BIOS Configuration
Upon first boot, you may need to enter the BIOS (Basic Input/Output System) to configure settings such as boot order, date/time, and enable specific features. Typically, you can access the BIOS by pressing the Del key during startup. Refer to the on-screen prompts for specific key presses.
3.2 Key Features
The MSI H510M PRO motherboard incorporates several advanced features to enhance performance and user experience:
- Core Boost: With premium layout and digital power design to support more cores and provide better performance.
- DDR4 Boost: Optimized circuit design for stable and high-speed DDR4 memory performance.
- Lightning Fast Experience: Features PCIe 4.0 for high-speed graphics card and storage connectivity.
- Turbo M.2: Running at PCI-E Gen3 x4, this slot maximizes performance for NVMe based SSDs, offering speeds up to 32 Gb/s.
- 1Gbps LAN: Provides reliable and fast network connectivity.
- Audio Boost: Delivers high-quality audio experience.

Figure 3.1: Illustration of Core Boost and DDR4 Boost technologies on the motherboard, indicating optimized power delivery and memory pathways.

Figure 3.2: Diagram showing the location of PCIe 4.0/3.0 x16 and PCIe 3.0 x1 slots, indicating high-speed expansion capabilities.

Figure 3.3: Graph comparing data transfer speeds of SATA, M.2, and Turbo M.2 Gen3 x4, demonstrating the superior performance of the Turbo M.2 slot.
4. Maintenance
Proper maintenance can extend the lifespan and ensure optimal performance of your motherboard:
- Dust Cleaning: Regularly clean dust from inside your PC case, especially around the motherboard, CPU cooler, and fan vents. Use compressed air for best results.
- Driver Updates: Keep your motherboard drivers (chipset, LAN, audio) updated to the latest versions available on the MSI official website.
- BIOS Updates: Periodically check for BIOS updates on the MSI website. BIOS updates can improve compatibility, stability, and performance. Follow the update instructions carefully to avoid issues.
- Cable Management: Ensure cables inside the case are neatly organized to improve airflow and prevent obstruction of components.
5. Troubleshooting
This section provides solutions to common issues you might encounter:
| Problem | Possible Cause | Solution |
|---|---|---|
| System does not power on. | Loose power connections, faulty power supply, case power button issue. | Check 24-pin ATX and 8-pin CPU power connectors. Test power supply. Verify front panel power button connection. |
| No display on monitor. | Incorrect video output, faulty GPU/RAM, monitor issue. | Ensure monitor is connected to the correct video output (motherboard or discrete GPU). Reseat RAM modules. Test with a different monitor or GPU. |
| Operating system not booting. | Incorrect boot order, corrupted OS, faulty storage drive. | Check BIOS boot order. Attempt OS repair or reinstallation. Test storage drive. |
| Peripheral (USB, LAN, Audio) not working. | Missing/outdated drivers, disabled in BIOS, hardware fault. | Install/update drivers from MSI website. Check BIOS settings to ensure ports are enabled. Test with different peripherals. |
| System instability or crashes. | Overheating, unstable overclock, faulty component. | Monitor temperatures. Reset BIOS to default settings. Test components individually. |
6. Technical Specifications
Detailed specifications for the MSI H510M PRO Motherboard:
| Feature | Specification |
|---|---|
| Brand | MSI |
| Series | H510M PRO |
| Item Model Number | H510M PRO |
| CPU Socket | LGA 1200 |
| Compatible Processors | 11th and 10th Gen Intel Core/Pentium/Celeron processors |
| Chipset Type | Intel H510 |
| RAM Memory Technology | DDR4 |
| Memory Clock Speed | Up to 3200 MHz (Max) |
| PCIe Support | PCIe 4.0 |
| M.2 Slot | Turbo M.2 (PCI-E Gen3 x4) |
| USB Ports | USB 3.2 Gen 1, USB 2.0 |
| LAN | 1Gbps LAN |
| Video Outputs | D-SUB/DP/HDMI |
| Form Factor | mATX |
| Product Dimensions | 9.6 x 9.6 x 2.5 inches |
| Item Weight | 1.54 pounds |
7. Warranty and Support
For warranty information and technical support, please refer to the official MSI website or contact MSI customer service. Keep your purchase receipt for warranty claims. Drivers and BIOS updates are also available on the MSI support page.
No official product videos from the seller were found in the provided data for embedding.


