
1. Introduction and Product Overview
The Stanley Compressor TAB 200/10/30VW FM is an oil-free air compressor designed for various applications, including inflating objects, cleaning tools, and inflating tires. It features a maximum working pressure of 10 bar and a 30-liter tank capacity, delivering an air displacement of 180 liters per minute. Its portable design with wheels and an anti-slip handle ensures easy transport and storage.
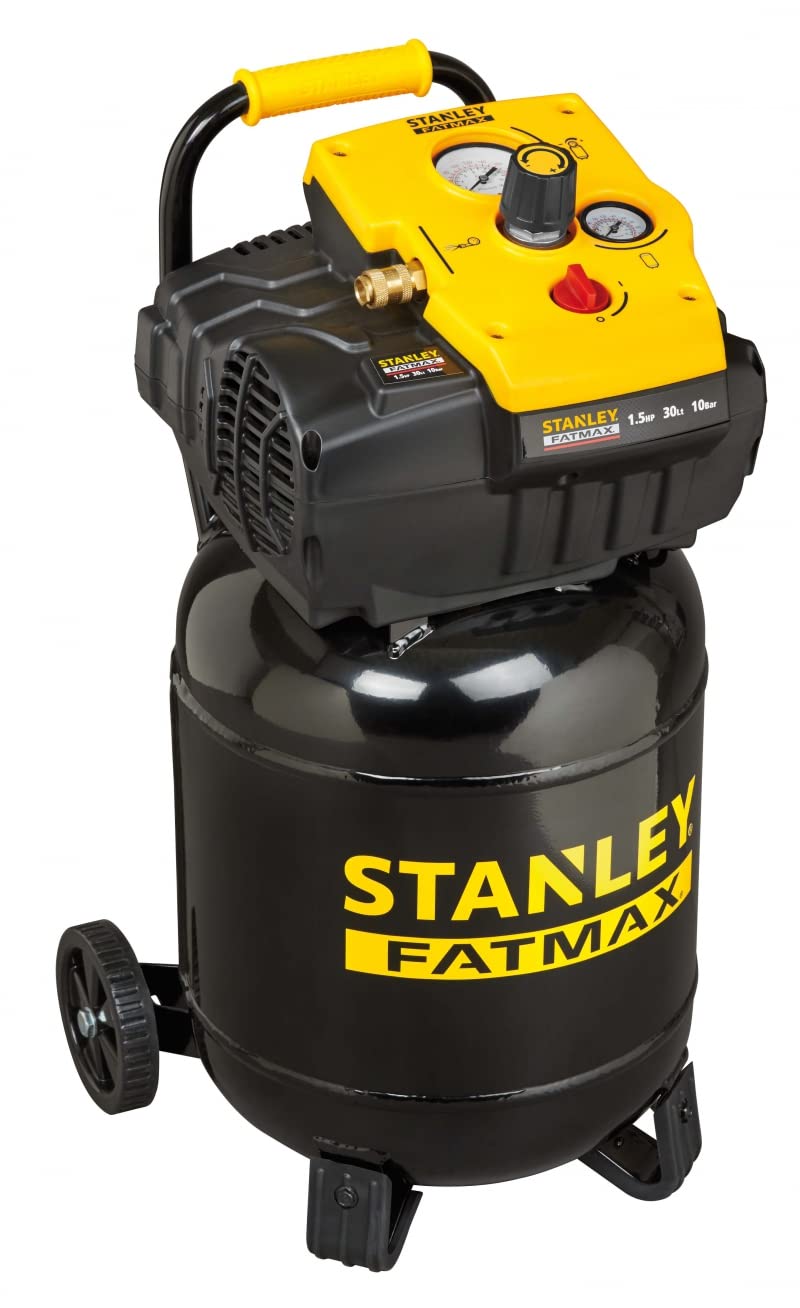
Figure 1: Front view of the Stanley Compressor TAB 200/10/30VW FM. This image shows the overall design of the compressor, highlighting its compact structure and the integrated handle for portability.
Key Features:
- High Performance: Maximum working pressure of 10 bar and a 30-liter tank capacity.
- Versatile Applications: Suitable for inflating various items, cleaning tasks, and tire inflation.
- Oil-Free Operation: Requires no oil, reducing maintenance and ensuring cleaner air output.
- Portability: Equipped with wheels and an anti-slip handle for convenient movement and storage.
- Adjustable Pressure: Features an adjustable pressure control and a manometer for precise pressure monitoring.
2. Safety Information
Read and understand all safety warnings and instructions before operating this air compressor. Failure to follow these instructions may result in electric shock, fire, and/or serious injury.
General Safety Warnings:
- Work Area Safety: Keep the work area clean and well-lit. Do not operate the compressor in explosive atmospheres, such as in the presence of flammable liquids, gases, or dust.
- Electrical Safety: Ensure the power supply matches the voltage specified on the compressor's nameplate. Do not expose the compressor to rain or wet conditions. Never use the cord for carrying, pulling, or unplugging the compressor.
- Personal Safety: Always wear appropriate personal protective equipment (PPE), including safety glasses, hearing protection, and gloves. Do not overreach; maintain proper footing and balance at all times.
- Compressor Use and Care: Do not modify the compressor. Do not operate the compressor if the switch does not turn it on and off. Disconnect the plug from the power source before making any adjustments, changing accessories, or storing the compressor.
- Pressure Safety: Never exceed the maximum operating pressure of the compressor or the air tool being used. Always drain condensation from the tank regularly to prevent corrosion.
- Children and Bystanders: Keep children and bystanders away while operating the compressor.
3. Package Contents
Carefully unpack the compressor and check for any damage. Ensure all items listed below are present.
- 1 x Stanley Compressor TAB 200/10/30VW FM
- 1 x User Manual
- Wheels (for assembly)
- Handle (for assembly)
4. Setup and Assembly
Follow these steps to prepare your compressor for first use.
4.1 Attaching Wheels and Handle
- Place the compressor on a stable, flat surface.
- Attach the wheels to the designated axles at the base of the compressor using the provided hardware. Ensure they are securely fastened.
- Mount the anti-slip handle to the top of the compressor unit. Secure it with the appropriate screws or bolts.

Figure 2: Side view of the compressor showing the attached wheels and handle. This illustrates the assembled unit ready for transport.
4.2 Electrical Connection
- Ensure the compressor's power switch is in the "OFF" position.
- Connect the power cord to a grounded electrical outlet that matches the compressor's voltage requirements (30 Volt, as per specifications).
- Avoid using extension cords if possible. If an extension cord is necessary, ensure it is rated for the compressor's power requirements and is properly grounded.
5. Operating Instructions
This section details how to safely operate your Stanley air compressor.
5.1 Controls Overview
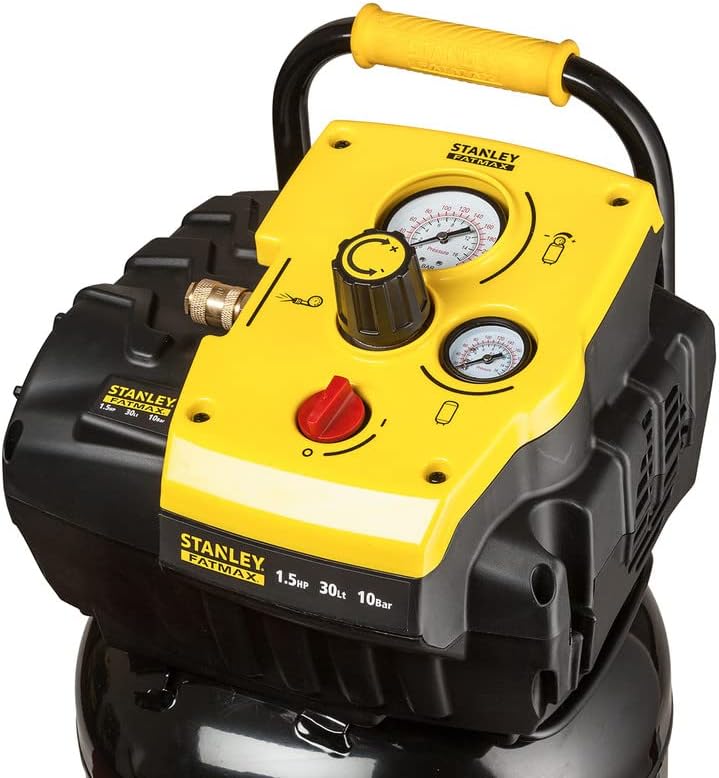
Figure 3: Close-up of the compressor's control panel. This image highlights the pressure gauges, regulator knob, and power switch.
- Power Switch: Located on the control panel, typically red, for turning the compressor ON/OFF.
- Pressure Gauges: Two gauges display tank pressure and regulated output pressure.
- Pressure Regulator Knob: Used to adjust the output air pressure.
- Air Outlet: Connection point for air hoses and tools.
5.2 Starting the Compressor
- Ensure all connections are secure and the air hose (if attached) is free of kinks.
- Turn the pressure regulator knob counter-clockwise to the lowest setting.
- Flip the power switch to the "ON" position. The compressor will start to build pressure in the tank.
- Allow the compressor to reach its maximum pressure and shut off automatically. This indicates it is ready for use.
5.3 Adjusting Output Pressure
- Connect your air tool or accessory to the air outlet.
- Turn the pressure regulator knob clockwise to increase the output pressure, observing the regulated pressure gauge.
- Adjust the pressure to the recommended setting for your specific air tool or application.
5.4 Shutting Down the Compressor
- Turn the power switch to the "OFF" position.
- Disconnect the air tool from the air outlet.
- Slowly open the drain valve at the bottom of the tank to release any remaining air pressure and condensation. Close the valve once the tank is empty.

Figure 4: Compressor connected to an air hose and nozzle, demonstrating a typical usage scenario for inflation or cleaning tasks.
6. Maintenance
Regular maintenance ensures the longevity and optimal performance of your compressor. Always disconnect the compressor from the power source before performing any maintenance.
6.1 Draining Condensation
- Condensation accumulates in the air tank and must be drained daily or after each use.
- With the compressor off and depressurized, open the drain valve located at the bottom of the tank.
- Allow all water to drain completely, then close the valve securely.
6.2 Cleaning
- Keep the compressor clean and free of dust and debris. Use a dry cloth to wipe down the exterior.
- Ensure ventilation openings are clear to prevent overheating.
6.3 Oil-Free Design
This compressor features an oil-free pump, eliminating the need for oil checks or changes. Do not attempt to add oil to the pump.
7. Troubleshooting
Refer to this section for common issues and their solutions.
| Problem | Possible Cause | Solution |
|---|---|---|
| Compressor does not start. | No power supply; Power switch off; Thermal overload. | Check power connection; Turn power switch ON; Allow compressor to cool down. |
| Low air pressure or continuous running. | Air leak in hose or fittings; Drain valve open; Excessive air consumption. | Check and tighten connections; Close drain valve; Use appropriate air tools for compressor capacity. |
| Excessive noise or vibration. | Loose components; Compressor on uneven surface. | Check and tighten all fasteners; Place compressor on a stable, level surface. |
If the problem persists after attempting these solutions, contact customer support.
8. Specifications
Technical specifications for the Stanley Compressor TAB 200/10/30VW FM.
- Brand: Stanley
- Model Number: TAB 200/10/30VW FM
- Power: 1.5 Horsepower (HP)
- Tank Volume: 30 Liters
- Maximum Operating Pressure: 10 Bar
- Air Flow Capacity: 180 Liters Per Minute
- Voltage: 30 Volt
- Power Source: Corded Electric
- Material: Alloy Steel
- Color: Black
- Special Feature: Lightweight
- Included Components: 1 x air compressor, 1 x user manual
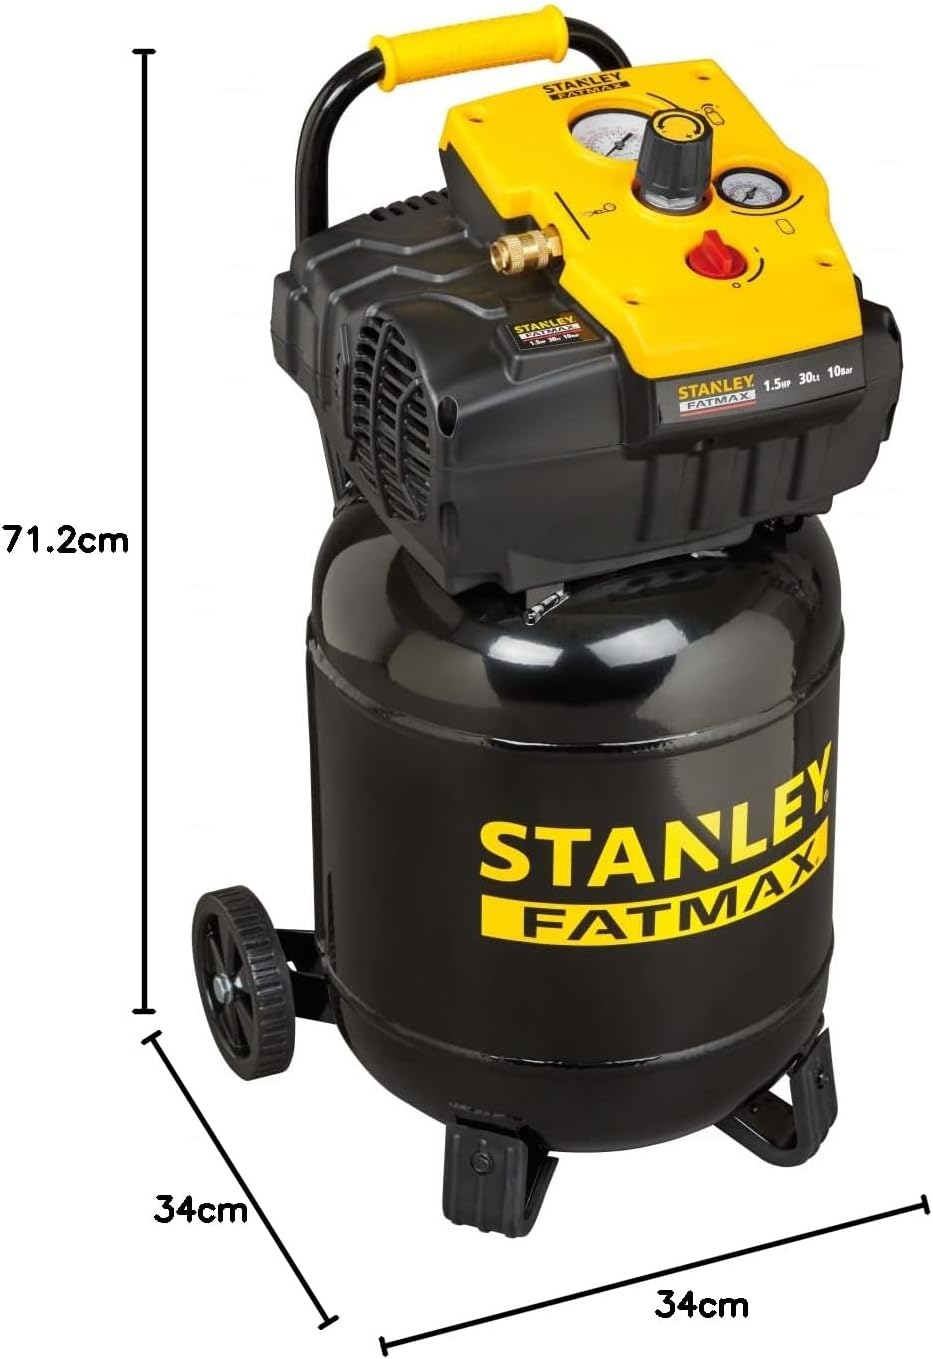
Figure 5: Dimensional drawing of the Stanley Compressor TAB 200/10/30VW FM, showing height and width measurements for reference.
9. Warranty and Support
For warranty information or technical support, please refer to the warranty card included with your product or visit the official Stanley website. Keep your purchase receipt as proof of purchase.
Contact Information: Please refer to the contact details provided in your product packaging or on the manufacturer's official website for customer service and support.


