1. Introduction
The SP CONNECT SP Aero Mount Pro is a lightweight, carbon-reinforced smartphone and cycle computer mount designed for bicycle handlebars or stems. This manual provides essential information for the correct installation, operation, and maintenance of your Aero Mount Pro to ensure optimal performance and safety.
What's in the Box
- Aero Mount Pro
- Garmin Adapter
- Wahoo Adapter
- Aero Cover
- O-Ring Set (S/M/L)
2. Important Safety Information
- Surface Compatibility: Ensure the mounting surface on your handlebar or stem is flat and clean before installation.
- Adhesive Curing Time: After applying the 3M double-sided tape, allow approximately 24 hours for the adhesive to fully cure and stabilize before placing any devices on the mount. This ensures maximum bond strength.
- Secure Attachment: Always use the provided rubber O-rings in conjunction with the 3M adhesive for reinforced hold and maximum security, especially during vigorous riding.
- Regular Inspection: Periodically check the mount, adhesive, and O-rings for any signs of wear or damage. Replace components as necessary.
- Device Security: Always ensure your smartphone or cycle computer is securely locked into the mount before riding.
3. Setup and Installation
3.1 Mounting the Aero Mount Pro
- Clean the flat surface on your bicycle's stem or handlebar where you intend to install the mount. Ensure it is free of dirt, grease, and moisture.
- Remove the protective backing from the 3M double-sided tape on the underside of the Aero Mount Pro.
- Carefully position the mount on the desired flat surface. The asymmetric shape allows for slight forward or backward adjustment. Press firmly for several seconds to ensure good adhesion.
- Select the appropriate size O-rings (S, M, or L) that fit snugly around your stem/handlebar and the mount. Loop the O-rings over the mount's hooks and around the stem/handlebar to provide additional security.
- Allow the adhesive to cure for approximately 24 hours before attaching any devices.

Image: The SP Aero Mount Pro securely installed on a bicycle stem, reinforced with the included O-rings for enhanced stability.

Image: A top-down view of the SP Aero Mount Pro mounted on a bicycle stem, ready for device attachment.
3.2 Attaching a Smartphone
To attach your smartphone (equipped with an SP CONNECT phone case), align the phone case with the mount and place it onto the mount. Rotate your phone 90 degrees clockwise until it locks securely into place. To remove, rotate 90 degrees counter-clockwise and lift.
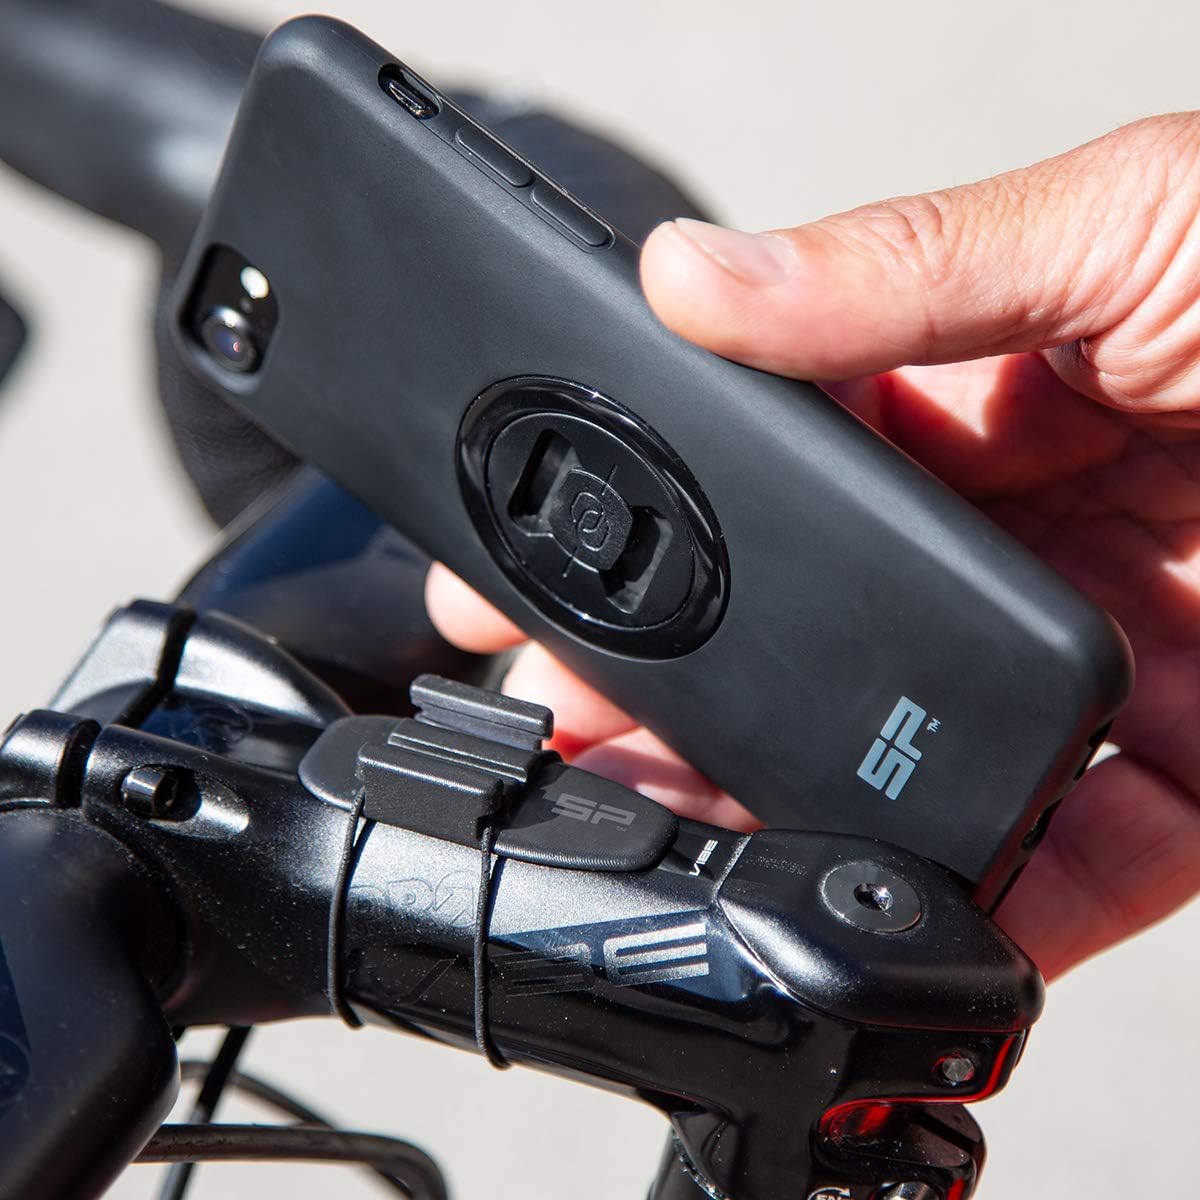
Image: A hand demonstrating the attachment of a smartphone, fitted with an SP CONNECT case, to the Aero Mount Pro.

Image: A smartphone securely attached to the SP Aero Mount Pro, positioned on a bicycle's stem.
3.3 Attaching a Cycle Computer (Garmin/Wahoo)
The Aero Mount Pro includes adapters for Garmin and Wahoo cycle computers. Slide the appropriate adapter (Garmin or Wahoo) into the mount until it clicks into place. Then, attach your cycle computer to the adapter as you normally would. This allows you to use your cycle computer either alone or simultaneously with a smartphone mounted on an out-front mount.

Image: A Garmin cycle computer attached to the SP Aero Mount Pro via its dedicated adapter.

Image: A Wahoo cycle computer attached to the SP Aero Mount Pro via its dedicated adapter.
3.4 Using the Aero Cap
When no device is mounted, you can install the included Aero Cap for a streamlined and aesthetic appearance. Simply slide the Aero Cap into the mount until it sits flush.

Image: The SP Aero Mount Pro with the Aero Cap in place, providing a sleek finish when no device is attached.
4. Operating Instructions
Once installed and cured, the SP Aero Mount Pro provides a secure platform for your smartphone or cycle computer. Simply attach your device as described in Section 3.2 or 3.3. Ensure the device is fully locked into the mount before beginning your ride. The mount's low profile design minimizes aerodynamic drag, making it suitable for performance-oriented cycling.
5. Maintenance
- Cleaning: Clean the mount with a damp cloth and mild soap. Avoid harsh chemicals or abrasive materials.
- Adhesive Check: Periodically inspect the 3M adhesive bond. If the mount shows signs of loosening, re-secure it or replace the adhesive if necessary.
- O-Ring Inspection: Check the rubber O-rings for signs of wear, cracking, or degradation. Replace them if they appear compromised to maintain optimal security.
- Storage: Store the mount in a cool, dry place when not in use.
6. Troubleshooting
- Mount Not Holding Securely:
- Ensure the mounting surface was clean and dry during installation.
- Verify that the 3M adhesive had sufficient curing time (at least 24 hours) before use.
- Confirm that the O-rings are correctly installed and are not worn or broken. Replace if necessary.
- The mounting surface may not be sufficiently flat. The mount requires a flat surface for proper adhesion.
- Device Not Locking into Mount:
- Ensure your smartphone case or cycle computer adapter is compatible with the SP CONNECT mounting system.
- Verify that the device is aligned correctly and rotated a full 90 degrees clockwise until a click is heard, indicating it is locked.
- Check for any obstructions or debris in the mounting mechanism.
- O-Rings Breaking/Degrading:
- O-rings are subject to wear and tear. Replace them with new ones from the included set or contact customer support for replacements.
- Ensure the correct size O-ring is used to avoid excessive tension.
7. Specifications
| Feature | Detail |
|---|---|
| Model Number | 53248 |
| Product Dimensions | 3.54 x 2.76 x 1.38 inches |
| Item Weight | 0.176 ounces (5 grams) |
| Material | Carbon reinforced plastic |
| Color | Black |
| Mounting Type | Handlebar / Stem (adhesive + O-rings) |
| Compatible Devices | Smartphones (with SP CONNECT case), Garmin cycle computers (with adapter), Wahoo cycle computers (with adapter) |
8. Warranty Information
For detailed warranty information regarding your SP CONNECT SP Aero Mount Pro, please refer to the official SP CONNECT website or contact their customer support directly. Keep your proof of purchase for any warranty claims.
9. Customer Support
If you have any questions, require technical assistance, or need to order replacement parts, please visit the official SP CONNECT website or contact their customer service department. Contact information can typically be found on the manufacturer's website or product packaging.


