Introduction
This manual provides comprehensive instructions for the installation, configuration, and maintenance of your ASUS Prime B560M-A motherboard. Designed to support 10th and 11th Gen Intel Core processors, this micro ATX motherboard offers advanced features for PC builders and enthusiasts.
1. Setup and Installation
Follow these steps for proper installation of your motherboard and its components.
1.1 Unboxing and Inspection
Carefully remove the motherboard from its packaging. Inspect for any visible damage. Ensure all accessories are present, including SATA cables, M.2 screws, and the I/O shield.

Figure 1: ASUS Prime B560M-A Motherboard with its retail box and included accessories, such as SATA cables, M.2 screws, and documentation.
1.2 Motherboard Layout and Components
Familiarize yourself with the key components and connectors on the motherboard.

Figure 2: A top-down view of the ASUS Prime B560M-A motherboard, highlighting the LGA 1200 CPU socket, four DDR4 DIMM slots, and various PCIe slots, including the primary PCIe 4.0 x16 slot.

Figure 3: An angled perspective of the ASUS Prime B560M-A motherboard, providing a clearer view of the rear I/O ports, M.2 slots, and SATA ports.
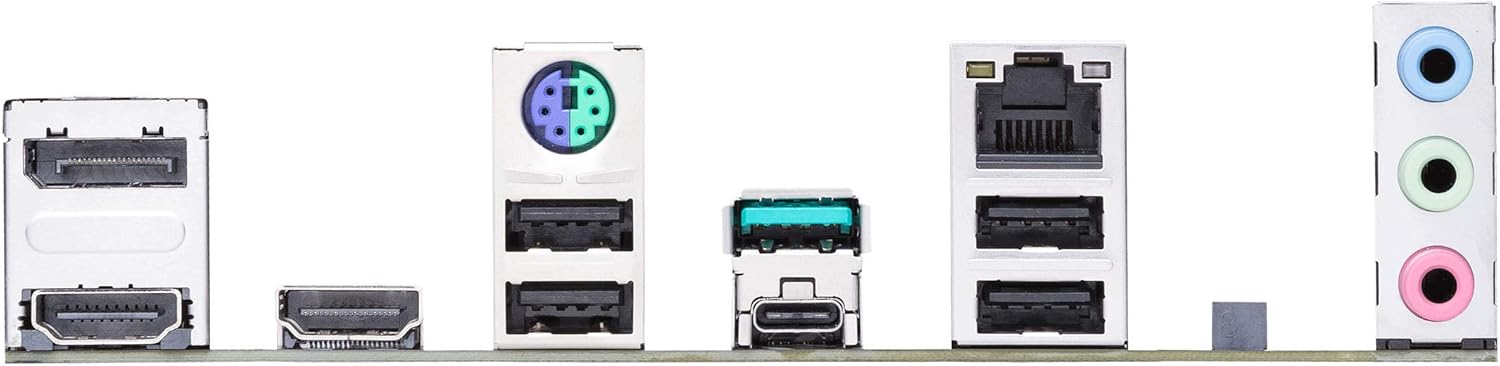
Figure 4: Close-up of the rear I/O panel of the ASUS Prime B560M-A motherboard, displaying its array of ports including DisplayPort, HDMI, USB 3.2 Gen 2 Type-C, USB 3.2 Gen 1, USB 2.0, Ethernet, and audio jacks.
1.3 Component Installation Order
- CPU Installation: Carefully align the CPU with the socket and gently place it. Secure the retention arm.
- CPU Cooler Installation: Install your CPU cooler according to its manufacturer's instructions.
- RAM Installation: Open the DIMM slot clips, align the memory modules, and press firmly until they click into place.
- M.2 SSD Installation: Insert the M.2 SSD into the appropriate slot and secure it with the provided screw.
- Motherboard Mounting: Install the I/O shield into your PC case. Carefully place the motherboard into the case, aligning it with the standoffs. Secure with screws.
- Graphics Card (GPU) Installation: Insert the graphics card into the primary PCIe x16 slot and secure it.
- Power Supply Connections: Connect the 24-pin ATX power connector and the 8-pin CPU power connector from your power supply to the motherboard. Connect PCIe power cables to your GPU if required.
- Front Panel Connections: Connect the power button, reset button, HDD LED, power LED, and front panel USB/audio headers to the corresponding pins on the motherboard. Refer to the motherboard's silkscreen labels for correct orientation.
- Storage Device Connections: Connect SATA data cables from your storage drives (HDDs/SSDs) to the SATA ports on the motherboard. Connect power cables from your power supply to these drives.
2. Operating Your Motherboard
Once your system is assembled, you can proceed with initial boot-up and software configuration.
2.1 Initial Boot and BIOS/UEFI Setup
Upon first power-on, the system will typically enter the BIOS/UEFI utility. Here you can configure system settings, boot order, and enable/disable various features.
- Press DEL or F2 during POST (Power-On Self-Test) to enter the BIOS/UEFI setup.
- Navigate using keyboard arrows or mouse.
- Key sections include:
- Main: System information.
- Ai Tweaker: Overclocking and performance tuning (memory frequency, CPU ratios).
- Advanced: CPU configuration, PCH configuration, onboard device configuration.
- Monitor: System temperatures, fan speeds, voltages.
- Boot: Boot device priority, CSM settings.
- Tool: ASUS EZ Flash 3 Utility for BIOS updates.
- Exit: Save and exit, discard changes.
2.2 Driver and Software Installation
For optimal performance and stability, install the latest drivers and utilities from the ASUS support website or the provided support DVD/USB.
- Chipset Drivers: Essential for proper communication between components.
- LAN Drivers: For network connectivity.
- Audio Drivers: For sound functionality.
- Graphics Drivers: For integrated graphics (if used) or dedicated GPU.
- ASUS Utilities:
- Armoury Crate: Centralized software for system monitoring, driver updates, and Aura Sync RGB control.
- Fan Xpert 2+: For advanced fan control and cooling optimization.
- AI Suite 3: A suite of utilities for system tuning and monitoring.
3. Maintenance
Regular maintenance helps ensure the longevity and stable operation of your motherboard.
- Dust Removal: Periodically clean dust from the motherboard and components using compressed air. Ensure the system is powered off and unplugged.
- BIOS Updates: Check the ASUS support website for the latest BIOS versions. BIOS updates can improve compatibility, stability, and performance. Use the ASUS EZ Flash 3 utility for safe updates.
- Driver Updates: Keep your drivers updated to the latest versions from the ASUS website or component manufacturers (e.g., Intel, Realtek).
- Cable Management: Ensure internal cables are neatly routed to improve airflow and prevent interference.
4. Troubleshooting
This section provides solutions to common issues you might encounter.
4.1 No Power / No Boot
- Check Power Connections: Ensure the 24-pin ATX and 8-pin CPU power cables are securely connected to the motherboard and power supply.
- Front Panel Headers: Verify that the power button header is correctly connected.
- Power Supply: Test the power supply with another system or a PSU tester.
- CMOS Clear: Try clearing the CMOS by removing the CMOS battery for 5-10 minutes or using the CLRTC jumper (refer to the full manual for jumper location).
4.2 No Display Output
- Monitor Connection: Ensure the monitor cable is securely connected to the graphics card (or motherboard if using integrated graphics) and the monitor.
- Graphics Card: Reseat the graphics card in its PCIe slot. Ensure any required PCIe power cables are connected.
- RAM: Reseat RAM modules. Try booting with only one RAM stick.
4.3 Component Not Detected (e.g., SSD, HDD, RAM)
- Reseat Component: Power off the system and reseat the problematic component (M.2 SSD, SATA drive, RAM).
- Check Cables: Ensure SATA data and power cables are securely connected. Try different cables or ports.
- BIOS/UEFI Settings: Check if the component is detected in the BIOS/UEFI. Ensure SATA mode (AHCI/RAID) is correctly configured.
5. Specifications
Key technical specifications for the ASUS Prime B560M-A motherboard.
| Feature | Specification |
|---|---|
| CPU Socket | LGA 1200 |
| Compatible Processors | 10th and 11th Generation Intel Core Processors |
| Chipset | Intel B560 |
| RAM Memory Technology | DDR4 |
| Memory Speed (Max) | 5000 MHz (OC) |
| Memory Storage Capacity (Max) | 128 GB |
| PCIe Slots | 1x PCIe 4.0 x16, 2x PCIe 3.0 x1 |
| M.2 Slots | 2 (1x PCIe 4.0 x4, 1x PCIe 3.0 x4) |
| SATA Ports | 6x SATA 6Gb/s |
| USB Ports (Rear) | USB 3.2 Gen 2 Type-C, USB 3.2 Gen 2 Type-A, USB 3.2 Gen 1 Type-A, USB 2.0 |
| LAN | Intel 1Gb Ethernet |
| Video Output | DisplayPort, Dual HDMI |
| Form Factor | Micro ATX |
| Dimensions (LxW) | 9.6 x 9.2 inches (approx.) |
6. Warranty and Support
For detailed warranty information, technical support, and additional resources, please visit the official ASUS support website.
- Official ASUS Support: https://www.asus.com/support/
- Product Support Page: Search for "PRIME B560M-A" on the ASUS support site for drivers, utilities, and FAQs.
- Full User Manual (PDF): For a more detailed guide, you can download the complete user manual. Download PDF Manual
ASUS provides a limited warranty for its motherboards. Please retain your proof of purchase for warranty claims.


