
Cooler Master MB540-KGNN-S00
Contents
Cooler Master MasterBox 540 ARGB PC Case
Instruction Manual
1. Product Overview
The Cooler Master MasterBox 540 is an ARGB ATX Gaming PC Case designed for enthusiasts seeking both stunning aesthetics and versatile performance. Its front panel features customizable ARGB strips inspired by automotive lighting, radiating outward behind a translucent DarkMirror façade. This mid-tower chassis supports multiple cooling configurations and offers easy access to internal components through its removable top panel and tool-less tempered glass side panel.

Figure 1: Front-angled view of the Cooler Master MasterBox 540 ARGB PC Case, showcasing its illuminated front panel and tempered glass side panel.
2. Package Contents
Please verify that all items listed below are present in your MasterBox 540 package:
- 1 x Cooler Master MasterBox 540 PC Case
- 1 x 120mm ARGB SickleFlow Rear Fan (pre-installed)
- 1 x ARGB Controller
- Accessory Box (containing screws, zip ties, and other small parts)
- User Manual (this document)

Figure 2: The included ARGB controller for managing lighting effects.
3. Key Features
- Spectacular ARGB Lighting: Unique ARGB Ether front panel with automotive-inspired lighting strips and integrated DarkMirror façade. Illumination can be assigned via software or the included ARGB controller.
- Versatile & Well-Connected: The top panel is entirely removable for easy access during assembly or liquid cooling system installation. The front I/O panel includes a USB 3.2 Gen2 USB Type-C port (10Gbps).
- Tempered Glass Side Panel: Showcase your system components through the tempered glass side panel, which can be removed easily without tools.
- Versatile Cooling Options: Features a pre-installed Sickleflow 120mm rear fan. Front and top panels support up to 3 x 120mm fans, 2 x 140mm fans, or a 360mm radiator. PSU shroud includes top ventilation.
- Impressive Clearances: Accommodates E-ATX (up to 12” x 10.7”), ATX, micro-ATX, and mini-ITX motherboards. CPU coolers up to 165mm, graphics cards up to 410mm, and ATX PSUs up to 180mm.
4. Installation Guide
4.1 Preparing the Case
Before beginning installation, ensure you have a clean, static-free workspace. Remove the tempered glass side panel by unscrewing the thumb screws (if present) and gently pulling it away. The top panel can also be removed for easier access to the interior during component installation.

Figure 3: Interior view of the MasterBox 540 with the side panel removed, showing the spacious layout for component installation.
4.2 Motherboard Installation
- Install the necessary motherboard standoffs for your motherboard form factor (E-ATX, ATX, Micro-ATX, Mini-ITX).
- Carefully place your motherboard onto the standoffs, aligning the screw holes.
- Secure the motherboard with the provided screws.
4.3 Power Supply Unit (PSU) Installation
- Slide the PSU into its designated compartment at the bottom rear of the case.
- Secure the PSU with screws from the rear of the case.
- Route necessary cables through the cable management cutouts.
4.4 Storage Drive Installation
The MasterBox 540 offers flexible storage options:
- 2.5" SSD/HDD: Mount 2.5" drives to the dedicated trays behind the motherboard tray.
- 3.5" HDD: Install 3.5" drives into the removable drive cage located under the PSU shroud.

Figure 4: Interior view highlighting the various mounting points for storage drives.
4.5 Graphics Card (GPU) Installation
- Remove the necessary PCIe slot covers from the rear of the case.
- Insert your graphics card into the appropriate PCIe slot on the motherboard.
- Secure the graphics card with screws.
4.6 Cooling System Installation (Fans/Radiators)
The MasterBox 540 supports various cooling configurations:
- Front: Up to 3 x 120mm or 2 x 140mm fans, or a 360mm radiator.
- Top: Up to 3 x 120mm or 2 x 140mm fans, or a 360mm radiator.
- Rear: 1 x 120mm fan (pre-installed).
The removable top panel facilitates easier installation of fans and radiators.
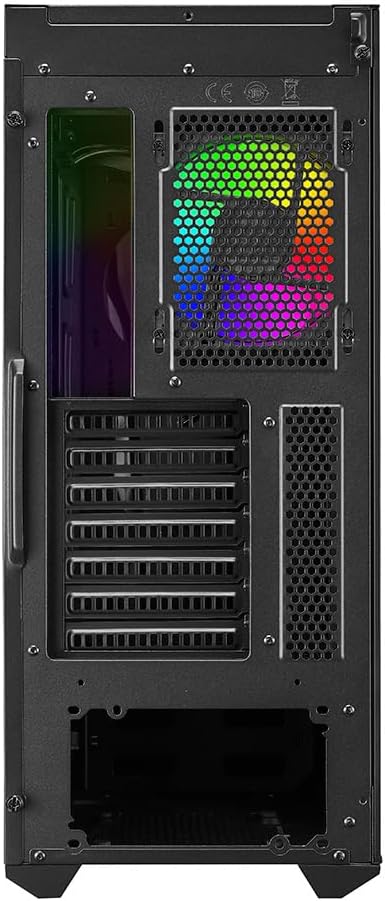
Figure 5: The MasterBox 540 with its top panel removed, demonstrating ease of access for fan and radiator installation.
5. Operating the ARGB Lighting
The MasterBox 540 features dynamic ARGB lighting on its front panel and includes a pre-installed ARGB SickleFlow fan. The lighting can be controlled in two primary ways:
- Included ARGB Controller: The case comes with a dedicated ARGB controller (pre-routed to the RESET/ARGB front panel button). Use this controller to cycle through various lighting modes and colors without needing software.
- Motherboard Software: For advanced customization and synchronization with other ARGB components, connect the case's ARGB cables to a compatible ARGB header on your motherboard. Then, use your motherboard's proprietary ARGB software (e.g., ASUS Aura Sync, MSI Mystic Light Sync, Gigabyte RGB Fusion, ASRock Polychrome Sync) to control the lighting effects.
Video 1: Demonstration of the dynamic ARGB lighting effects on the Cooler Master MasterBox 540.
6. Specifications
| Feature | Specification |
|---|---|
| Brand | Cooler Master |
| Model Name | MasterBox 540 (MB540-KGNN-S00) |
| Case Type | Mid Tower |
| Motherboard Compatibility | E-ATX (up to 12” x 10.7”), ATX, Micro-ATX, Mini-ITX |
| Materials | Steel, Plastic, Tempered Glass |
| Color | Black with ARGB |
| Dimensions (L x W x H) | 19.7 x 8.46 x 18.58 inches (499 x 215 x 472 mm) |
| Weight | 16.94 pounds (7.68 kg) |
| Pre-installed Fans | Rear: 1 x 120mm ARGB SickleFlow Fan |
| Fan Support (Front) | 3 x 120mm, 2 x 140mm |
| Fan Support (Top) | 3 x 120mm, 2 x 140mm |
| Radiator Support (Front) | 120mm, 140mm, 240mm, 280mm, 360mm |
| Radiator Support (Top) | 120mm, 140mm, 240mm, 280mm, 360mm |
| Radiator Support (Rear) | 120mm |
| CPU Cooler Clearance | Up to 165mm |
| GPU Clearance | Up to 410mm |
| PSU Clearance | Up to 180mm (295mm without HDD cage) |
| Drive Bays (2.5" SSD/HDD) | 2 |
| Drive Bays (3.5" HDD) | 2 (convertible from 2.5") |
| Front I/O Ports | 1 x USB 3.2 Gen2 Type-C, 2 x USB 3.2 Gen1 Type-A, 1 x 3.5mm Audio Jack, 1 x 3.5mm Mic Jack, 1 x ARGB Control Button |
7. Troubleshooting
If you encounter issues with your MasterBox 540 PC case, please refer to the following common troubleshooting steps:
- No Power/System Not Booting:
- Ensure all power cables (24-pin ATX, CPU, GPU, SATA) are securely connected to the motherboard, components, and PSU.
- Verify that the front panel power switch cable is correctly connected to the motherboard's F_PANEL header.
- Check if the PSU switch is in the 'ON' position.
- ARGB Lighting Not Working:
- Confirm that the ARGB cables from the front panel and fan are correctly connected to either the included ARGB controller or your motherboard's ARGB header.
- If using the motherboard, ensure the correct software is installed and configured.
- If using the controller, press the ARGB control button on the front panel to cycle through modes.
- Poor Airflow/High Temperatures:
- Ensure all installed fans are spinning and oriented correctly for optimal airflow (intake vs. exhaust).
- Check for dust buildup on fan filters and clean them regularly.
- Verify that there are no obstructions to airflow inside the case.
- Front Panel USB/Audio Not Working:
- Ensure the USB and audio cables from the front panel are securely connected to the corresponding headers on your motherboard.
For further assistance, please contact Cooler Master support.
8. Warranty and Support
Cooler Master products are backed by a limited warranty. For detailed warranty terms and conditions, please refer to the official Cooler Master website or the warranty card included with your product.
For technical support, spare parts, or any inquiries regarding your MasterBox 540, please visit the Cooler Master support portal or contact their customer service team through the official website:
Ask a question about this manual
Ask about setup, troubleshooting, compatibility, parts, safety, or missing instructions. Manuals+ will review the question and use this page’s manual context to help answer it.