
1. Introduction
This manual provides detailed instructions for the safe and efficient operation of your Eventek KPS1505DF DC Power Supply. This device is a high-precision, adjustable switching DC regulated power supply designed for various applications requiring stable voltage and current output. Please read this manual thoroughly before use and retain it for future reference.

Image 1.1: Front view of the Eventek KPS1505DF DC Power Supply with included alligator clip test leads.
2. Safety Instructions
To ensure safe operation and prevent damage to the device or injury, observe the following safety precautions:
- Always connect the power supply to a grounded outlet.
- Do not operate the device in wet or damp conditions.
- Ensure proper ventilation; do not block the cooling fan or vents.
- Do not open the casing; there are no user-serviceable parts inside. Refer servicing to qualified personnel.
- Verify the input voltage setting matches your local power supply before connecting.
- Avoid short-circuiting the output terminals.
- Disconnect power before making or changing connections.
3. Product Overview and Components
Familiarize yourself with the various parts of your DC power supply:

Image 3.1: Labeled front and rear panels of the Eventek KPS1505DF DC Power Supply.
- Voltage Display: Shows the output voltage in Volts (V).
- Current Display: Shows the output current in Amperes (A).
- CV Display: Indicates Constant Voltage mode is active.
- CC Display: Indicates Constant Current mode is active.
- Power Display: Shows the output power in Watts (W).
- A-Coarse: Coarse adjustment knob for output current.
- A-Fine: Fine adjustment knob for output current.
- V-Coarse: Coarse adjustment knob for output voltage.
- V-Fine: Fine adjustment knob for output voltage.
- Power Switch: Turns the unit ON/OFF.
- Output Negative Electrode (-): Black terminal for negative output connection.
- Ground Strap (GND): Yellow terminal for chassis ground connection.
- Output Positive Electrode (+): Red terminal for positive output connection.
- 5V/2A USB Output: USB port for charging devices.
- Cooling Fan: Dissipates heat from the unit.
- AC Input Socket: Connects to the main power cord.
- Fuse Block: Contains the protective fuse.

Image 3.2: Close-up of the 4-digit LED display and 5V/2A USB output port.
4. Setup
Follow these steps to set up your Eventek KPS1505DF DC Power Supply:
- Unpacking: Carefully remove the power supply and all accessories from the packaging. Verify all components listed in the 'What You Get' section are present.
- Placement: Place the power supply on a stable, level surface with adequate ventilation. Ensure the cooling fan at the rear is not obstructed.
- Power Connection: Connect the provided input power cord to the AC Input Socket (16) on the rear panel and then to a grounded electrical outlet.
- Initial Check: Before connecting any load, turn on the power supply using the Power Switch (10). The LED display should illuminate.
5. Operating Instructions
This section details how to operate your DC power supply for various tasks.
5.1. Adjusting Voltage and Current
- Power On: Ensure the power supply is turned on.
- Pre-setting Output: Before connecting your load, it is recommended to set the desired voltage and current limits. Turn the A-Coarse (6) and A-Fine (7) knobs fully counter-clockwise to set the current to minimum.
- Set Voltage: Use the V-Coarse (8) and V-Fine (9) knobs to adjust the output voltage to your desired level. The Voltage Display (1) will show the set value.
- Connect Load: Connect your device or circuit to the output terminals: positive to the red terminal (13) and negative to the black terminal (11). If grounding is required, connect to the yellow GND terminal (12).
- Set Current Limit: With the load connected, slowly turn the A-Coarse (6) and A-Fine (7) knobs clockwise to set the desired current limit. The Current Display (2) will show the actual current being drawn by the load, up to the set limit.
- Constant Voltage (CV) and Constant Current (CC) Modes: The power supply automatically switches between CV and CC modes. If the load resistance is high, the unit operates in CV mode (CV indicator on). If the load resistance is low and the current reaches the set limit, the unit switches to CC mode (CC indicator on).
5.2. Using the 5V/2A USB Output
The power supply includes a dedicated 5V/2A USB output port (14) for charging compatible devices. Simply connect your USB device to this port. This output operates independently of the main variable DC output.

Image 5.1: The power supply in use, demonstrating its precision measurement capabilities and USB charging function.
6. Maintenance
Proper maintenance ensures the longevity and reliable operation of your power supply:
- Cleaning: Disconnect the power supply from the main power before cleaning. Use a soft, dry cloth to wipe the exterior. Do not use abrasive cleaners or solvents.
- Ventilation: Regularly check that the cooling fan and air vents are free from dust and obstructions. Accumulated dust can impair cooling efficiency.
- Storage: When not in use for extended periods, store the power supply in a cool, dry place, away from direct sunlight and extreme temperatures.
- Fuse Replacement: If the power supply fails to turn on, check the fuse in the Fuse Block (17) on the rear panel. Replace it only with a fuse of the same type and rating.
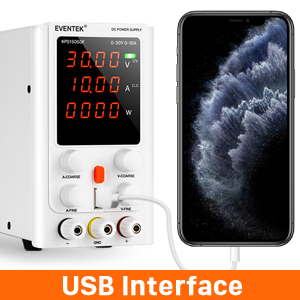
Image 6.1: Detail of the fuse block, located on the rear panel.
7. Troubleshooting
If you encounter issues with your power supply, refer to the following common problems and solutions:
| Problem | Possible Cause | Solution |
|---|---|---|
| No power/display off | Power cord disconnected, power switch off, blown fuse. | Check power cord connection, ensure power switch is ON, replace fuse if blown (refer to Maintenance). |
| No output voltage/current | Output terminals not connected, voltage/current knobs set to zero, internal fault. | Verify connections, adjust voltage/current knobs, contact support if issue persists. |
| Overheating | Blocked ventilation, excessive load. | Ensure clear airflow around the unit, reduce load if operating continuously at maximum capacity. |
| USB port not charging | Device incompatibility, faulty USB cable. | Try a different USB cable or device to confirm functionality. |
8. Specifications
Key technical specifications for the Eventek KPS1505DF DC Power Supply:
- Output Voltage: 0-30V (Adjustable)
- Output Current: 0-10A (Adjustable)
- Display: 4-Digits LED Display for Voltage, Current, and Power
- Voltage Display Accuracy: 0.01V
- Current Display Accuracy: 0.001A
- USB Output: 5V/2A
- Protection Functions: Boundary current protection, thermal protection, voltage overload protection, short circuit protection, overpower protection.
- Dimensions: Approximately 9.9 x 3.1 x 5.8 inches (L x W x H)
- Weight: Approximately 3.93 Pounds
- Manufacturer: Eventek
- Date First Available: April 23, 2021

Image 8.1: Dimensions of the Eventek KPS1505DF DC Power Supply.
9. Warranty and Support
Your Eventek KPS1505DF DC Power Supply comes with a 24-month warranty from the date of purchase. This warranty covers manufacturing defects and ensures reliable operation under normal use conditions.
For technical support, warranty claims, or any questions regarding your product, please refer to the contact information provided with your purchase or visit the official Eventek website. Please have your model number (KPS1505DF) and purchase details ready when contacting support.


