
ECCPP 161689-5211-1644021963
ECCPP Roof Rack Crossbars User Manual
Model: 161689-5211-1644021963
1. Introduction
This manual provides comprehensive instructions for the installation, operation, maintenance, and troubleshooting of your ECCPP Roof Rack Crossbars. These crossbars are designed to fit Hyundai Tucson Sport Utility 4-door models from 2016-2020, specifically those with existing side rails. The product is engineered to provide a secure and versatile platform for transporting various types of cargo on your vehicle's rooftop.
The ECCPP roof rack system enhances your vehicle's utility, allowing for the safe transport of items such as camping gear, luggage, fishing poles, bikes, snowboards, kayaks, and canoes. Please read this manual thoroughly before installation and use to ensure proper fitment, safe operation, and longevity of the product.

Figure 1.1: ECCPP Roof Rack Crossbars shown on a Hyundai Tucson.
2. Specifications
The ECCPP Roof Rack Crossbars are constructed from high-strength marine-grade aluminum alloy, ensuring durability and reliability for various cargo needs.

Figure 2.1: Product information and structural analysis diagram.
| Feature | Detail |
|---|---|
| Brand | ECCPP |
| Model Number | 161689-5211-1644021963 |
| Color | Black |
| Material | Marine-grade Aluminum Alloy |
| Load Capacity | Up to 165 Pounds (75 kg) |
| Mounting Type | Roof Mount, Rails, Crossbar Mount |
| Item Dimensions (L x W x H) | 41.93 x 8.66 x 5.12 inches |
| Item Weight | 7.78 pounds |
| Foldable | No |
| Vehicle Fitment | Hyundai Tucson Sport Utility 4-door (1.6L 2016-2018, 2.0L 2016-2020, 2.4L 2018-2020, L 2016-2017) |

Figure 2.2: Detailed dimensions of the crossbars.
3. Setup and Installation
Installation of the ECCPP Roof Rack Crossbars is designed to be straightforward and does not require drilling or cutting. A screwdriver is the primary tool needed. Ensure your vehicle is parked on a level surface and the engine is off before beginning installation.
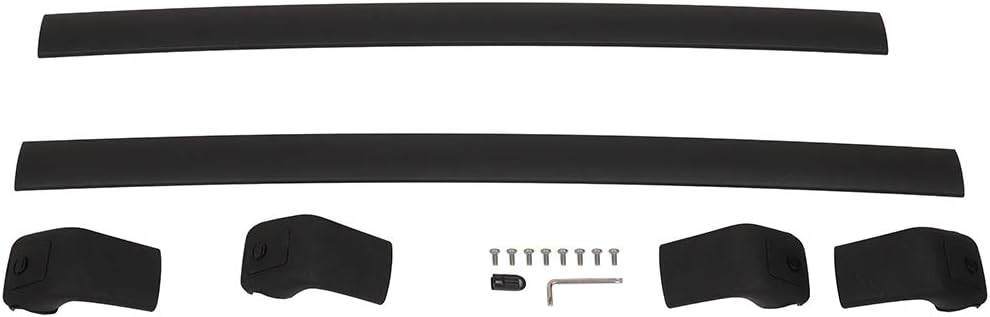
Figure 3.1: All components included in the package.
3.1. Package Contents Verification
Before starting, unpack all components and verify against the parts list (refer to Figure 3.1). Ensure all crossbar sections, mounting feet, screws, and the necessary Allen wrench are present.
3.2. Identifying Front and Rear Crossbars
The crossbars may have slightly different lengths or curvature to fit the specific contours of your vehicle's roof. Identify the front and rear crossbars. Typically, the longer or more curved bar is for the front, and the shorter one for the rear. Refer to your vehicle's manual or the product's specific fitment guide if unsure.
3.3. Attaching Mounting Feet
Each crossbar end will have a mounting foot. Slide the mounting feet onto the ends of the crossbars. Ensure they are oriented correctly to align with your vehicle's side rails. The feet are designed to securely clamp onto the existing side rails.

Figure 3.2: Close-up view of the crossbar end cap, showing the mounting point.
3.4. Positioning on Vehicle Roof
Carefully place the assembled crossbars onto your vehicle's side rails. Adjust the position of the mounting feet along the crossbar to match the width of your vehicle's side rails. Ensure the crossbars are centered and parallel to each other for optimal performance and aesthetics.
3.5. Securing the Crossbars
Using the provided screwdriver or Allen wrench, tighten the screws on each mounting foot. These screws will expand the clamping mechanism, securing the crossbars firmly to your vehicle's side rails. Tighten evenly on both sides to ensure a balanced and secure fit. Do not overtighten, as this may damage the components or your vehicle's rails.

Figure 3.3: Visual representation of the easy installation process.
3.6. Final Check
After tightening all screws, gently shake each crossbar to ensure it is securely attached and does not wobble. Double-check all connection points. The low-profile streamline design is intended to reduce wind noise and vibration, and proper installation is key to achieving this.

Figure 3.4: The crossbars securely installed on a vehicle's roof.
4. Operating Instructions
Once installed, your ECCPP Roof Rack Crossbars provide a robust platform for transporting various items. Adhere to the following guidelines for safe and effective operation.
4.1. Load Capacity
The crossbars have a maximum load capacity of 165 pounds (75 kg). Do not exceed this weight limit. Exceeding the load capacity can compromise the integrity of the crossbars, your vehicle's roof, and create a safety hazard. Distribute the weight evenly across the crossbars to maintain vehicle stability.

Figure 4.1: The crossbars are designed for a super load capacity of up to 165 lbs.
4.2. Securing Cargo
Always use appropriate tie-downs, straps, or cargo nets to secure items to the crossbars. Ensure cargo is tightly fastened and cannot shift during transit. Periodically check the security of your cargo during long journeys.
4.3. Driving Considerations
When carrying cargo on the roof, be aware of changes to your vehicle's center of gravity, height, and aerodynamics. Drive cautiously, especially when cornering, braking, or in windy conditions. Avoid sudden maneuvers. The streamlined design helps reduce wind noise, but large or irregularly shaped cargo can still affect vehicle handling and fuel efficiency.

Figure 4.2: The low-profile streamline design helps reduce wind noise.
4.4. Wide Use Applications
The ECCPP roof rack provides a versatile foundation for various accessories. Consider specialized carriers for bikes, kayaks, or ski equipment for enhanced security and ease of transport.

Figure 4.3: Examples of wide use applications for the roof rack system.
5. Maintenance
Regular maintenance ensures the longevity and safe operation of your ECCPP Roof Rack Crossbars.
5.1. Regular Inspection
Periodically inspect all mounting points, screws, and the crossbar structure for any signs of wear, damage, or looseness. This is especially important after long trips or before carrying heavy loads. Tighten any loose fasteners immediately.
5.2. Cleaning
Clean the crossbars regularly with mild soap and water. Avoid abrasive cleaners or solvents that could damage the finish or material. Rinse thoroughly and dry to prevent water spots or corrosion.
5.3. Storage
If you plan to remove the crossbars for extended periods, store them in a dry, clean place away from direct sunlight and extreme temperatures. This will help preserve the material and finish.
6. Troubleshooting
This section addresses common issues you might encounter with your roof rack crossbars.
6.1. Excessive Wind Noise
- Cause: Improper installation, loose components, or specific cargo shapes.
- Solution: Ensure all mounting screws are tightened securely. Verify the crossbars are positioned correctly and parallel. If carrying cargo, ensure it is streamlined and does not create excessive drag.
6.2. Loose Fitment After Installation
- Cause: Insufficient tightening of mounting screws or settling of components.
- Solution: Re-tighten all mounting screws using the provided tool. Perform a stability check by gently shaking the crossbars. If looseness persists, re-evaluate the installation steps.
6.3. Damaged or Broken Hardware
- Cause: Overtightening during installation, manufacturing defect, or wear and tear.
- Solution: If hardware breaks during installation, cease installation immediately. Contact ECCPP customer support for replacement parts. Do not attempt to use damaged hardware or substitute with non-approved parts, as this can compromise safety and product integrity.

Figure 6.1: The crossbars feature an anti-theft design and are acid rain resistant.
7. Warranty and Support
For specific warranty information regarding your ECCPP Roof Rack Crossbars, please refer to the warranty card included with your product or visit the official ECCPP website. Warranty terms typically cover manufacturing defects under normal use conditions.
If you require technical assistance, have questions about installation, or need to inquire about replacement parts, please contact ECCPP customer support through their official channels. Provide your product model number (161689-5211-1644021963) and purchase details when contacting support to facilitate a quicker resolution.
You can often find contact information on the ECCPP brand store page on Amazon or their official company website. Always ensure you are contacting official support channels for accurate information and assistance.
Ask a question about this manual
Ask about setup, troubleshooting, compatibility, parts, safety, or missing instructions. Manuals+ will review the question and use this page’s manual context to help answer it.