1. Safety Instructions
Read all instructions carefully before using the appliance and keep them for future reference. Failure to follow these instructions may result in electric shock, fire, or injury.
General Safety
- Do not attempt to operate this oven with the door open as this can result in harmful exposure to microwave energy.
- Do not place any object between the oven front face and the door or allow soil or cleaner residue to accumulate on sealing surfaces.
- Do not operate the oven if it is damaged. It is particularly important that the oven door closes properly and that there is no damage to the: (1) door (bent), (2) hinges and latches (broken or loosened), (3) door seals and sealing surfaces.
- The oven should not be adjusted or repaired by anyone except properly qualified service personnel.
- Ensure the appliance is properly grounded.
- Do not use corrosive chemicals or vapors in this appliance.
- This appliance is intended for household use only.
Microwave Specific Warnings
- Liquids or other foods must not be heated in sealed containers since they are liable to explode.
- Microwave heating of beverages can result in delayed eruptive boiling, therefore care must be taken when handling the container.
- Do not fry food in the oven. Hot oil can damage oven parts and utensils and even result in skin burns.
- Eggs in their shell and whole hard-boiled eggs should not be heated in microwave ovens since they may explode, even after microwave heating has ended.
- Always use microwave-safe cookware.
2. Product Overview
This section provides an overview of the microwave oven's components and control panel.
Components
- Oven Cavity
- Door with Handle
- Control Panel
- Turntable Ring
- Glass Turntable Plate
- Grill Rack (for grill and combined cooking)
- Power Cord
Control Panel
The control panel features a digital LED display, two rotary knobs for function and setting, and push buttons for Start/+30S and Stop/Cancel/ECO.

Image: Detailed view of the microwave oven's control panel, showing the digital LED display, rotary knobs for function and setting, and push buttons. Icons for various cooking modes are visible around the knobs.
- Digital LED Display: Shows time, power level, and program indicators.
- Function Knob: Selects cooking modes (Microwave, Micro+Grill, Grill, Auto Menu).
- Setting Knob: Adjusts power levels, time, weight, or selects auto menu items.
- Start/+30S Button: Starts cooking or adds 30 seconds to cooking time.
- Stop/Cancel/ECO Button: Stops cooking, cancels settings, or activates ECO mode.
3. Setup
Unpacking
- Remove all packaging materials from the oven cavity and accessories.
- Check the oven for any damage, such as dents or a misaligned door. Do not operate the oven if it is damaged.
- Retain the packaging materials for safe transport if needed.
Placement
- Place the oven on a flat, stable surface that can support its weight and the heaviest food item likely to be cooked in the oven.
- Ensure adequate ventilation: leave a minimum of 20cm space above the oven, 10cm at the rear, and 5cm on both sides. Do not block any ventilation openings.
- Keep the oven away from heat sources and strong magnetic fields.
- The microwave oven is designed for freestanding installation.

Image: Front view of the Toshiba MW2-AG23P(WH) microwave oven, illustrating its external dimensions (485mm width, 403mm depth, 296mm height) and 23L capacity, with a 270mm turntable diameter.
Initial Use
- Insert the turntable ring and glass plate into the oven cavity. Ensure they are correctly seated.
- Plug the power cord into a grounded electrical outlet.
- The oven display will show '12:00' or '0:00' indicating it is ready for use.
4. Operating Instructions
Setting the Clock
- In standby mode, press the 'Clock' button (often integrated with the Setting knob).
- Rotate the Setting knob to set the hour, then press 'Clock' again.
- Rotate the Setting knob to set the minutes, then press 'Clock' again to confirm.
Microwave Cooking
Use microwave power for reheating, cooking, and defrosting various foods.
- Place food in a microwave-safe container on the glass turntable.
- Rotate the Function knob to select 'Microwave' mode.
- Rotate the Setting knob to choose the desired power level (e.g., 900W for high, 5 levels available).
- Rotate the Setting knob again to set the cooking time.
- Press the 'Start/+30S' button to begin cooking.

Image: Visual representation of five microwave power levels (Low, Defrost, Medium, Medium-High, High) with corresponding food examples like butter, meat, fish, and soup.
Grill Cooking
Ideal for browning and crisping food. Use the provided grill rack.
- Place food on the grill rack, then place the rack on the glass turntable.
- Rotate the Function knob to select 'Grill' mode.
- Rotate the Setting knob to set the grilling time.
- Press the 'Start/+30S' button to begin grilling.

Image: Interior view of the microwave oven showing food being grilled, highlighting the grill heating element and the crispy result.
Combined Cooking (Micro+Grill)
Combines microwave and grill functions for faster cooking and browning.
- Place food on the grill rack, then on the glass turntable.
- Rotate the Function knob to select 'Micro+Grill' mode.
- Rotate the Setting knob to choose the desired combination level (e.g., Combi 1, Combi 2).
- Rotate the Setting knob again to set the cooking time.
- Press the 'Start/+30S' button to begin.
Defrosting
The oven offers defrosting by weight and by time.
- Defrost by Time: Rotate the Function knob to 'Defrost Time'. Rotate the Setting knob to set the desired defrosting time. Press 'Start/+30S'.
- Defrost by Weight: Rotate the Function knob to 'Defrost Weight'. Rotate the Setting knob to select the food weight. The oven will automatically calculate the defrosting time. Press 'Start/+30S'.

Image: Illustration of various defrosting modes (Meat, Frozen Vegetables, Fish, Frozen Food) and a visual comparison of frozen versus defrosted meat.
Automatic Menus
The oven includes 8 pre-set automatic menus for common dishes.
- Rotate the Function knob to 'Auto Menu'.
- Rotate the Setting knob to select the desired menu item (e.g., Pizza, Potatoes, Meat, Fish, Vegetables, Beverage, Pasta, Popcorn).
- Press 'Start/+30S' to begin cooking.
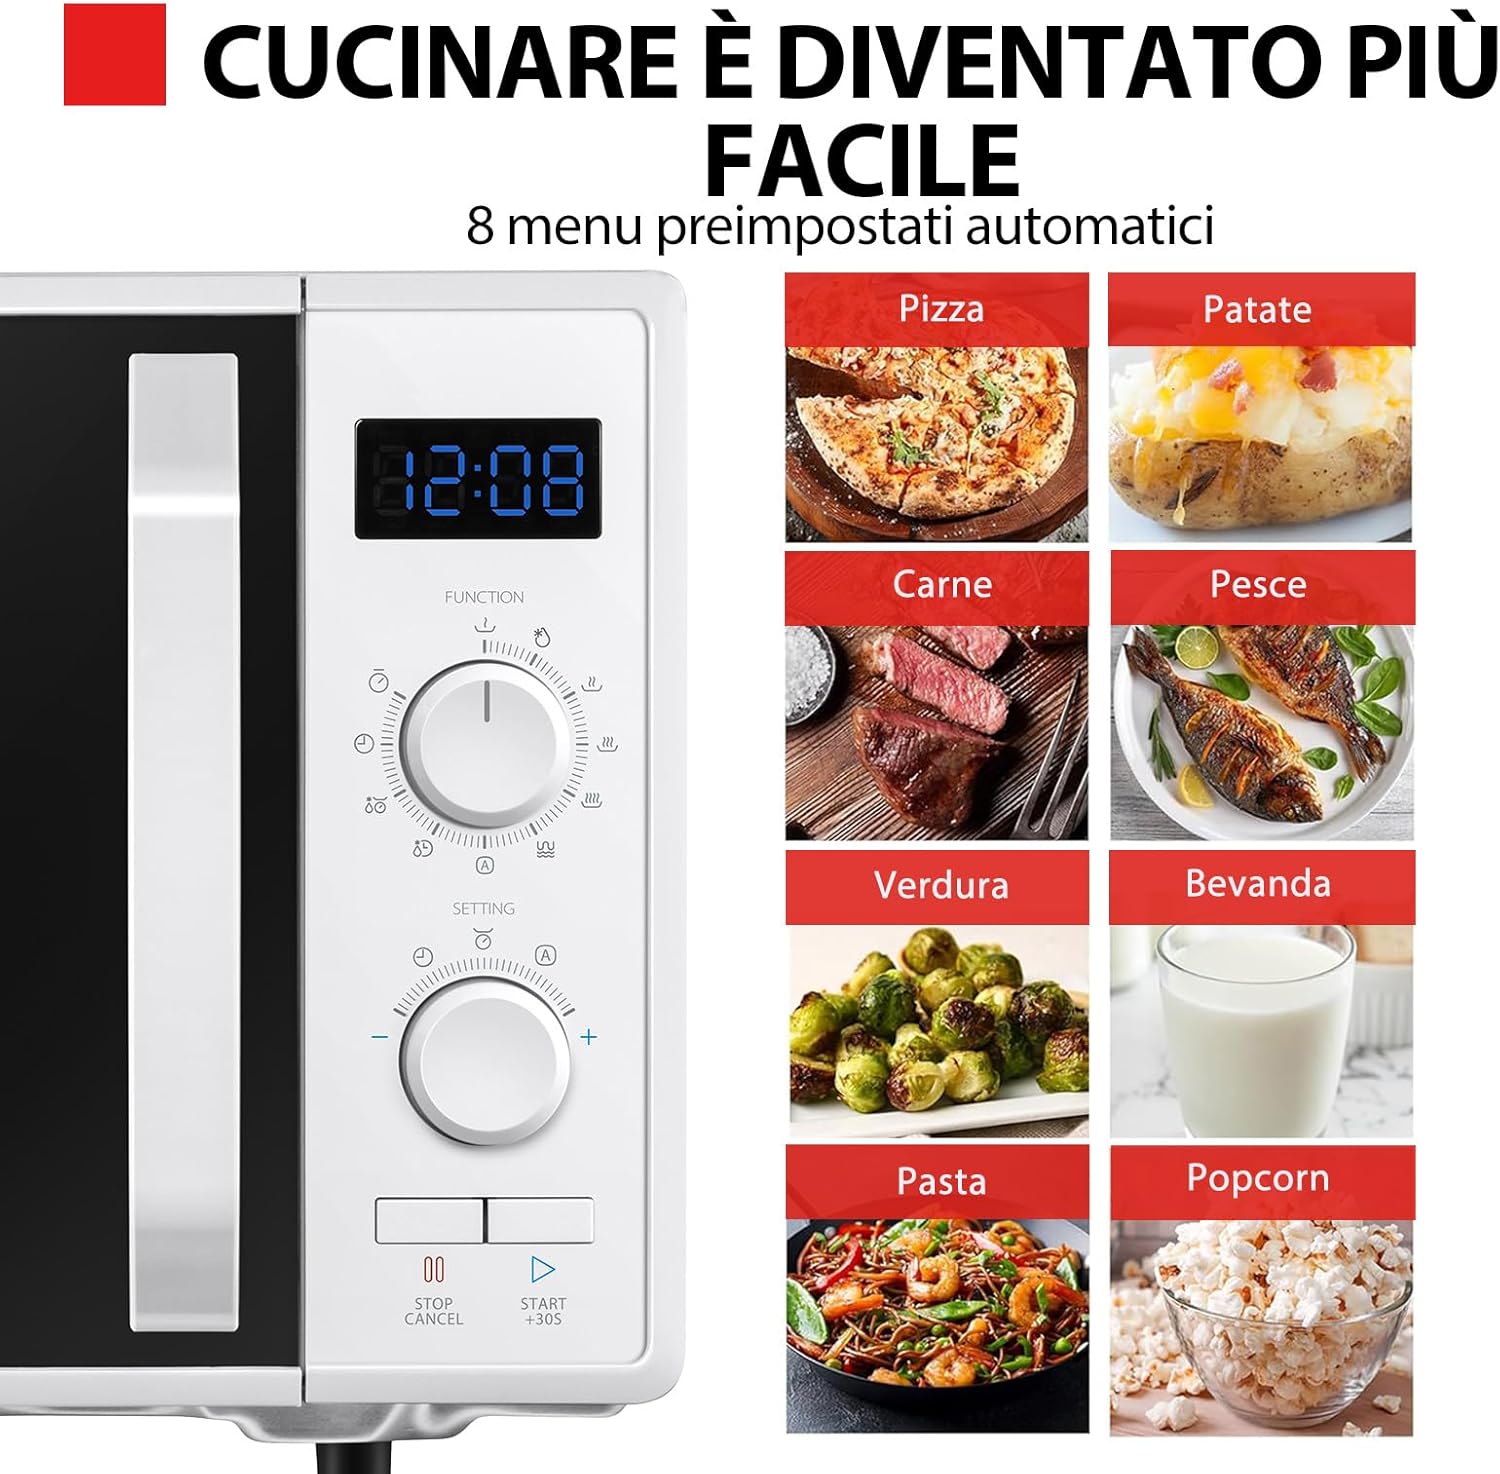
Image: Control panel alongside a grid of 8 automatic menu options with corresponding food images: Pizza, Potatoes, Meat, Fish, Vegetables, Beverage, Pasta, Popcorn.
Quick Start Function
- In standby mode, press the 'Start/+30S' button to immediately start cooking at full microwave power for 30 seconds.
- Each subsequent press of 'Start/+30S' will add 30 seconds to the cooking time.
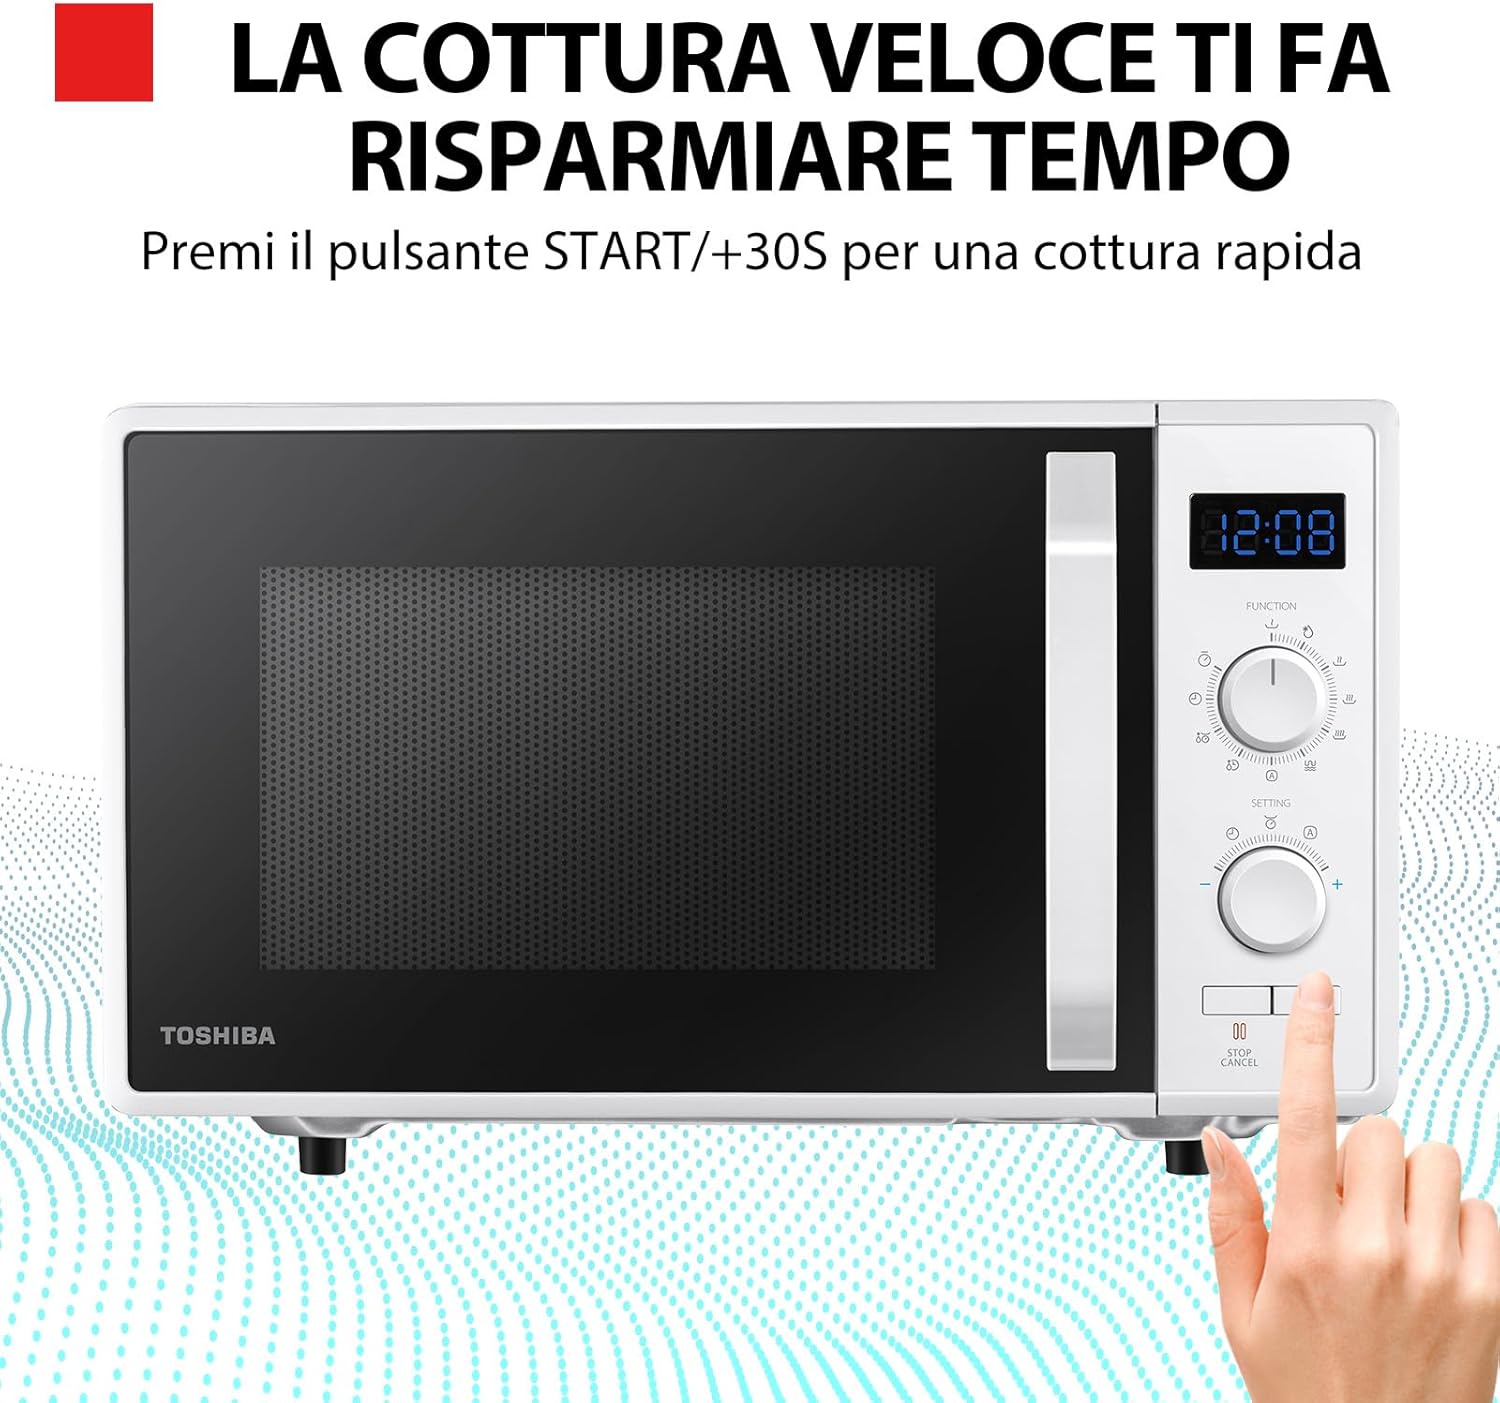
Image: A hand pressing the 'Start/+30S' button on the microwave oven, indicating the quick cooking feature.
ECO Mode
- Press the 'Stop/Cancel/ECO' button for 3 seconds to activate ECO mode.
- In ECO mode, the display will turn off to save energy.
- Press any button or open the door to exit ECO mode.

Image: The microwave oven with an 'eco' symbol displayed on its screen, indicating the energy-saving ECO mode.
Turntable with Position Memory
This feature ensures the turntable returns to its original position after cooking, making it easier to remove items with handles.
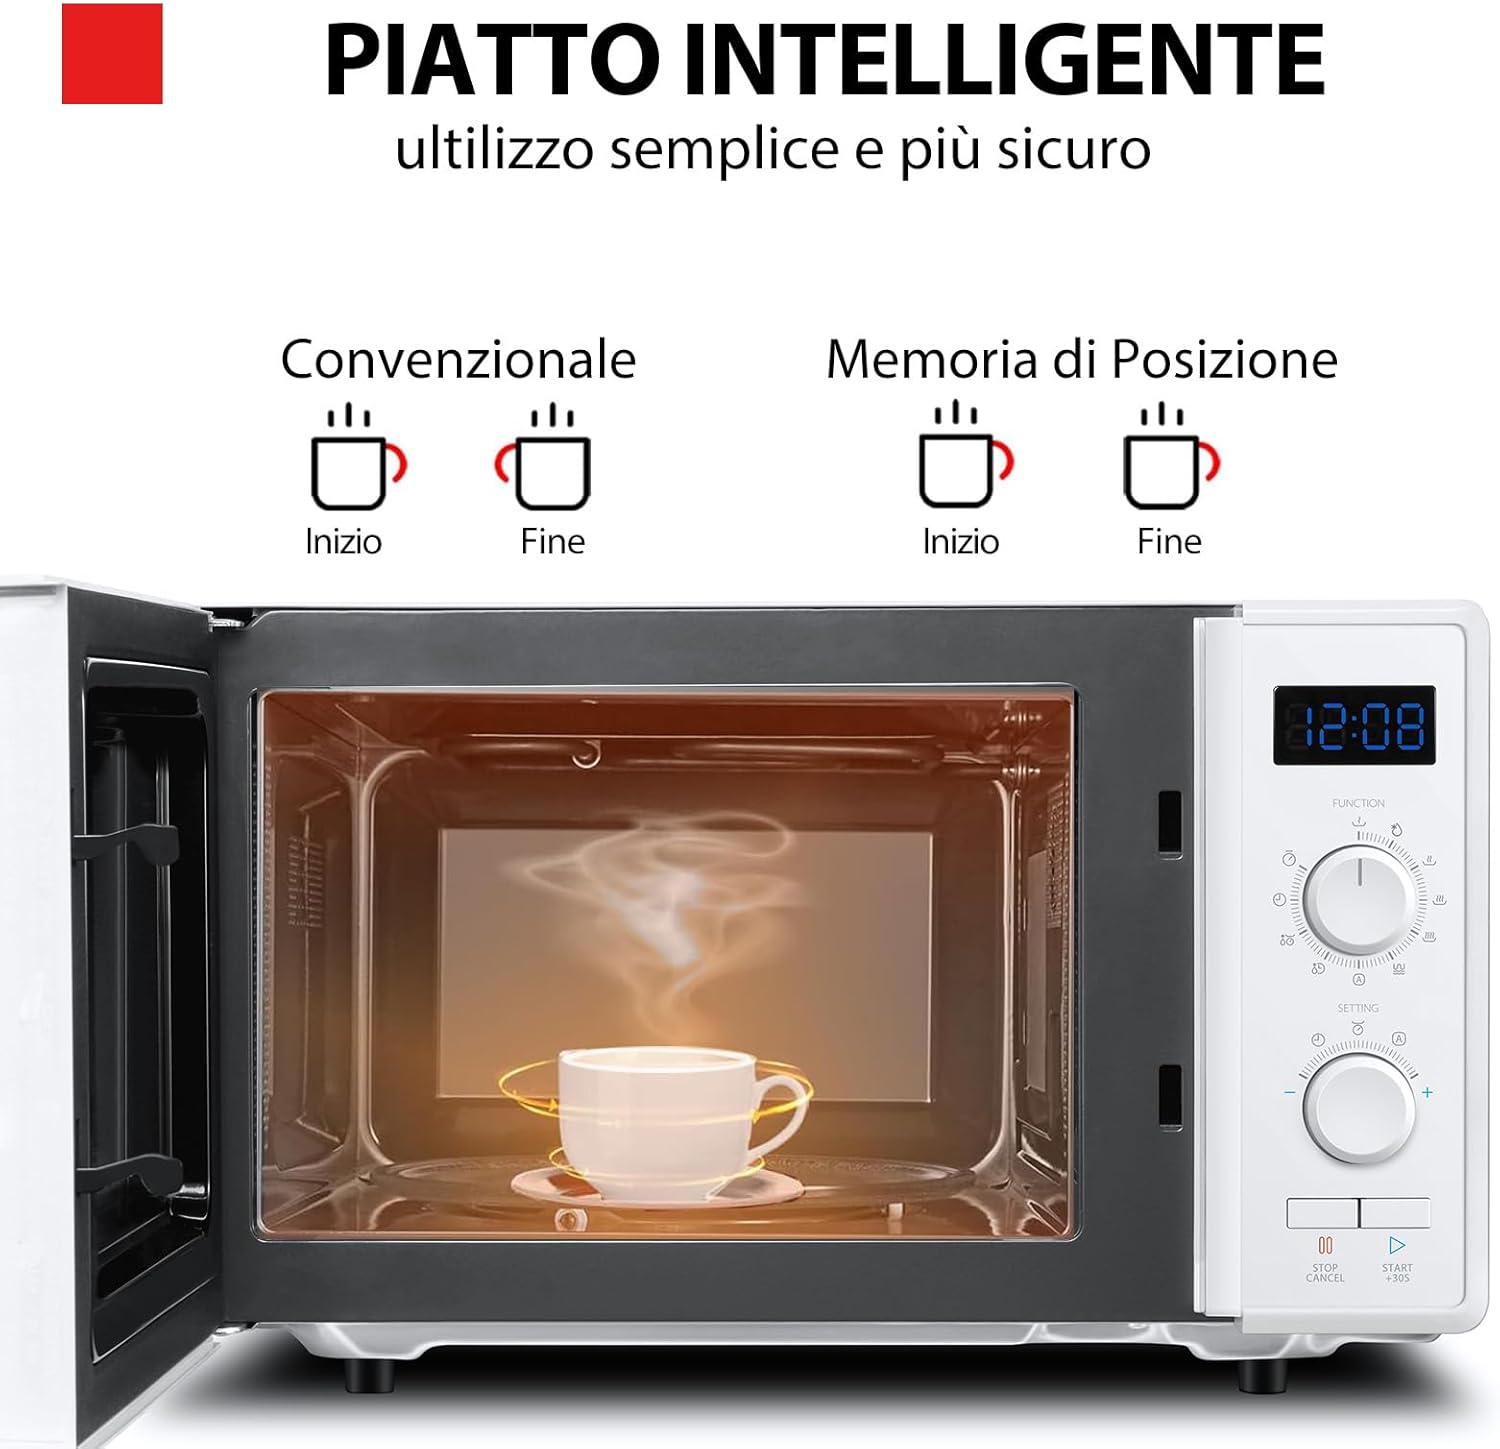
Image: Interior view of the microwave oven showing a cup on the turntable. Illustrations compare conventional turntable movement (stops randomly) with position memory (returns to start position).
5. Maintenance and Cleaning
Regular cleaning and maintenance will ensure optimal performance and extend the life of your microwave oven.
Cleaning the Oven Interior
- Always unplug the oven before cleaning.
- Wipe the interior cavity after each use with a damp cloth to prevent food splatters from drying.
- For stubborn stains, place a bowl of water with lemon juice inside and microwave for 5-10 minutes. The steam will loosen the food residue, making it easier to wipe away.
- Do not use abrasive cleaners or sharp objects that could scratch the interior surfaces.
Cleaning the Exterior
- Clean the exterior surface with a soft, damp cloth.
- Avoid getting water into the ventilation openings.
- Wipe the door and door seals regularly to ensure proper closure and prevent microwave energy leakage.
Cleaning the Turntable and Ring
- The glass turntable plate and turntable ring can be removed for cleaning.
- Wash them in warm, soapy water or in the dishwasher.
- Ensure they are completely dry before placing them back in the oven.
6. Troubleshooting
If you encounter any issues with your microwave oven, refer to the following common problems and solutions.
| Problem | Possible Cause | Solution |
|---|---|---|
| Oven will not start | Power cord not securely plugged in. Blown fuse or tripped circuit breaker. Door not closed properly. | Plug in securely. Replace fuse or reset circuit breaker. Close door securely. |
| Food not heating | Incorrect cooking time or power level set. Microwave-safe cookware not used. | Adjust time/power. Use appropriate cookware. |
| Turntable not rotating | Turntable not properly seated on the ring. Food too large or heavy. | Re-seat turntable. Reduce food size/weight. |
| Unusual noise during operation | Food container touching oven walls. Turntable not properly seated. | Adjust food container. Re-seat turntable. |
| Oven light not working | Bulb needs replacement. | Contact qualified service personnel for bulb replacement. |
If the problem persists after trying these solutions, please contact customer support.
7. Specifications
| Feature | Detail |
|---|---|
| Model Number | MW2-AG23P(WH) |
| Capacity | 23 Liters |
| Microwave Power | 900 W (5 adjustable levels) |
| Grill Power | 1050 W |
| Combined Power | 1950 W |
| External Dimensions (W x D x H) | 485mm x 403mm x 296mm |
| Internal Dimensions (W x D x H) | 314mm x 347mm x 221mm |
| Turntable Diameter | 270mm |
| Material | Metal, Plastic |
| Color | White |
| Special Features | Combined Cooking, Turntable with Position Memory, Digital Display, 8 Auto Menus, Defrost by Weight/Time, Quick Start, ECO Mode, Integrated LED Lights |
8. Warranty and Support
Your Toshiba MW2-AG23P(WH) Microwave Oven comes with a warranty certificate included in the packaging.
Warranty Information
- Please refer to the provided warranty certificate for detailed terms and conditions, including coverage period and what is covered.
- Keep your proof of purchase for warranty claims.
Customer Support
- For technical assistance, troubleshooting beyond this manual, or warranty service, please contact Toshiba customer support.
- Contact details can typically be found on the Toshiba official website or on your warranty certificate.


